Connectivity
IPSec VPN 이중화 구성: CPE 장애 극복을 위한 고가용성 네트워크 구성
Table of Contents
배경
일반적으로 OCI 환경에서 IPSec VPN 구성 시 한 대의 CPE 장비를 사용하는데, 이 경우에는 CPE가 단일 장애 지점(Single Point of Failure, SPOF)이 될 수 있습니다. 이 단일 장애 지점을 극복하려면, 두 번째 CPE를 첫 번째 CPE와 동일한 위치나 다른 데이터 센터에 배치하여 고가용성 아키텍처를 구성하여야 합니다. 이번 포스팅에서는 OCI 환경에서 IPSec VPN의 고가용성을 위해 두 대의 CPE(Customer-Premises Devices) 장비와 4개의 VPN Tunnel로 IPSec VPN을 구성하는 방법에 대해서 설명합니다.
구성도
전체 구성도는 다음과 같습니다. 춘천 리전을 On-Premise 환경, 서울 리전을 Oracle Cloud 환경이라 가정합니다. 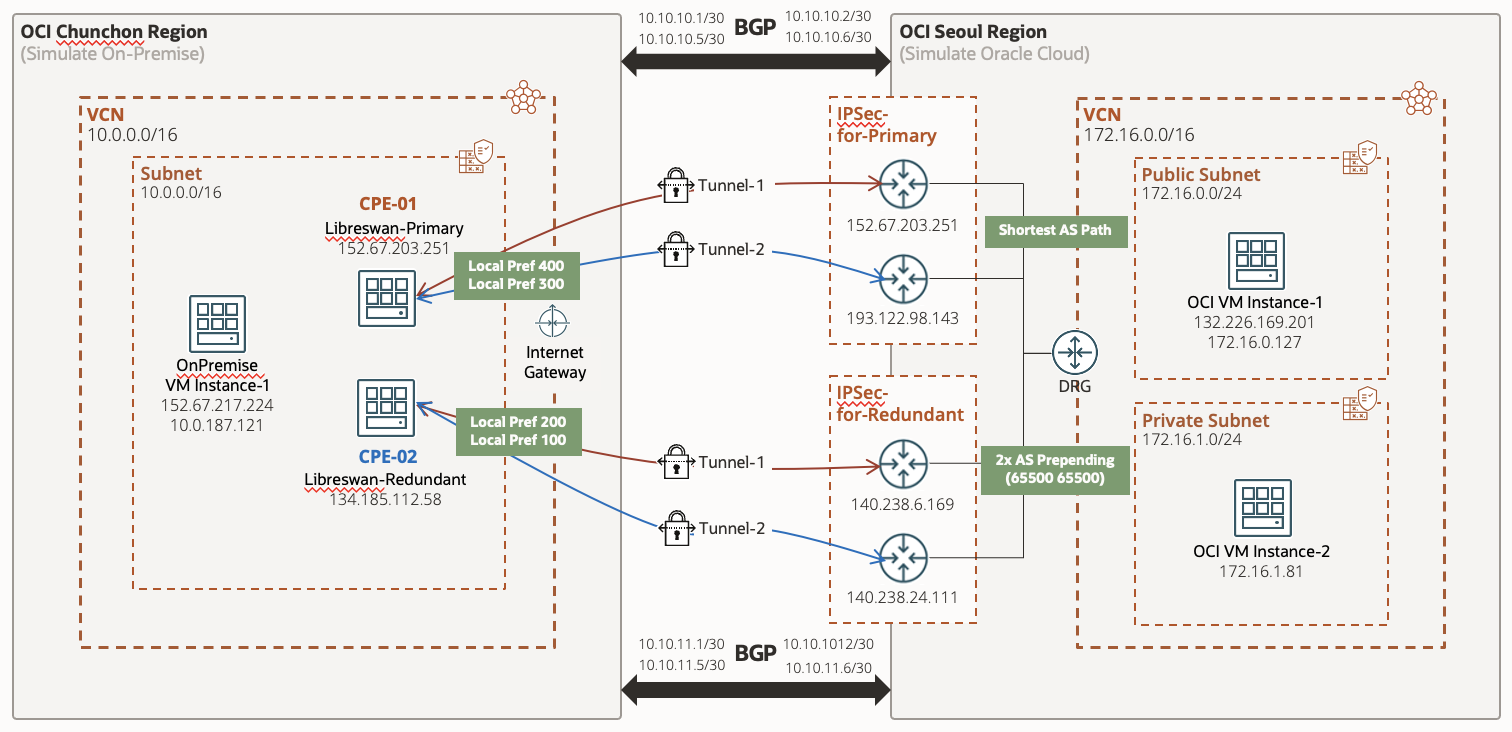
VCN 및 VM 인스턴스 생성
춘천 리전과 서울 리전에 필요한 VCN과 VM 인스턴스를 생성합니다. Public IP와 Private IP는 동적으로 할당되므로 다르게 여기서의 구성과 다를 수 있습니다. VCN과 VM 인스턴스 생성 가이드는 다음 포스트를 참고 합니다.
OCI에서 VCN Wizard를 활용하여 빠르게 VCN 생성하기
Virtual Cloud Network (VCN)
| Region | Name | CIDR | Subnet |
|---|---|---|---|
| 춘천 (온프레미스) | OnPremise-Libreswan | 10.0.0.0/16 | 10.0.0.0/16 (Public) |
| 서울 (Oracle Cloud) | VCN-SEOUL-HUB | 172.16.0.0/16 | 172.16.0.0/24 (Public) 172.16.1.0/24 (Private) |
VM 인스턴스
| Region | Name | Subnet | Public IP | Private IP |
|---|---|---|---|---|
| 춘천 (온프레미스) | Libreswan_Primary | 10.0.0.0/16 (Public) | 152.67.203.251 | 10.0.88.45 |
| 춘천 (온프레미스) | OnPremise VM Instance-1 | 10.0.0.0/16 (Public) | 152.67.217.224 | 10.0.187.121 |
| 서울 (Oracle Cloud) | OCI VM Instance-1 | 172.16.0.0/24 (Public) | 132.226.169.201 | 172.16.0.127 |
| 서울 (Oracle Cloud) | OCI VM Instance-2 | 172.16.1.0/24 (Private) | 172.16.1.81 |
DRG (Dynamic Routing Gateway) 생성 및 서울 리전 VCN 연결
DRG (Dynamic Routing Gateway) 생성 및 서울 리전 VCN 연결은 아래 포스트를 참고하여 구성합니다.
DRG (Dynamic Routing Gateway) 생성 및 서울 리전 VCN 연결
IPSec Connection 생성 (Primary)
IPSec Connection은 Primary, Redundant(Standby) 각각 한 개씩 생성합니다. 먼저 Primary IPSec Connection을 생성합니다.
기본 정보
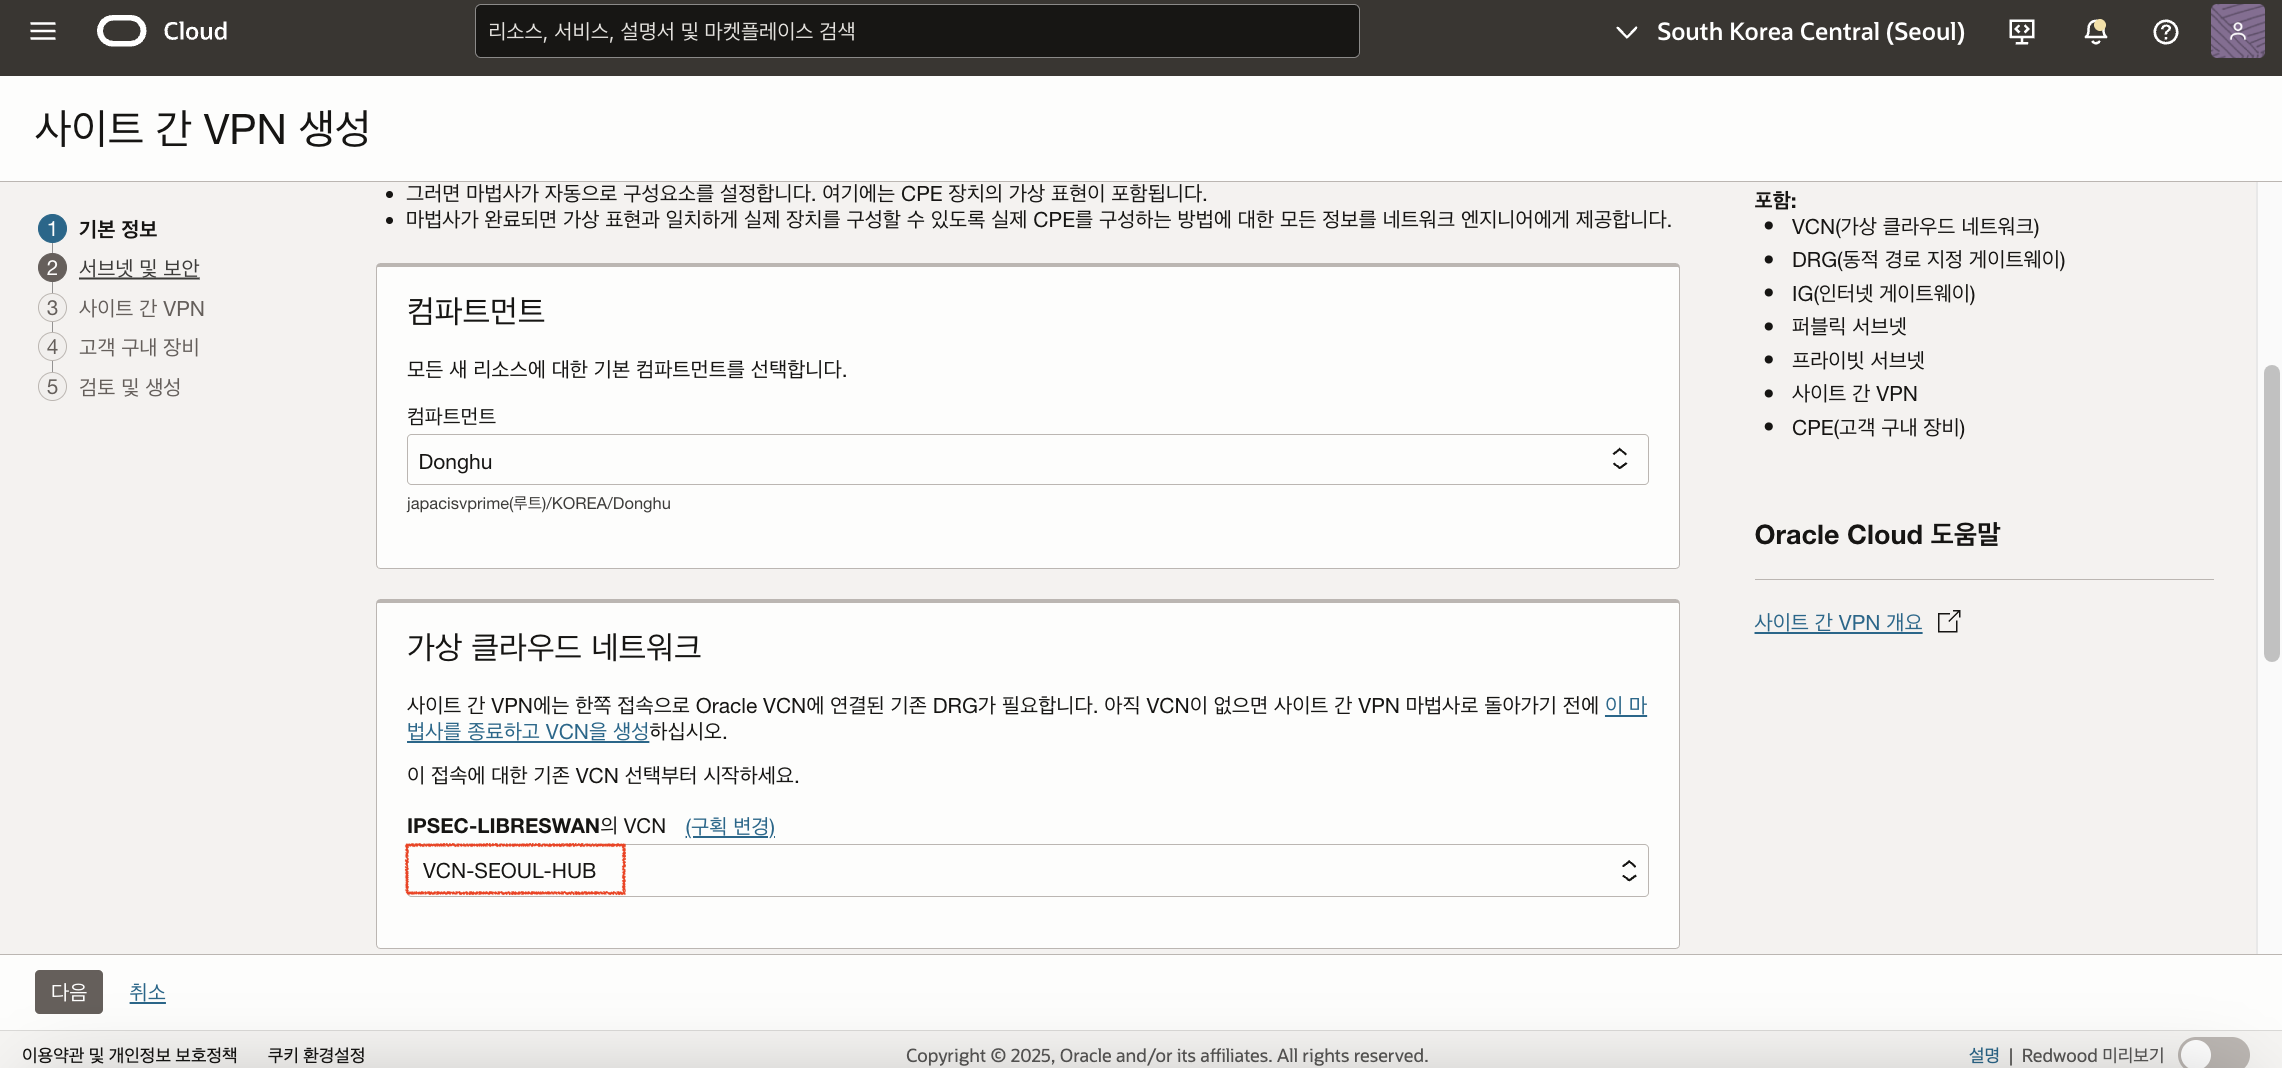
IPSec 접속 생성을 위해 서울 리전에서 메뉴 > 네트워킹(Networking) > 고객 접속(Customer Connectivity)으로 이동 후 사이트 간 VPN(Site-to-Site VPN)을 선택한 후 VPN 마법사 시작 버튼을 클릭합니다. 사이트 간 VPN 생성에서 다음 스크린샷과 같이 앞서 생성한 VCN(VCN-SEOUL-HUB)을 선택하고 다음을 클릭합니다.
서브넷 및 보안 설정
연결하기 위한 서브넷과 Security List를 선택합니다. Public Subnet과 Private Subnet을 모두 선택합니다. 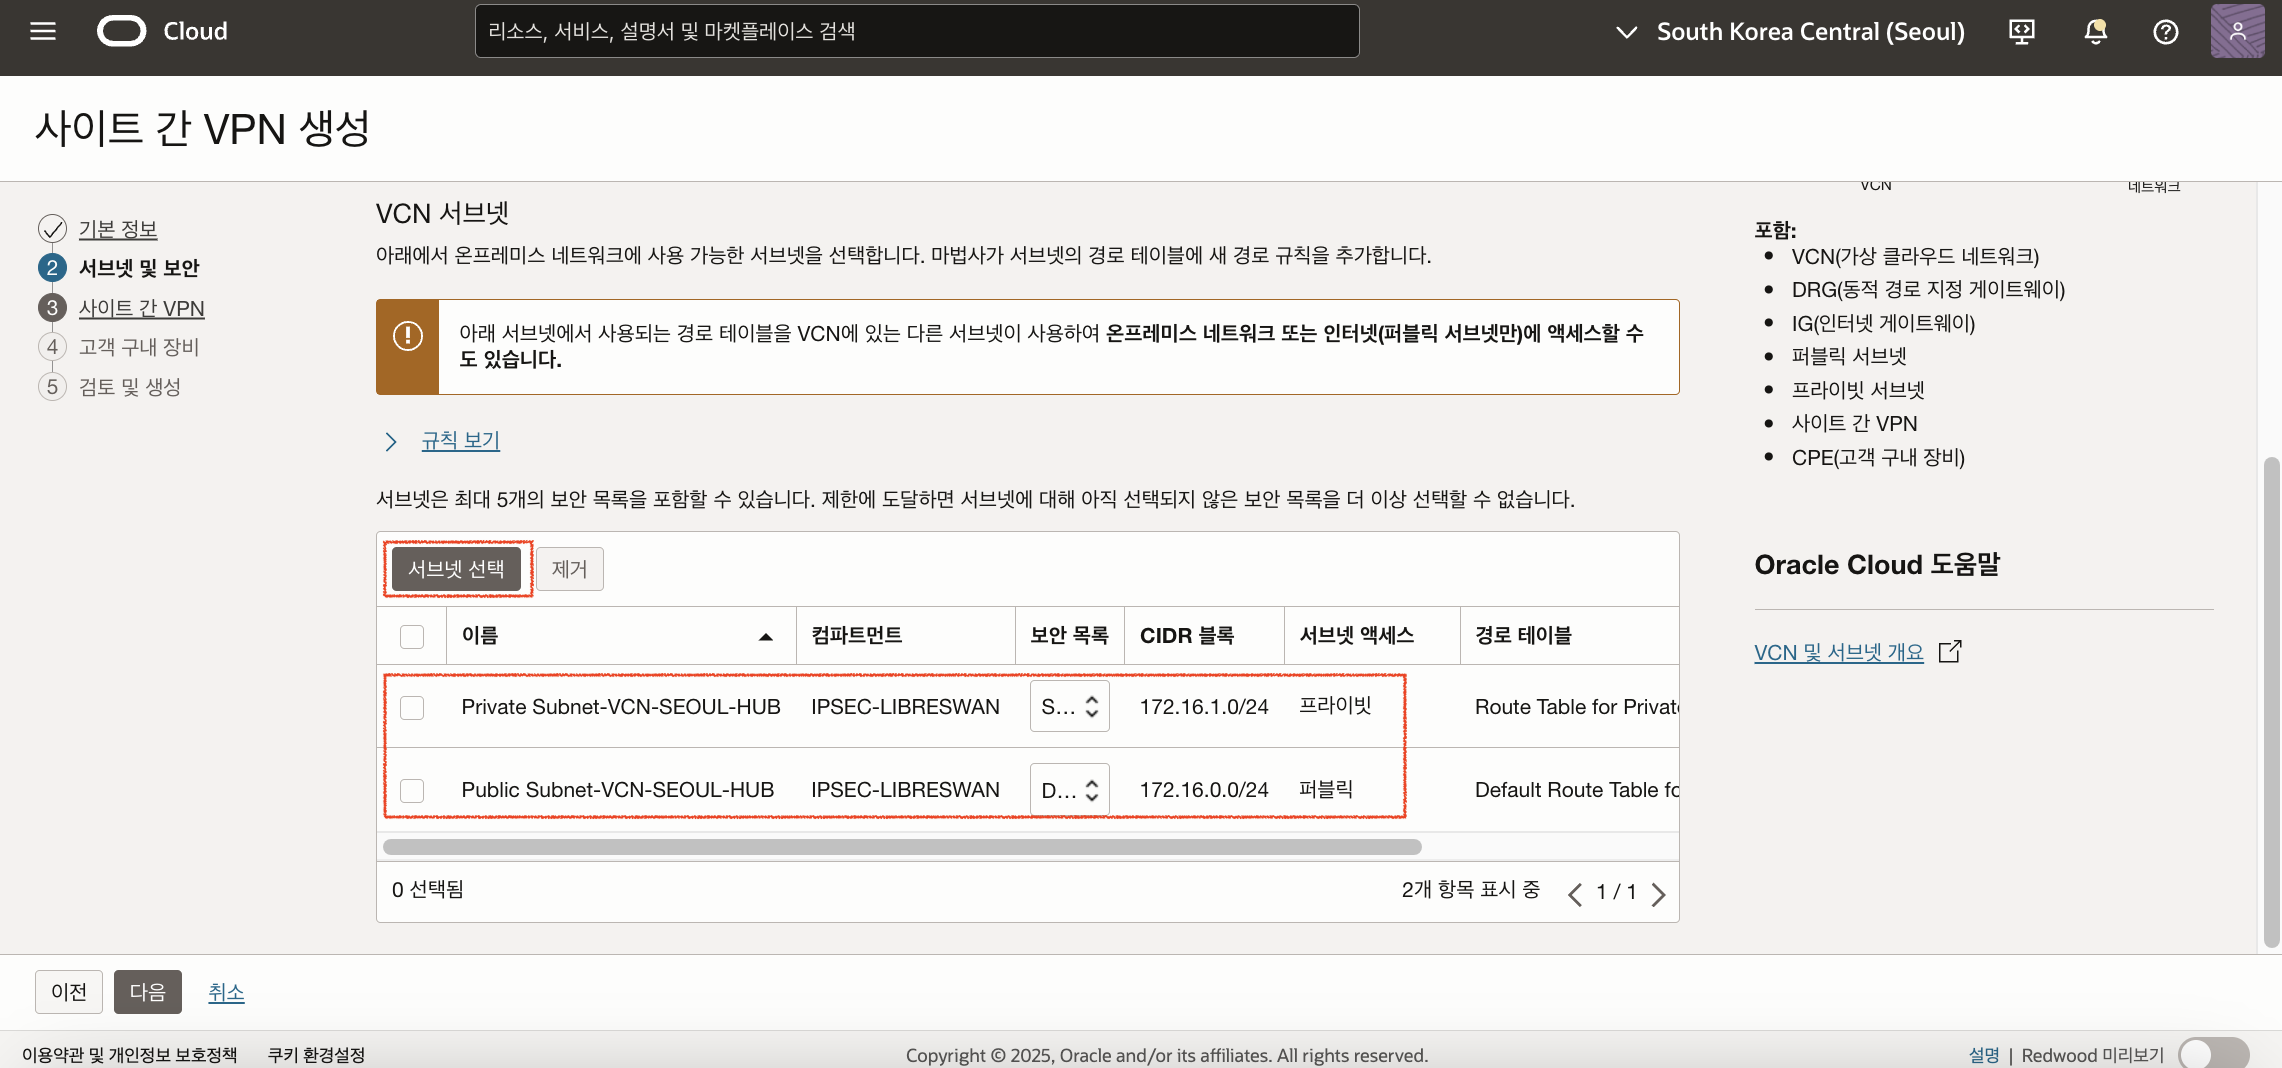
사이트 간 VPN 설정
사이트 간 VPN 설정에서 IPSec Connection과 Tunnel을 다음과 같이 설정합니다.
IPSec Connection
| VPN 이름 | 경로 지정 유형 | 온프레미스 네트워크에 대한 경로 |
|---|---|---|
| IPSec-for-Primary | BGP 동적 경로 지정 | 10.0.0.0/16 (춘천 리전 VCN CIDR) |
Tunnel
| 터널 이름 | IKE 버전(IKE Version) | 내 BGP ASN | IPv4 내부 터널 인터페이스 - CPE | IPv4 내부 터널 인터페이스 - Oracle | 공유 암호 |
|---|---|---|---|---|---|
| Tunnel-1 | IKEv2 | 65000 | 10.10.10.1/30 | 10.10.10.2/30 | 자동 생성된 공유 암호 |
| Tunnel-2 | IKEv2 | 65000 | 10.10.10.5/30 | 10.10.10.6/30 | 자동 생성된 공유 암호 |
고객 구내 장비 (CPE)
CPE 설정에서는 새로 CPE를 생성합니다. 새로 만들기를 클릭한 후 다음과 같이 생성합니다.
| CPE 이름 | IP 주소 | CPE 공급업체 | 플랫폼/버전 |
|---|---|---|---|
| Libreswan-Primary | 152.67.203.251(Libreswan-Primary 인스턴스의 Public IP) | Libreswan | 3.18 or later |
마지막으로 설정한 내용을 최종 검토하고 VPN 솔루션 생성(Create VPN Solution) 버튼을 클릭하여 Primary IPSec Connection을 생성합니다.
IPSec Connection 생성 (Redundant, Standby)
Redundant (Standby) IPSec Connection을 생성합니다.
기본 정보
IPSec 접속 생성을 위해 서울 리전에서 메뉴 > 네트워킹(Networking) > 고객 접속(Customer Connectivity)으로 이동 후 사이트 간 VPN(Site-to-Site VPN)을 선택한 후 VPN 마법사 시작 버튼을 클릭합니다. 사이트 간 VPN 생성에서 Primary와 동일하게 앞서 생성한 VCN(VCN-SEOUL-HUB)을 선택하고 다음을 클릭합니다.
서브넷 및 보안 설정
연결하기 위한 서브넷과 Security List를 선택합니다. Primary와 동일하게 Public Subnet과 Private Subnet을 모두 선택합니다.
사이트 간 VPN 설정
사이트 간 VPN 설정에서 IPSec Connection과 Tunnel을 다음과 같이 설정합니다.
IPSec Connection
| VPN 이름 | 경로 지정 유형 | 온프레미스 네트워크에 대한 경로 |
|---|---|---|
| IPSec-for-Redundant | BGP 동적 경로 지정 | 10.0.0.0/16 (춘천 리전 VCN CIDR) |
Tunnel
| 터널 이름 | IKE 버전(IKE Version) | 내 BGP ASN | IPv4 내부 터널 인터페이스 - CPE | IPv4 내부 터널 인터페이스 - Oracle | 공유 암호 |
|---|---|---|---|---|---|
| Tunnel-1 | IKEv2 | 65000 | 10.10.11.1/30 | 10.10.11.2/30 | 자동 생성된 공유 암호 |
| Tunnel-2 | IKEv2 | 65000 | 10.10.11.5/30 | 10.10.11.6/30 | 자동 생성된 공유 암호 |
고객 구내 장비 (CPE)
CPE 설정에서는 새로 CPE를 생성합니다. 새로 만들기를 클릭한 후 다음과 같이 생성합니다.
| CPE 이름 | IP 주소 | CPE 공급업체 | 플랫폼/버전 |
|---|---|---|---|
| Libreswan-Redundant | 134.185.112.58(Libreswan-Redundant 인스턴스의 Public IP) | Libreswan | 3.18 or later |
마지막으로 설정한 내용을 최종 검토하고 VPN 솔루션 생성(Create VPN Solution) 버튼을 클릭하여 Redundant IPSec Connection을 생성합니다.
생성한 두 개의 IPSec Connection 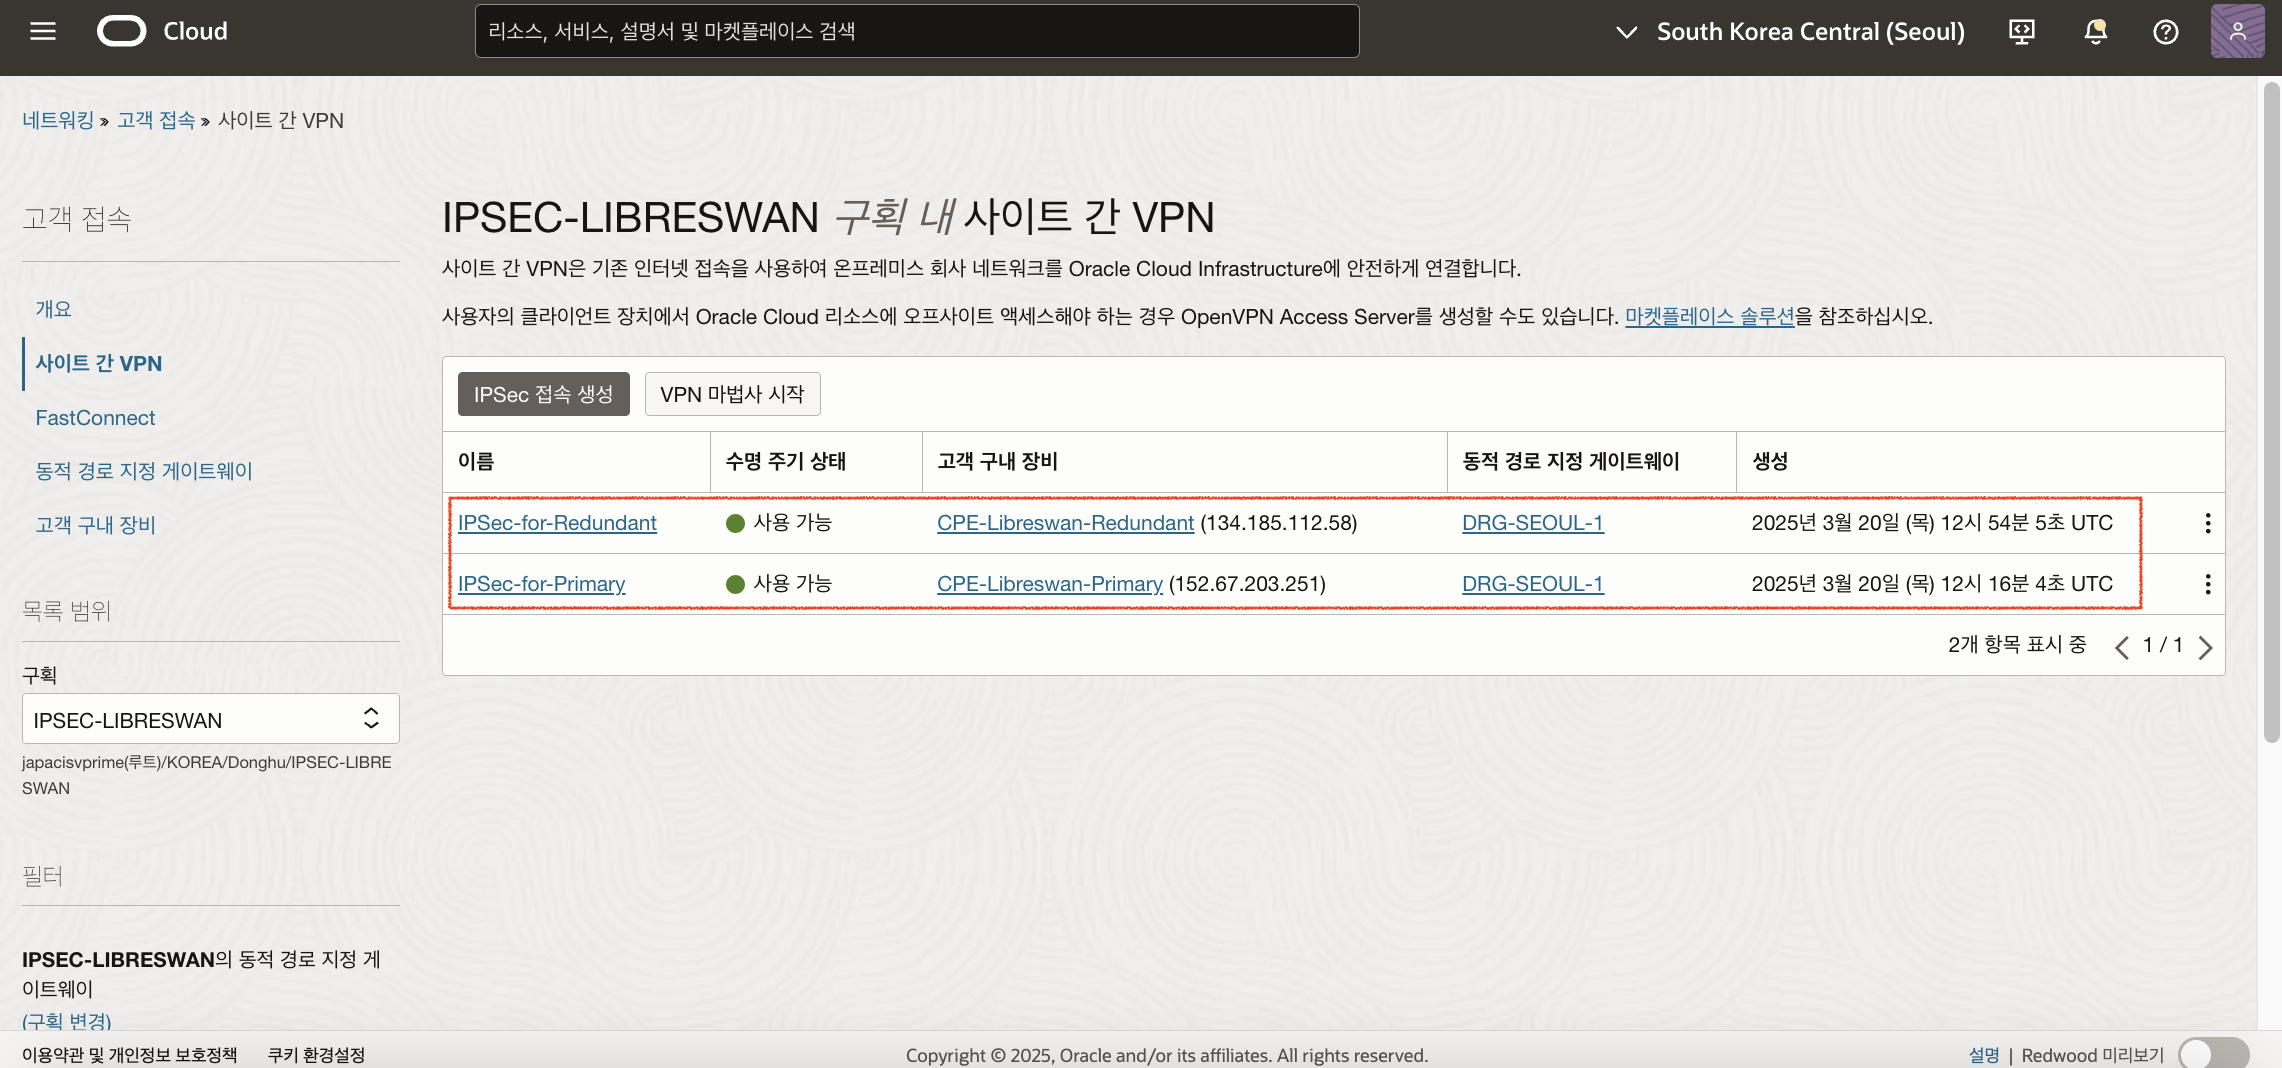
CPE 구성 헬퍼 확인 (Open CPE Configuration Helper)
생성한 IPSec Connection 상세 화면에서는 CPE 구성 헬퍼 열기(Open CPE Configuration Helper) 버튼을 볼 수 있습니다. 버튼을 클릭한 후 콘텐츠 생성(Create Content) 버튼을 누르고 구성 헬퍼를 복사하거나 다운로드합니다. Primary와 Redundant 둘 다 진행합니다. 추후 이 정보를 참고하여 CPE(Libreswan)를 구성합니다. 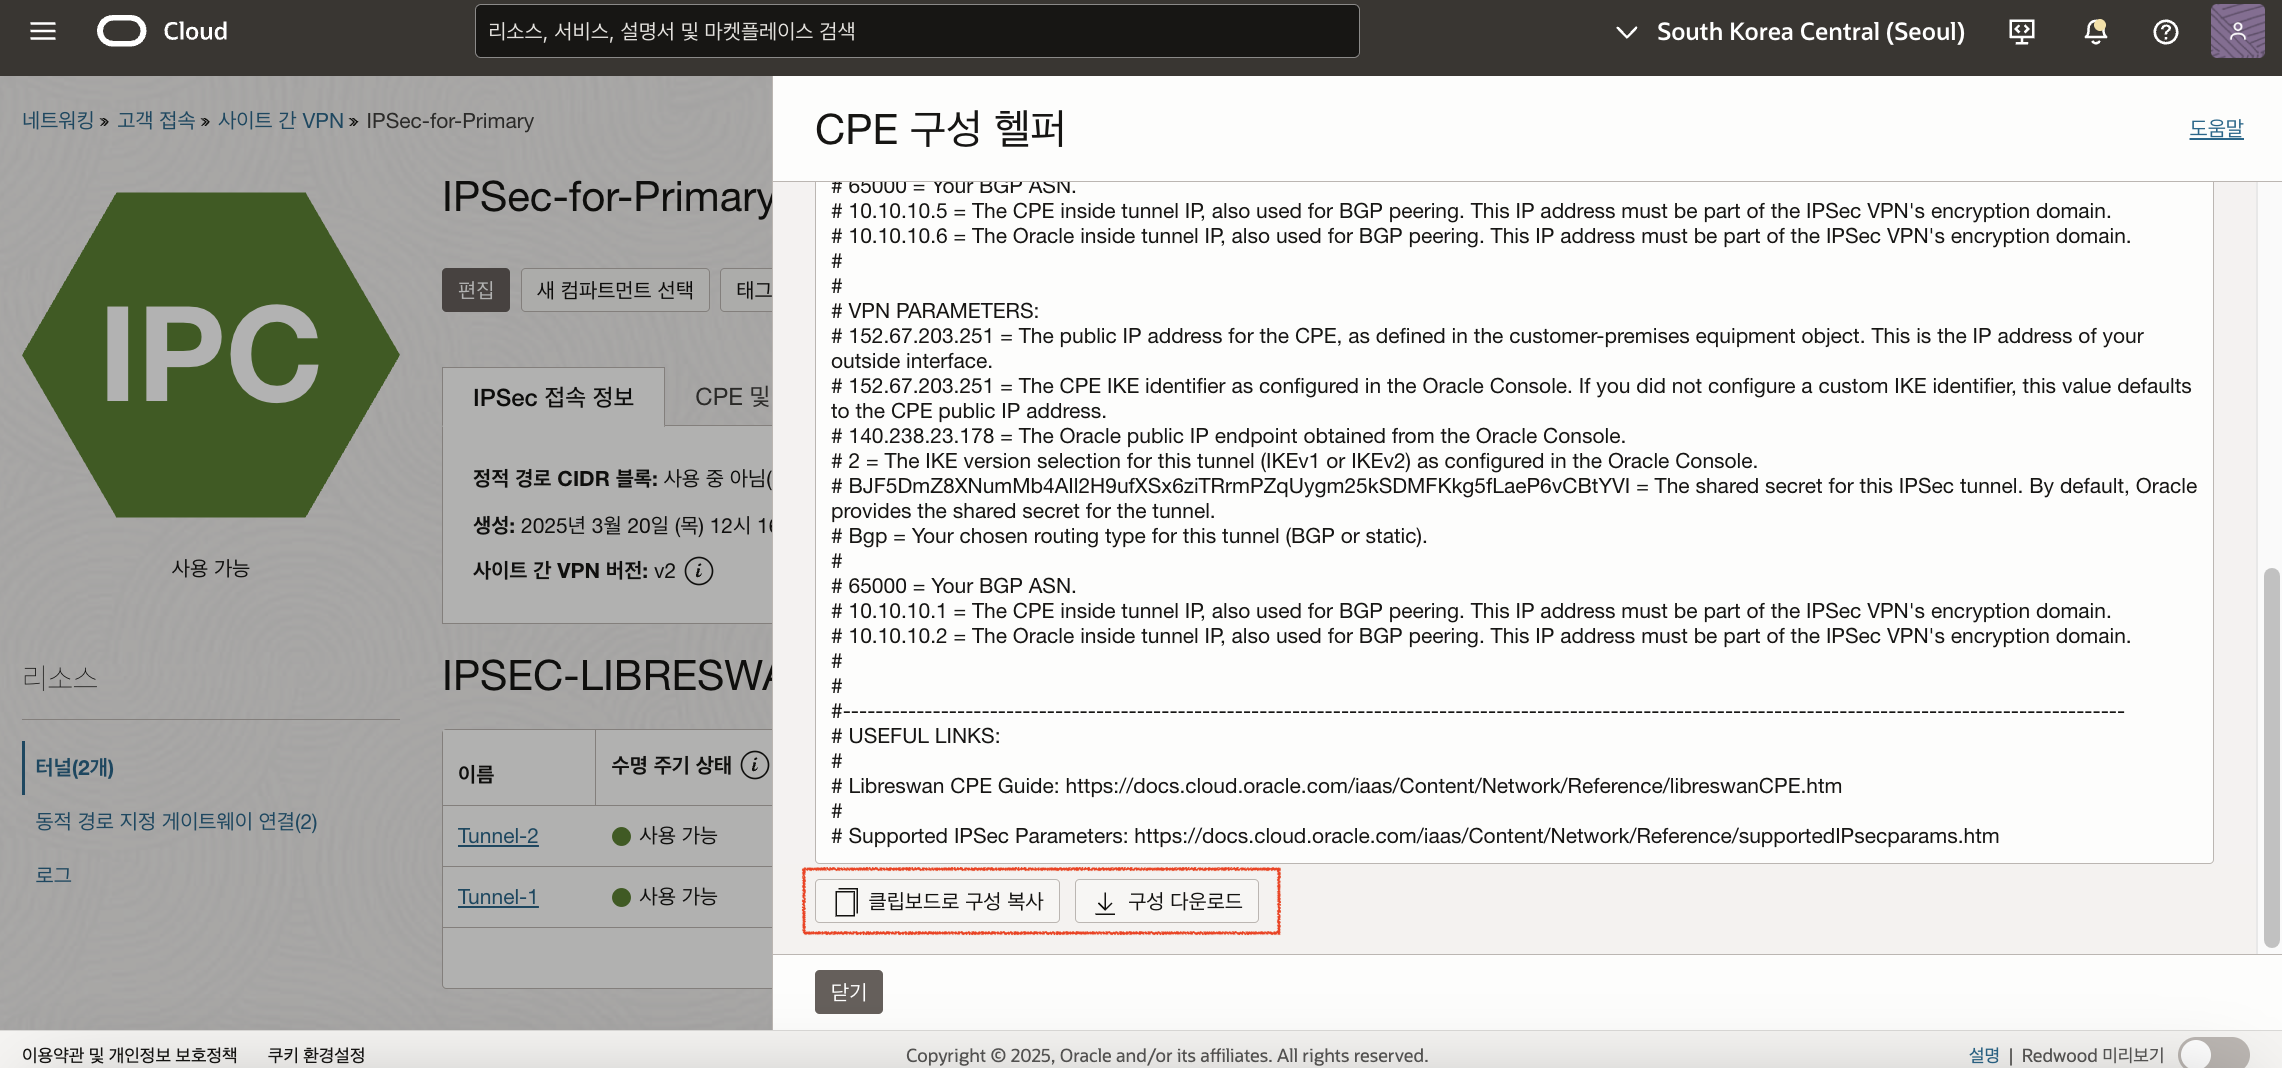
CPE(Libreswan) 설치 및 구성 (Primary)
CPE 구성을 위해 Libreswan을 설치하도록 합니다. 앞서 Libreswan을 위해 생성한 인스턴스(Libreswan-Primary)로 접속합니다.
$ ssh -i {ssh key} opc@152.67.203.251
root 사용자로 변경합니다.
$ sudo su -
이제 클라이언트가 Libreswan을 통해 트래픽을 보내고 받을 수 있도록 네트워크 인터페이스에서 IP forwarding을 활성화해야 합니다. 먼저 인터페이스 이름을 확인합니다.
[root@libreswan-primary ~]# ifconfig
enp0s5: flags=4163<UP,BROADCAST,RUNNING,MULTICAST>  mtu 9000
        inet 10.0.88.45  netmask 255.255.0.0  broadcast 10.0.255.255
        inet6 fe80::17ff:fe02:fa83  prefixlen 64  scopeid 0x20<link>
        ether 02:00:17:02:fa:83  txqueuelen 1000  (Ethernet)
        RX packets 1028572  bytes 1528239496 (1.4 GiB)
        RX errors 0  dropped 0  overruns 0  frame 0
        TX packets 1039163  bytes 393456193 (375.2 MiB)
        TX errors 0  dropped 0 overruns 0  carrier 0  collisions 0

lo: flags=73<UP,LOOPBACK,RUNNING>  mtu 65536
        inet 127.0.0.1  netmask 255.0.0.0
        inet6 ::1  prefixlen 128  scopeid 0x10<host>
        loop  txqueuelen 1000  (Local Loopback)
        RX packets 218  bytes 15536 (15.1 KiB)
        RX errors 0  dropped 0  overruns 0  frame 0
        TX packets 218  bytes 15536 (15.1 KiB)
        TX errors 0  dropped 0 overruns 0  carrier 0  collisions 0
인터페이스 이름은 enp0s5 입니다. 다음과 같이 sysctl.conf 파일을 오픈하여 다음과 같이 내용을 추가합니다.
$ vi /etc/sysctl.conf

kernel.unknown_nmi_panic = 1
net.ipv4.ip_forward = 1
net.ipv4.conf.all.accept_redirects = 0
net.ipv4.conf.all.send_redirects = 0
net.ipv4.conf.default.send_redirects = 0
net.ipv4.conf.enp0s5.send_redirects = 0
net.ipv4.conf.default.accept_redirects = 0
net.ipv4.conf.enp0s5.accept_redirects = 0
net.ipv4.conf.all.rp_filter=0
net.ipv4.conf.default.rp_filter=0
net.ipv4.conf.enp0s5.rp_filter=0
적용을 위해 다음 명령어를 실행합니다.
[root@libreswan-primary ~]# sysctl -p
kernel.unknown_nmi_panic = 1
net.ipv4.ip_forward = 1
net.ipv4.conf.all.accept_redirects = 0
net.ipv4.conf.all.send_redirects = 0
net.ipv4.conf.default.send_redirects = 0
net.ipv4.conf.enp0s5.send_redirects = 0
net.ipv4.conf.default.accept_redirects = 0
net.ipv4.conf.enp0s5.accept_redirects = 0
net.ipv4.conf.all.rp_filter = 0
net.ipv4.conf.default.rp_filter = 0
net.ipv4.conf.enp0s5.rp_filter = 0
CPE(Libreswan)와 통신을 위해서는 OS에서 udp 500, udp 4500 포트를 오픈해야 합니다. 다음 명령어로 포트를 오픈합니다.
$ firewall-cmd --add-port=500/udp
$ firewall-cmd --add-port=4500/udp
$ firewall-cmd --runtime-to-permanent
CPE(Libreswan)가 위치한 Subnet의 Security List의 Ingress Rule도 다음과 같이 추가해줍니다. 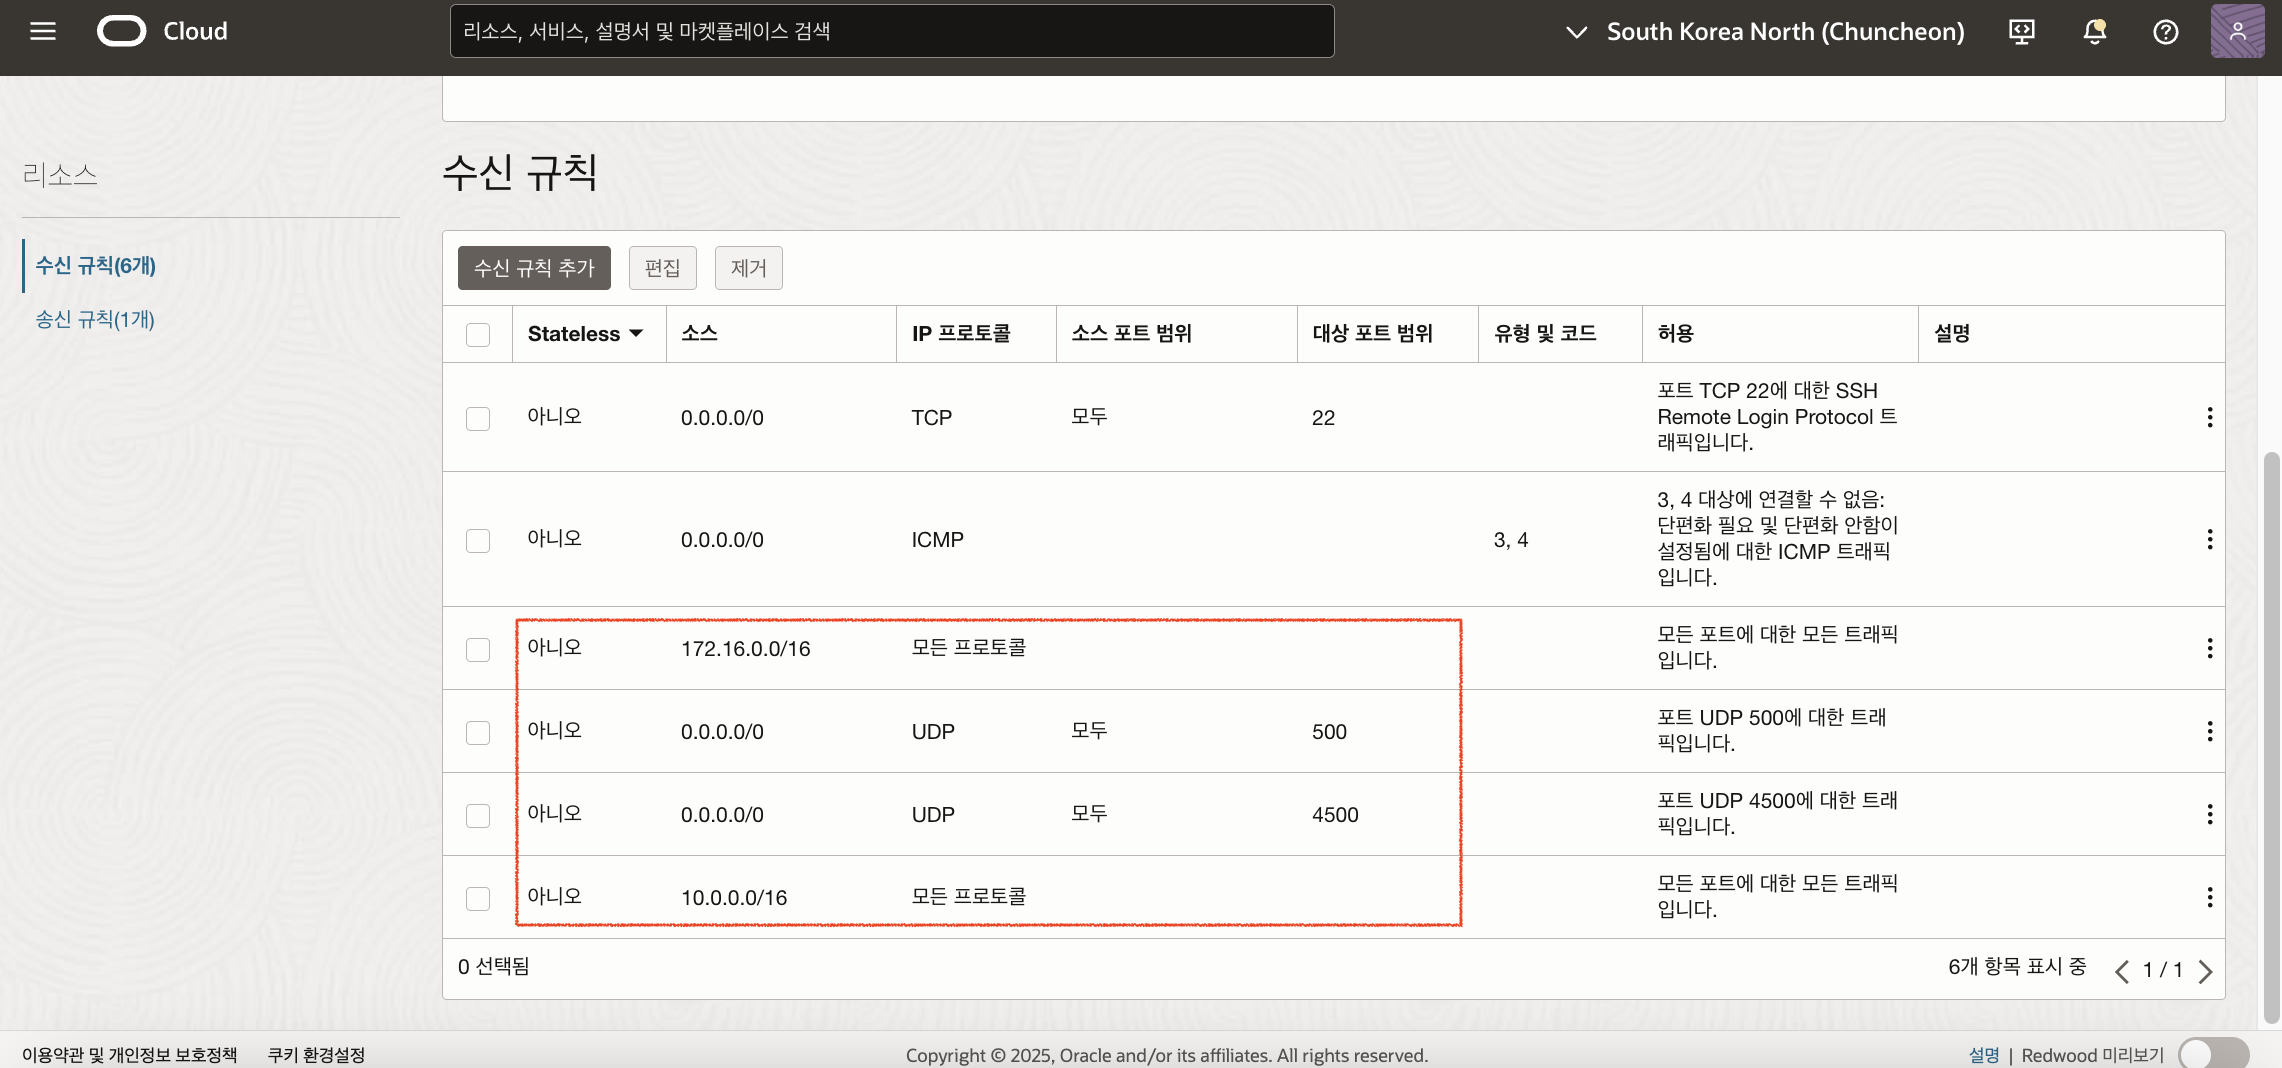
Libreswan을 설치합니다. Libreswan은 다음 명령어로 설치합니다.
$ yum install libreswan -y
Libreswan이 설치되면, 이전에 다운로드한 CPE 구성 정보를 토대로 ipsec 구성파일을 생성해야 합니다. 다음과 같이 파일을 생성하여 오픈합니다.
$ vi /etc/ipsec.d/oci-ipsec.conf
다음과 같이 입력합니다. left는 CPE 정보입니다. left는 CPE(Libreswan)의 Private IP이고, leftid는 CPE(Libreswan)의 Public IP입니다. right는 Oracle VPN IP 주소로, CPE 구성 정보 혹은 앞서 생성한 IPSec Connection 정보에서 확인할 수 있습니다. Tunnle-1과 Tunnel-2의 Oracle VPN IP를 정확히 확인하여 입력합니다.
conn Tunnel-1
     left=10.0.88.45
     # leftid=${cpePublicIpAddress} # See preceding note about 1-1 NAT device
     leftid=152.67.203.251
     right=140.238.23.178
     authby=secret
     leftsubnet=0.0.0.0/0
     rightsubnet=0.0.0.0/0
     auto=start
     mark=5/0xffffffff # Needs to be unique across all tunnels
     vti-interface=vti1
     vti-routing=no
     leftvti=10.10.10.1/30
     ikev2=insist # To use IKEv2, change to ikev2=insist
     ike=aes_cbc256-sha2_384;modp1536
     phase2alg=aes_gcm256;modp1536
     encapsulation=yes
     ikelifetime=28800s
     salifetime=3600s
conn Tunnel-2
     left=10.0.88.45
     # leftid=${cpePublicIpAddress} # See preceding note about 1-1 NAT device
     leftid=152.67.203.251
     right=193.122.98.143
     authby=secret
     leftsubnet=0.0.0.0/0
     rightsubnet=0.0.0.0/0
     auto=start
     mark=6/0xffffffff # Needs to be unique across all tunnels
     vti-interface=vti2
     vti-routing=no
     leftvti=10.10.10.5/30
     ikev2=insist # To use IKEv2, change to ikev2=insist
     ike=aes_cbc256-sha2_384;modp1536
     phase2alg=aes_gcm256;modp1536
     encapsulation=yes
     ikelifetime=28800s
     salifetime=3600s
ipsec을 위한 secret을 생성하여 오픈합니다.
$ vi /etc/ipsec.d/oci-ipsec.secrets
다음과 같은 형식으로 입력합니다. 앞의 IP는 CPE(Libreswan)의 Public IP, 뒤의 IP는 Oracle VPN IP, PSK 이후는 공유 암호(Shared Secret)로 CPE 구성 정보 혹은 앞서 생성한 IPSec Connection 정보에서 확인할 수 있습니다.
152.67.203.251 140.238.23.178: PSK "BJF5DmZ8XNumMb4AIl2H9ufXSx6ziTRrmPZqUygm25kSDMFKkg5fLaeP6vCBtYVI"
152.67.203.251 193.122.98.143: PSK "SwGLv6KctR0nAdKsyqxaHfsYy8DEKdqelszw4EbrUmmMyp1isk77kKRcNpPhwfEw"
다음 명령어로 ipsec 서비스를 시작합니다.
$ systemctl start ipsec
ipsec status와 ipsec verify로 상태를 확인합니다.
[root@libreswan-primary ~]# ipsec verify
Verifying installed system and configuration files

Version check and ipsec on-path                   	[OK]
Libreswan 4.12
Checking for IPsec support in kernel              	[OK]
 NETKEY: Testing XFRM related proc values
         ICMP default/send_redirects              	[OK]
         ICMP default/accept_redirects            	[OK]
         XFRM larval drop                         	[OK]
Pluto ipsec.conf syntax                           	[OK]
Checking rp_filter                                	[OK]
Checking that pluto is running                    	[OK]
 Pluto listening for IKE on udp 500               	[OK]
 Pluto listening for IKE/NAT-T on udp 4500        	[OK]
 Pluto ipsec.secret syntax                        	[OK]
Checking 'ip' command                             	[OK]
Checking 'iptables' command                       	[OK]
Checking 'prelink' command does not interfere with FIPS	[OK]
Checking for obsolete ipsec.conf options          	[OK]
OCI쪽의 터널 인터페이스와 연결이 되었는지 확인합니다.
[root@libreswan-primary ~]# ping 10.10.10.2
PING 10.10.10.2 (10.10.10.2) 56(84) bytes of data.
64 bytes from 10.10.10.2: icmp_seq=1 ttl=64 time=2.66 ms
64 bytes from 10.10.10.2: icmp_seq=2 ttl=64 time=2.67 ms
터널 인터페이스(vti1, vti2)도 추가된 것을 확인할 수 있습니다.
[root@libreswan-primary ~]# ifconfig
enp0s5: flags=4163<UP,BROADCAST,RUNNING,MULTICAST>  mtu 9000
        inet 10.0.88.45  netmask 255.255.0.0  broadcast 10.0.255.255
        inet6 fe80::17ff:fe02:fa83  prefixlen 64  scopeid 0x20<link>
        ether 02:00:17:02:fa:83  txqueuelen 1000  (Ethernet)
        RX packets 1030129  bytes 1528639578 (1.4 GiB)
        RX errors 0  dropped 0  overruns 0  frame 0
        TX packets 1040824  bytes 394128702 (375.8 MiB)
        TX errors 0  dropped 0 overruns 0  carrier 0  collisions 0

lo: flags=73<UP,LOOPBACK,RUNNING>  mtu 65536
        inet 127.0.0.1  netmask 255.0.0.0
        inet6 ::1  prefixlen 128  scopeid 0x10<host>
        loop  txqueuelen 1000  (Local Loopback)
        RX packets 218  bytes 15536 (15.1 KiB)
        RX errors 0  dropped 0  overruns 0  frame 0
        TX packets 218  bytes 15536 (15.1 KiB)
        TX errors 0  dropped 0 overruns 0  carrier 0  collisions 0

vti1: flags=209<UP,POINTOPOINT,RUNNING,NOARP>  mtu 8980
        inet 10.10.10.1  netmask 255.255.255.252  destination 10.10.10.1
        inet6 fe80::5efe:a00:582d  prefixlen 64  scopeid 0x20<link>
        tunnel   txqueuelen 1000  (IPIP Tunnel)
        RX packets 78074  bytes 4806048 (4.5 MiB)
        RX errors 0  dropped 0  overruns 0  frame 0
        TX packets 77283  bytes 4789695 (4.5 MiB)
        TX errors 0  dropped 0 overruns 0  carrier 0  collisions 0

vti2: flags=209<UP,POINTOPOINT,RUNNING,NOARP>  mtu 8980
        inet 10.10.10.5  netmask 255.255.255.252  destination 10.10.10.5
        inet6 fe80::5efe:a00:582d  prefixlen 64  scopeid 0x20<link>
        tunnel   txqueuelen 1000  (IPIP Tunnel)
        RX packets 80370  bytes 4994682 (4.7 MiB)
        RX errors 0  dropped 0  overruns 0  frame 0
        TX packets 77847  bytes 4837109 (4.6 MiB)
        TX errors 0  dropped 0 overruns 0  carrier 0  collisions 0
CPE(Libreswan) 설치 및 구성 (Redundant)
Primary와 마찬가지로 Redundant CPE 구성을 위해 Libreswan을 설치하도록 합니다. 앞서 Libreswan을 위해 생성한 인스턴스(Libreswan-Redundant)로 접속합니다.
$ ssh -i {ssh key} opc@134.185.112.58
root 사용자로 변경합니다.
$ sudo su -
설치 과정은 Primary와 동일합니다. 단 oci-ipsec.conf와 oci-ipsec.secrets 부분만 Redundant IPSec Connection의 CPE 구성 헬퍼를 참고합니다. 아래는 Redundant CPE의 oci-ipsec.conf와 oci-ipsec.secrets 내용입니다.
$ vi /etc/ipsec.d/oci-ipsec.conf
conn Tunnel-1
     left=10.0.96.204
     # leftid=${cpePublicIpAddress} # See preceding note about 1-1 NAT device
     leftid=134.185.112.58
     right=140.238.6.169
     authby=secret
     leftsubnet=0.0.0.0/0
     rightsubnet=0.0.0.0/0
     auto=start
     mark=5/0xffffffff # Needs to be unique across all tunnels
     vti-interface=vti1
     vti-routing=no
     leftvti=10.10.11.1/30
     ikev2=insist # To use IKEv2, change to ikev2=insist
     ike=aes_cbc256-sha2_384;modp1536
     phase2alg=aes_gcm256;modp1536
     encapsulation=yes
     ikelifetime=28800s
     salifetime=3600s
conn Tunnel-2
     left=10.0.96.204
     # leftid=${cpePublicIpAddress} # See preceding note about 1-1 NAT device
     leftid=134.185.112.58
     right=140.238.24.111
     authby=secret
     leftsubnet=0.0.0.0/0
     rightsubnet=0.0.0.0/0
     auto=start
     mark=6/0xffffffff # Needs to be unique across all tunnels
     vti-interface=vti2
     vti-routing=no
     leftvti=10.10.11.5/30
     ikev2=insist # To use IKEv2, change to ikev2=insist
     ike=aes_cbc256-sha2_384;modp1536
     phase2alg=aes_gcm256;modp1536
     encapsulation=yes
     ikelifetime=28800s
     salifetime=3600s
$ vi /etc/ipsec.d/oci-ipsec.secrets
134.185.112.58 140.238.6.169: PSK "YyZNeMNPDZQonCK5mWdbw1q9dCZ4p5N6aek4CBb4KFgkp0I3KCixLsFzADunhWzt"
134.185.112.58 140.238.24.111: PSK "GCPdSgXqADBqSKG1hiMTqAR5GNeqYZQmqe3YUwZK1EclRxA972rlKGFiLNe2PfZG"
다음 명령어로 ipsec 서비스를 시작합니다.
$ systemctl start ipsec
ipsec status와 ipsec verify로 상태를 확인합니다.
[root@libreswan-primary ~]# ipsec verify
Verifying installed system and configuration files

Version check and ipsec on-path                   	[OK]
Libreswan 4.12
Checking for IPsec support in kernel              	[OK]
 NETKEY: Testing XFRM related proc values
         ICMP default/send_redirects              	[OK]
         ICMP default/accept_redirects            	[OK]
         XFRM larval drop                         	[OK]
Pluto ipsec.conf syntax                           	[OK]
Checking rp_filter                                	[OK]
Checking that pluto is running                    	[OK]
 Pluto listening for IKE on udp 500               	[OK]
 Pluto listening for IKE/NAT-T on udp 4500        	[OK]
 Pluto ipsec.secret syntax                        	[OK]
Checking 'ip' command                             	[OK]
Checking 'iptables' command                       	[OK]
Checking 'prelink' command does not interfere with FIPS	[OK]
Checking for obsolete ipsec.conf options          	[OK]
OCI쪽의 터널 인터페이스와 연결이 되었는지 확인합니다.
[root@libreswan-primary ~]# ping 10.10.11.2
PING 10.10.11.2 (10.10.11.2) 56(84) bytes of data.
64 bytes from 10.10.11.2: icmp_seq=1 ttl=64 time=2.52 ms
64 bytes from 10.10.11.2: icmp_seq=2 ttl=64 time=2.59 ms
터널 인터페이스(vti1, vti2)도 추가된 것을 확인할 수 있습니다.
[root@libreswan-redundant ~]# ifconfig
enp0s5: flags=4163<UP,BROADCAST,RUNNING,MULTICAST>  mtu 9000
        inet 10.0.96.204  netmask 255.255.0.0  broadcast 10.0.255.255
        inet6 fe80::17ff:fe02:cfd0  prefixlen 64  scopeid 0x20<link>
        ether 02:00:17:02:cf:d0  txqueuelen 1000  (Ethernet)
        RX packets 853302  bytes 1483824526 (1.3 GiB)
        RX errors 0  dropped 0  overruns 0  frame 0
        TX packets 848961  bytes 351828239 (335.5 MiB)
        TX errors 0  dropped 0 overruns 0  carrier 0  collisions 0

lo: flags=73<UP,LOOPBACK,RUNNING>  mtu 65536
        inet 127.0.0.1  netmask 255.0.0.0
        inet6 ::1  prefixlen 128  scopeid 0x10<host>
        loop  txqueuelen 1000  (Local Loopback)
        RX packets 225  bytes 16184 (15.8 KiB)
        RX errors 0  dropped 0  overruns 0  frame 0
        TX packets 225  bytes 16184 (15.8 KiB)
        TX errors 0  dropped 0 overruns 0  carrier 0  collisions 0

vti1: flags=209<UP,POINTOPOINT,RUNNING,NOARP>  mtu 8980
        inet 10.10.11.1  netmask 255.255.255.252  destination 10.10.11.1
        inet6 fe80::5efe:a00:60cc  prefixlen 64  scopeid 0x20<link>
        tunnel   txqueuelen 1000  (IPIP Tunnel)
        RX packets 78677  bytes 4842005 (4.6 MiB)
        RX errors 0  dropped 0  overruns 0  frame 0
        TX packets 77152  bytes 4768932 (4.5 MiB)
        TX errors 0  dropped 0 overruns 0  carrier 0  collisions 0

vti2: flags=209<UP,POINTOPOINT,RUNNING,NOARP>  mtu 8980
        inet 10.10.11.5  netmask 255.255.255.252  destination 10.10.11.5
        inet6 fe80::5efe:a00:60cc  prefixlen 64  scopeid 0x20<link>
        tunnel   txqueuelen 1000  (IPIP Tunnel)
        RX packets 79293  bytes 4888721 (4.6 MiB)
        RX errors 0  dropped 0  overruns 0  frame 0
        TX packets 77141  bytes 4769546 (4.5 MiB)
        TX errors 0  dropped 0 overruns 0  carrier 0  collisions 0
BGP 구성
BGP(Boarder Gateway Protocol)은 다른 AS(Autonomous System) 사이의 경로 지정(라우팅)을 위해 사용되는 프로토콜입니다. BGP에 대한 자세한 설명은 아래 링크를 참고하세요.
이제 BGP를 실행하기 위해 FRRouting(FRR)을 인스톨합니다. FRR은 Linux 및 Unix 플랫폼용 IP 라우팅 프로토콜 오픈소스 솔루션으로 BGP, RIP, OSPF, IS-IS등과 같은 모든 표준 라우팅 프로토콜을 확장하여 구현하고 있습니다. FRR에 대한 내용은 아래 링크 참고합니다.
Libreswan-Primary, Libreswan-Redundant 인스턴스에서 다음 명령어로 FRR을 설치합니다.
$ yum install frr -y
FRR을 설치한 후 bgpd.conf라는 파일을 생성해야 합니다. 다음 내용을 bgpd.conf에 추가합니다.
$ vi /etc/frr/bgpd.conf
Primary
hostname libreswan-primary
log file //bgpd.log
log stdout
router bgp 65000
 bgp router-id 10.10.10.1
 timers bgp 6 18
 neighbor 10.10.10.2 remote-as 31898
 neighbor 10.10.10.2 ebgp-multihop 255
 neighbor 10.10.10.2 timers 6 18
 neighbor 10.10.10.6 remote-as 31898
 neighbor 10.10.10.6 ebgp-multihop 255
 neighbor 10.10.10.6 timers 6 18
 address-family ipv4 unicast
  network 10.0.0.0/16

  # Common settings
  neighbor 10.10.10.2 next-hop-self
  neighbor 10.10.10.2 soft-reconfiguration inbound
  neighbor 10.10.10.2 route-map BGP-ADVERTISE-OUT out
  neighbor 10.10.10.6 next-hop-self
  neighbor 10.10.10.6 soft-reconfiguration inbound
  neighbor 10.10.10.6 route-map BGP-ADVERTISE-OUT out

  # Individual neighbor-specific settings
  neighbor 10.10.10.2 route-map OUTGOING_TUNNEL_1 in
  neighbor 10.10.10.6 route-map OUTGOING_TUNNEL_2 in
 exit-address-family
ip prefix-list BGP-OUT seq 10 permit 10.0.0.0/16
ip prefix-list BGP-IN_1 seq 10 permit 172.16.0.0/24
ip prefix-list BGP-IN_2 seq 10 permit 172.16.1.0/24
route-map BGP-ADVERTISE-OUT permit 10
 match ip address prefix-list BGP-OUT
route-map OUTGOING_TUNNEL_1 permit 100
 match ip address prefix-list BGP-IN_1
 set local-preference 400
route-map OUTGOING_TUNNEL_1 permit 110
 match ip address prefix-list BGP-IN_2
 set local-preference 400
route-map OUTGOING_TUNNEL_2 permit 100
 match ip address prefix-list BGP-IN_1
 set local-preference 300
route-map OUTGOING_TUNNEL_2 permit 110
 match ip address prefix-list BGP-IN_2
 set local-preference 300
Redundant
hostname libreswan-redundant
log file //bgpd.log
log stdout
router bgp 65000
 bgp router-id 10.10.11.1
 timers bgp 6 18
 neighbor 10.10.11.2 remote-as 31898
 neighbor 10.10.11.2 ebgp-multihop 255
 neighbor 10.10.11.2 timers 6 18
 neighbor 10.10.11.6 remote-as 31898
 neighbor 10.10.11.6 ebgp-multihop 255
 neighbor 10.10.11.6 timers 6 18
 address-family ipv4 unicast
  network 10.0.0.0/16

  # Common settings
  neighbor 10.10.11.2 next-hop-self
  neighbor 10.10.11.2 soft-reconfiguration inbound
  neighbor 10.10.11.2 route-map BGP-ADVERTISE-OUT out
  neighbor 10.10.11.6 next-hop-self
  neighbor 10.10.11.6 soft-reconfiguration inbound
  neighbor 10.10.11.6 route-map BGP-ADVERTISE-OUT out

  # Individual neighbor-specific settings
  neighbor 10.10.11.2 route-map OUTGOING_TUNNEL_1 in
  neighbor 10.10.11.6 route-map OUTGOING_TUNNEL_2 in
 exit-address-family
ip prefix-list BGP-OUT seq 10 permit 10.0.0.0/16
ip prefix-list BGP-IN_1 seq 10 permit 172.16.0.0/24
ip prefix-list BGP-IN_2 seq 10 permit 172.16.1.0/24
route-map BGP-ADVERTISE-OUT permit 10
 match ip address prefix-list BGP-OUT
 set as-path prepend 65500 65500
route-map OUTGOING_TUNNEL_1 permit 100
 match ip address prefix-list BGP-IN_1
 set local-preference 200
route-map OUTGOING_TUNNEL_1 permit 110
 match ip address prefix-list BGP-IN_2
 set local-preference 200
route-map OUTGOING_TUNNEL_2 permit 100
 match ip address prefix-list BGP-IN_1
 set local-preference 100
route-map OUTGOING_TUNNEL_2 permit 110
 match ip address prefix-list BGP-IN_2
 set local-preference 100
bgpd.conf 내용에서 핵심이 되는 몇 가지 내용에 대해서 설명합니다.
- BGP에서 10.0.0.0/16(춘천: 온프레미스) 네트워크를 다른 라우터들에게 광고하기 위해
network 10.0.0.0/16을 설정하였습니다. - BGP Prefix로 BGP-OUT, BGP-IN_1, BGP-IN_2를 구성하였습니다. BGP-OUT은 BGP 프로토콜에서 아웃바운드(보내는) 경로를 필터링하기 위한 목적으로 사용됩니다. BGP-IN_1은 172.16.0.0/24 (Oracle Cloud Public Subnet) 인바운드 경로 필터링을 위해 사용되고, BGP-IN_2는 172.16.1.0/24 (Oracle Cloud Private Subnet) 인바운드 경로 필터링을 위해 사용됩니다.
route-map BGP-ADVERTISE-OUT permit 10에서는 BGP-OUT prefix-list에 정의된 IP 주소 목록과 일치하는 경로에 대해 이 route-map을 허용하는 필터링을 설정하였습니다. 또한 Primary와 다르게 Redundant의 경우에는set as-path prepend 65500 65500값을 설정하였습니다. AS Path Prepending은 BGP에서 경로를 우선순위가 낮은 경로로 설정하는 기법으로, 아웃바운드 경로, 즉 자신의 AS에서 외부로 나가는 BGP 경로에 영향을 미칩니다. 방법은 BGP 경로에 인위적으로 더 많은 AS 번호를 추가하여, 특정 경로가 다른 경로보다 덜 선호되도록 만듭니다. 여기서는 65500이라는 AS Path를 두 번 추가하여 Primary CPE가 Redundant CPE의 아웃바운드 경로 우선순위가 더 높도록 설정하였습니다. 이를 통해서 아웃바운드 경로에 대한 Failover, Failback을 수행할 수 있습니다.route-map으로 BGP-IN_1과 BGP-IN_2 prefix-list에 정의된 IP 주소 목록과 일치하는 경로에 대해 route-map을 허용하는 필터링을 설정하였습니다. 또한 Primary CPE에서는 Redundant CPE보다 더 높은 Local Preference 값을 설정하여 우선순위를 높였습니다. 그리고 각 IPSec Connection Tunnel에서도 터널1에 더 높은 Local Preference 값을 설정하여 우선순의를 높였습니다. Local Preference는 BGP 경로 선택 과정에서 자신의 AS 내에서 우선적으로 선택할 경로를 지정하는 데 사용되는 값으로, 인바운드 경로, 즉 자신의 AS로 들어오는 BGP 경로에 영향을 미칩니다. Local Preference 값이 높을수록 그 경로는 선호되는 경로로 간주됩니다. 이를 통해서 인바운드 경로에 대한 Failover, Failback을 수행할 수 있습니다.- Primary CPE
- Tunnel 1: Local Preference 400
- Tunnel 2: Local Preference 300
- Redundant CPE
- Tunnel 1: Local Preference 200
- Tunnel 2: Local Preference 100
- Primary CPE
이제 BGP가 자동으로 실행되도록 BGP Daemon을 활성화합니다. bgpd=yes로 변경합니다. (Primary, Redundant 모두 설정)
$ vi /etc/frr/daemons

bgpd=yes
ospfd=no
ospf6d=no
ripd=no
ripngd=no
isisd=no
pimd=no
nhrpd=no
eigrpd=no
sharpd=no
pbrd=no
bfdd=no
fabricd=no
FRR을 실행합니다. (Primary, Redundant 모두 실행)
$ systemctl enable frr.service
$ systemctl start frr.service
이제 OCI Console에서 IPSec Tunnel의 수신된 BGP 경로(BGP Routes Received)와 보급된 BGP 경로(BGP Route Advertised)를 확인합니다. (IPSec-for-Primary, IPSec-for-Redundant 모두 확인)
IPSec-for-Primary 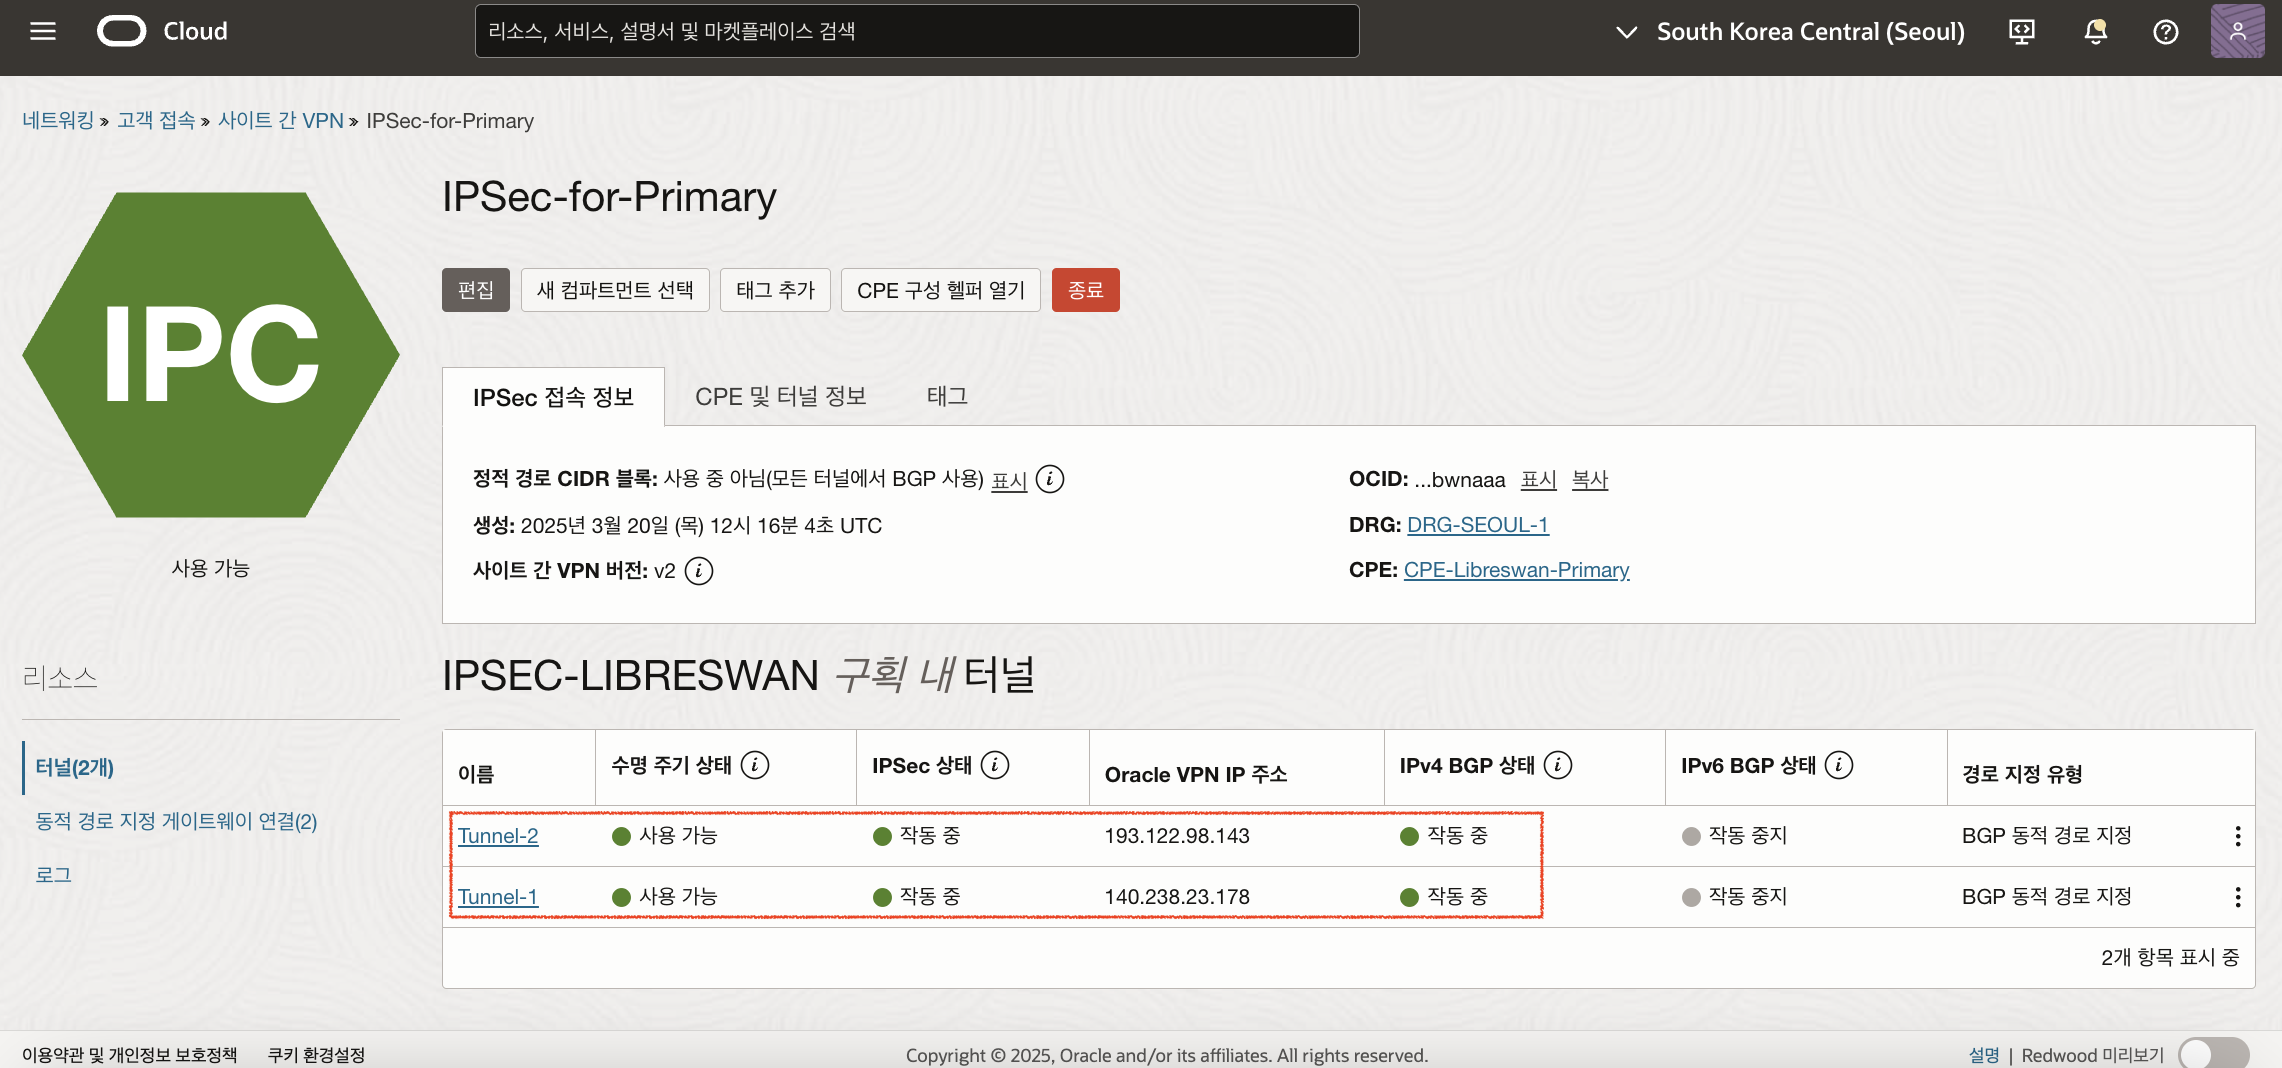
IPSec-for-Redundant 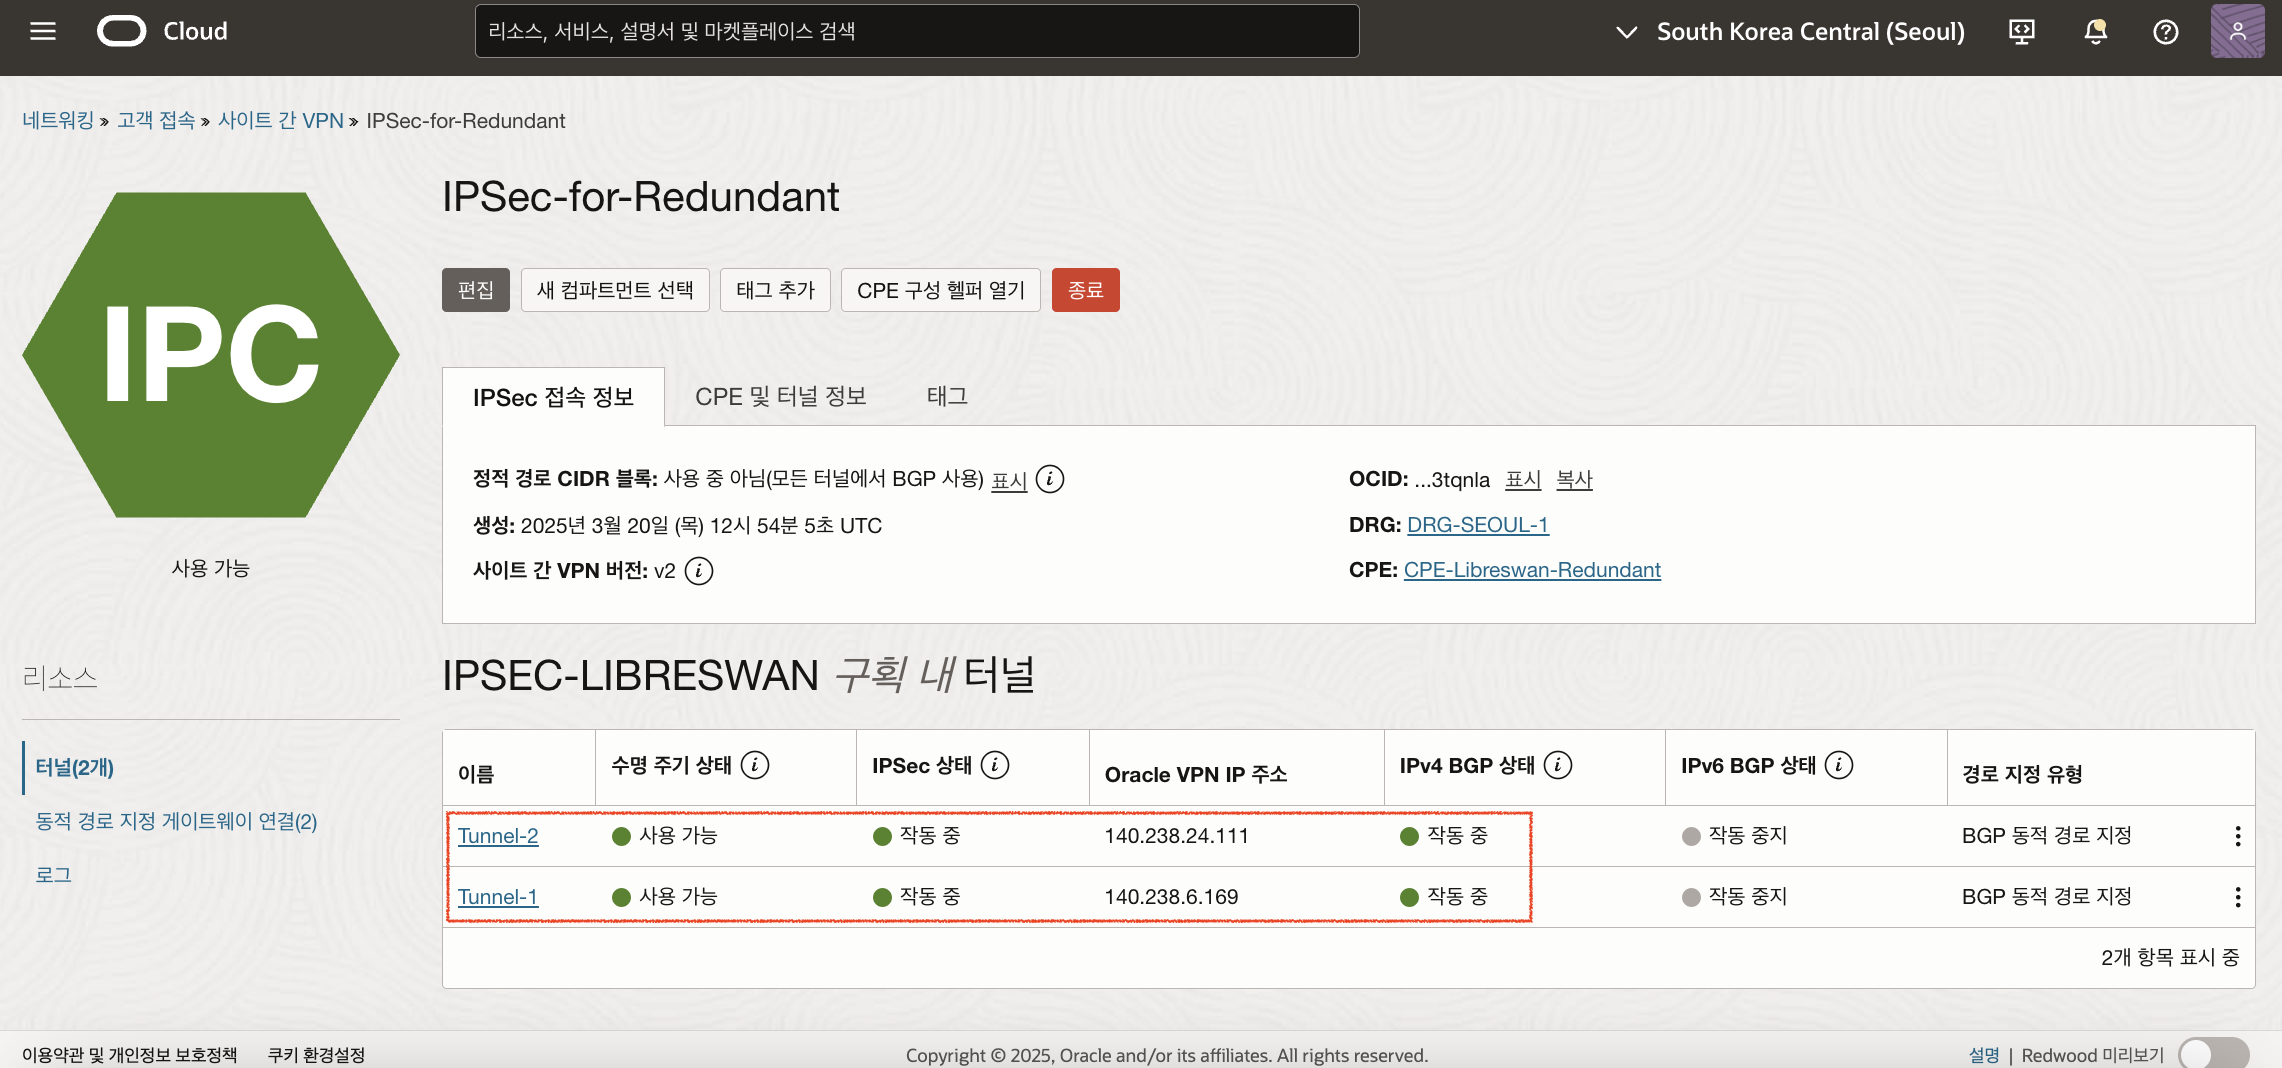
춘천 리전(온프레미스) 경로 테이블 구성
춘천 리전의 인스턴스에서 CPE(Libreswan)를 거치도록 경로 규칙을 추가해야 합니다. CPE(Libreswan)의 Private IP로 Target을 설정해야 하는데, 이를 위해서는 Libreswan이 설치된 인스턴스의 VNIC 설정에서 소스/대상 검사 건너뛰기(Skip source/destination check)를 체크해야 합니다. Primary CPE 인스턴스와 Redundant CPE 인스턴스 모두 설정해줍니다.
기본적으로 모든 VNIC은 각 네트워크 패킷의 헤더에 나열된 소스와 대상을 확인합니다. VNIC이 소스 또는 대상이 아니면 패킷이 삭제됩니다. 경로 테이블의 타겟으로 설정하는 것은 소스와 대상의 중간에 위치에 있다는 의미이므로, 소스/대상 검사 건너뛰기를 체크해야 합니다.
CPE(Libreswan) 인스턴스의 소스/대상 검사 건너뛰기(Skip source/destination check) 체크 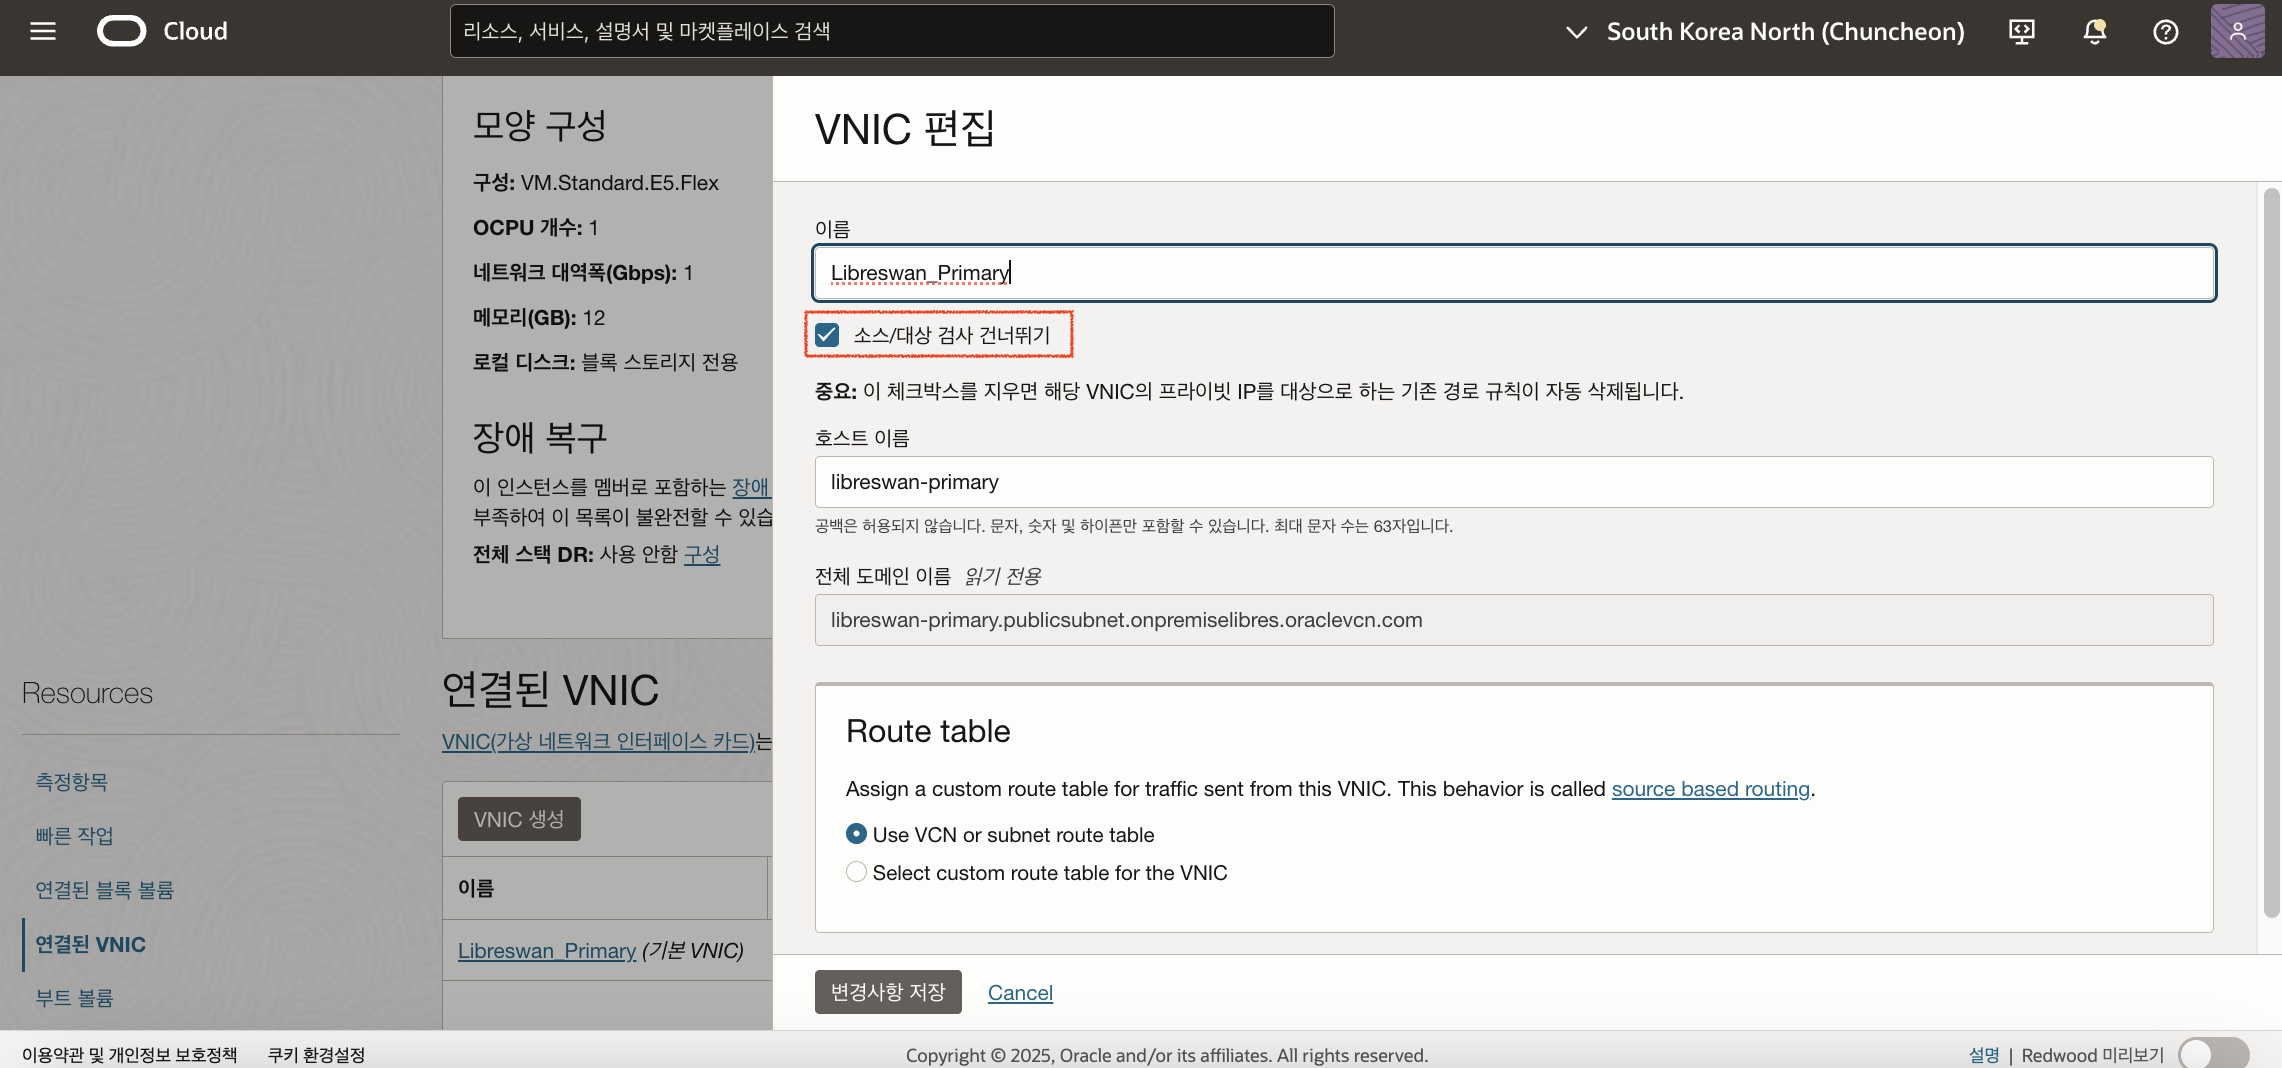
이제 CPE(Libreswan)이 있는 서브넷의 경로 규칙을 다음과 같이 추가합니다. (Libreswan_Primary의 Private IP: 10.0.88.45) 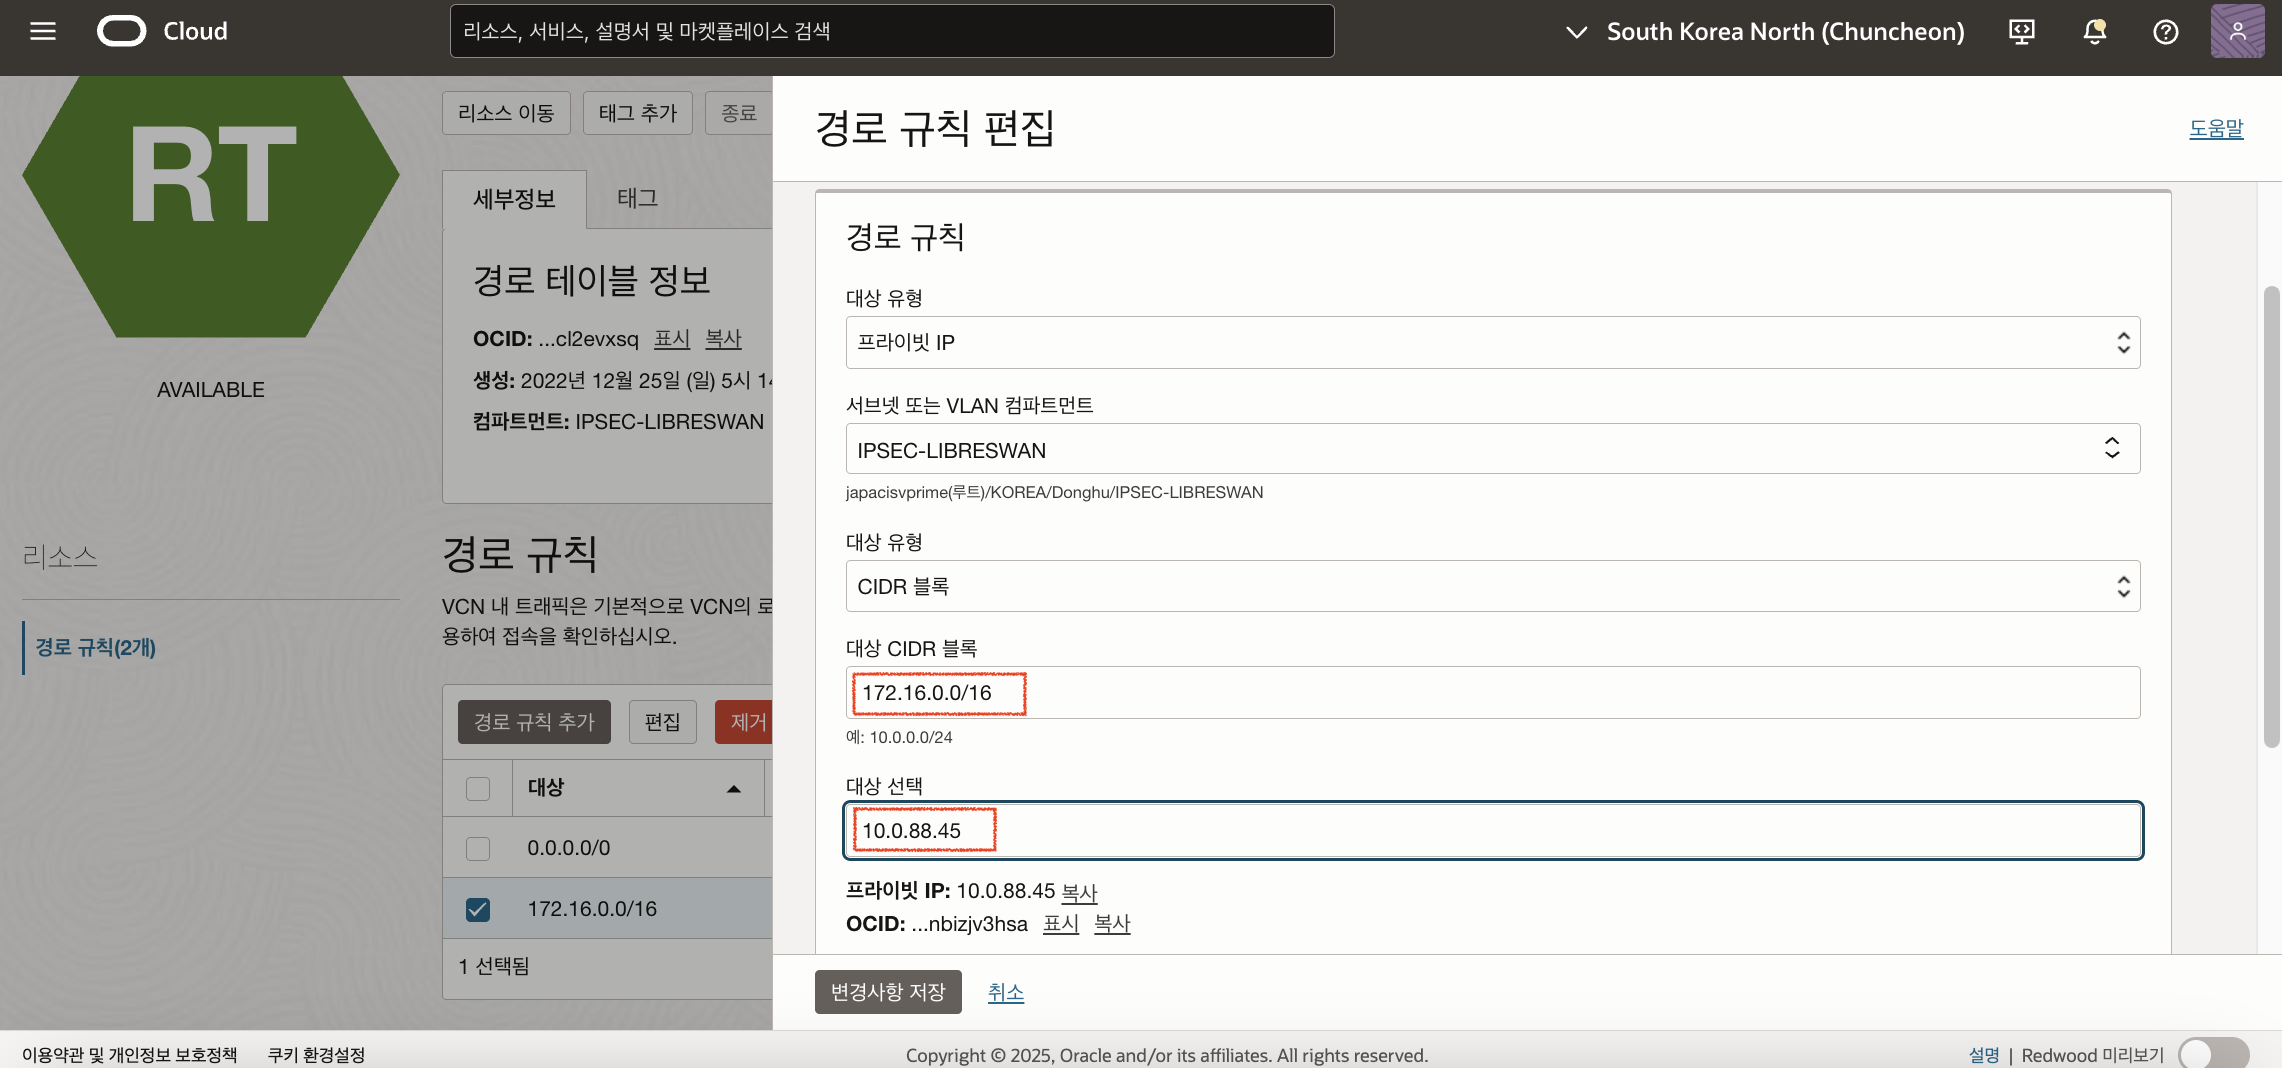
서브넷 경로 규칙에는 기본적으로 Primary CPE를 Target으로 지정하였습니다. Primary CPE가 다운될 경우 자동으로 Redundant CPE로 경로를 변경되는 부분은 게이트웨이 이중화 프로토콜 (VRRP 등)등과 같은 방식으로 구성하는 부분으로 여기서는 별도로 다루지 않습니다. Oracle Cloud 환경에서 온프레미스의 경로는 우선순위가 높은 CPE를 자동으로 감지하지만, 본 환경에서는 온프레미스 환경을 가장한 Oracle Cloud 환경이므로, 경로 규칙을 수동으로 변경해줘야 합니다.
Redundancy 테스트
먼저 OCI DRG 경로 테이블에서 온프레미스 (10.0.0.0/16)를 목적지로 할 경우 어떤 터널을 기본 사용하는지 확인할 수 있습니다. 서울 리전에 생성한 DRG (DRG-SEOUL-1)를 클릭한 후 DRG 경로 테이블에 자동으로 생성되어 있는 Autogenerated Drg Route Table for VCN attachments을 선택합니다. 모든 경로 규칙 가져오기 버튼을 클릭하면 다음과 같은 화면을 볼 수 있습니다. 현재 Primary-Tunnel-2가 Active상태로 해당 터널과 연결되어 있는 상태입니다. 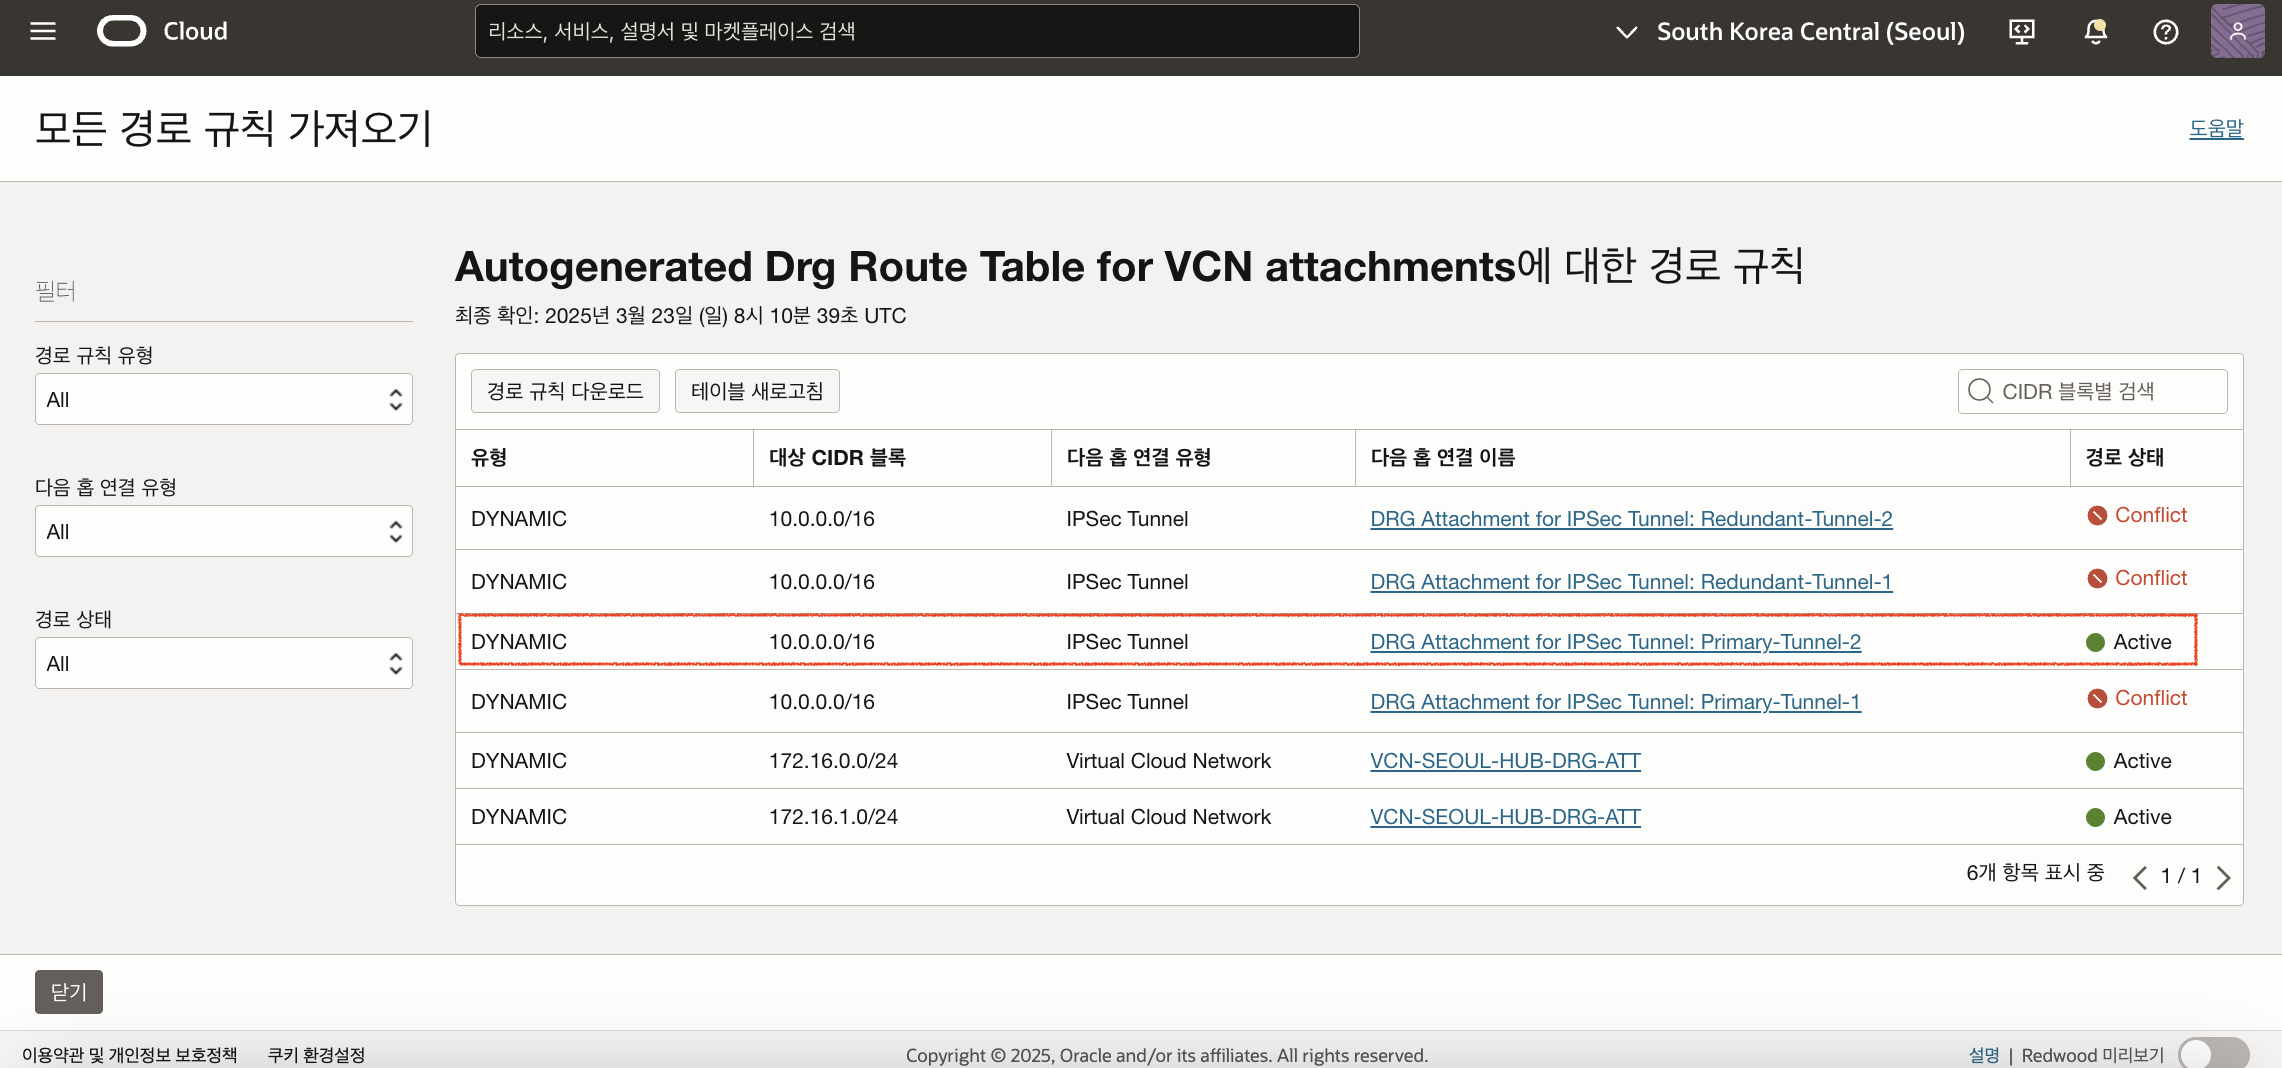
Failover 테스트
먼저 Libreswan_Primary (152.67.203.251) 인스턴스에 접속하여 frr 서비스를 중지하여 BGP를 셧다운 합니다.
$ ssh -i {ssh key} opc@152.67.203.251
$ sudo systemctl stop frr
다시 경로 테이블을 새로고침해보면 자동으로 Redundant Tunnel-2로 변경된 것을 확인할 수 있습니다. 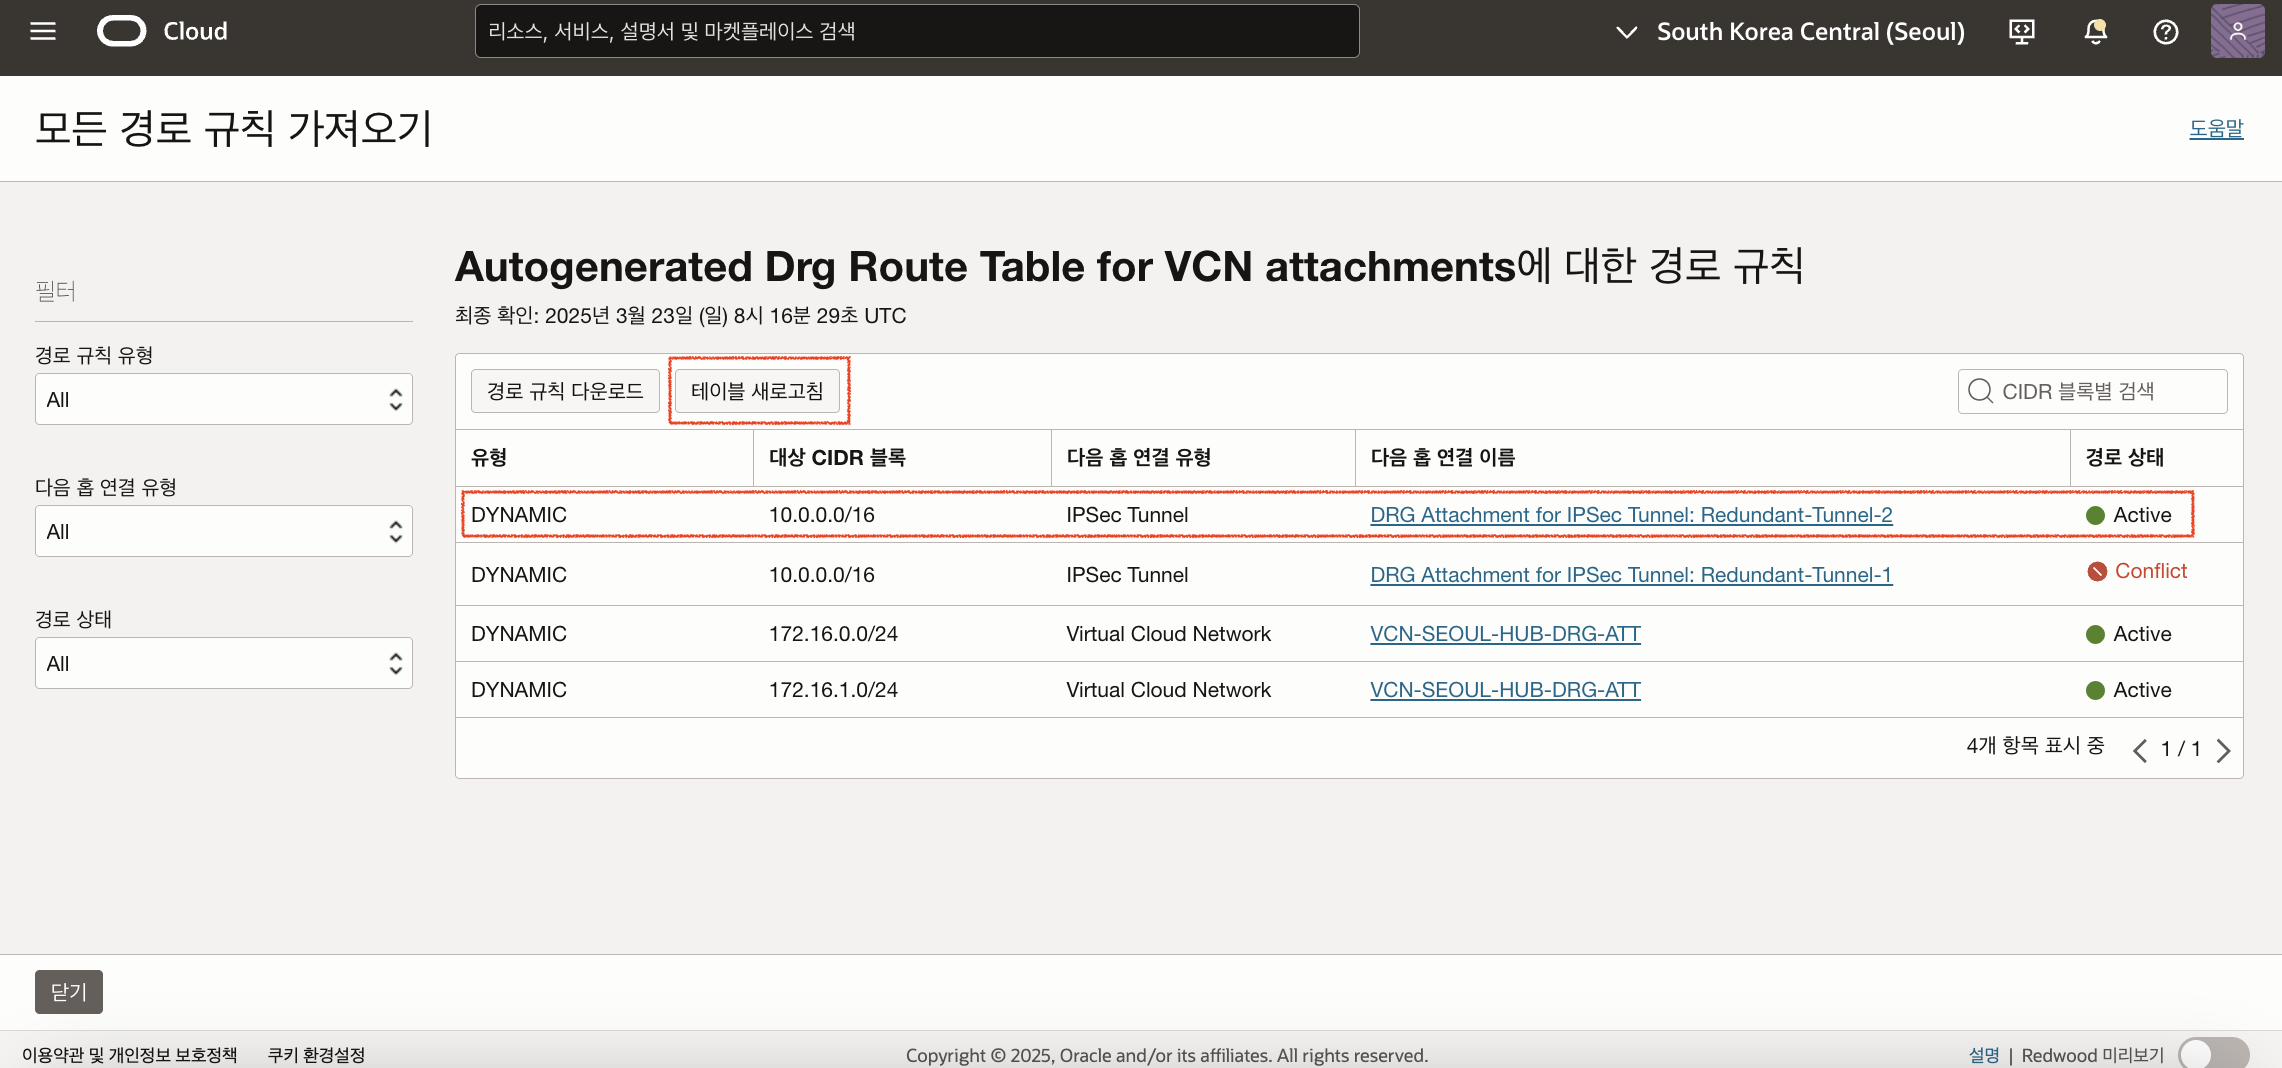
접속 테스트를 춘천리전의 경로 테이블에서 기존 Libreswan_Primary의 Private IP를 Libreswan_Redundant의 Private IP로 변경해줍니다. 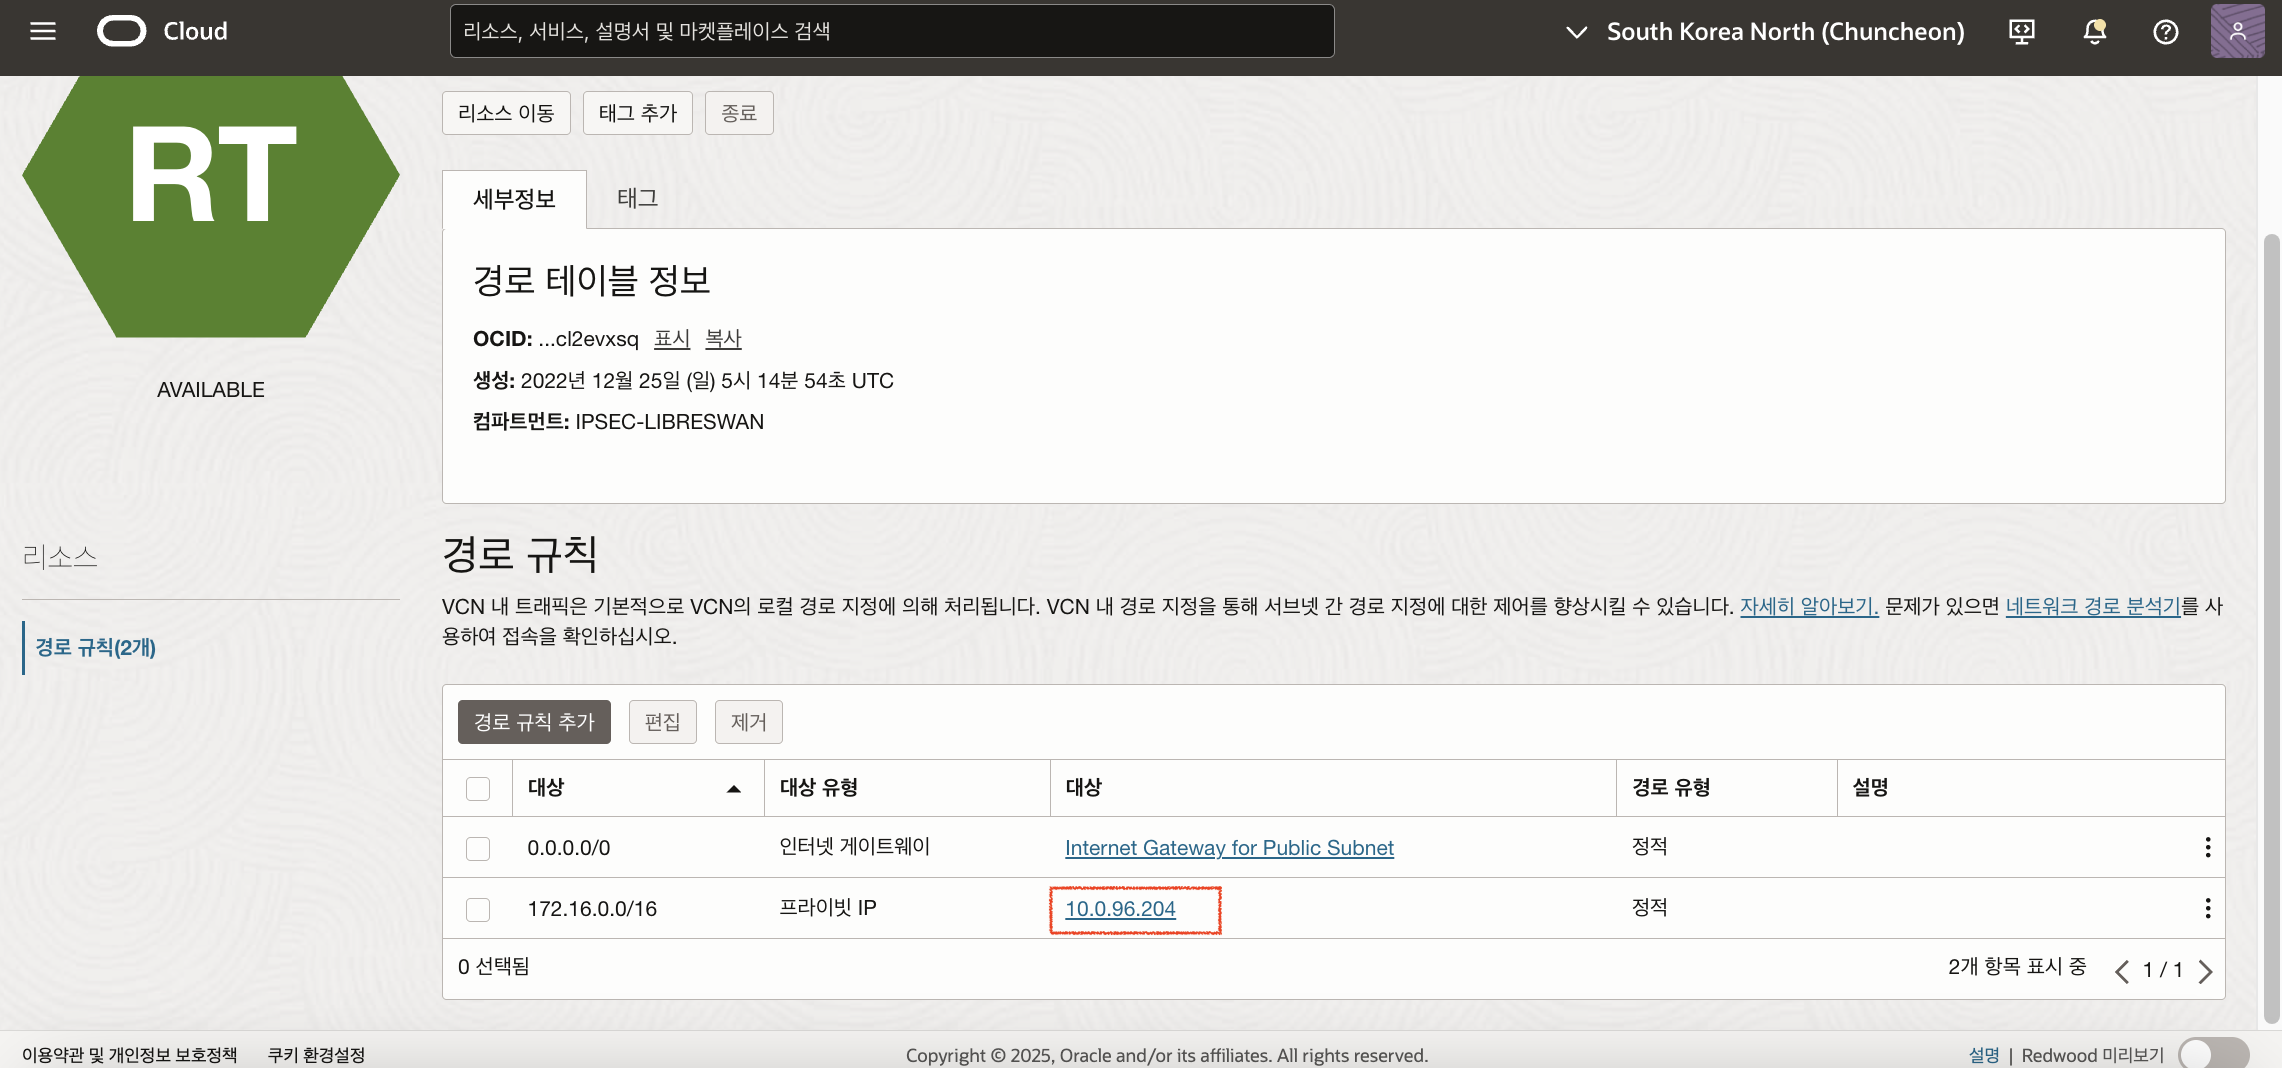
먼저 춘천 리전(온프레미스)에서 서울 리전(Oracle Cloud)으로 연결 테스트를 해보고 정상적으로 통신이 되는지 확인합니다.
[opc@onpremise-vm-instance-1 ~]$ ping 172.16.0.127
PING 172.16.0.127 (172.16.0.127) 56(84) bytes of data.
64 bytes from 172.16.0.127: icmp_seq=1 ttl=60 time=3.34 ms
64 bytes from 172.16.0.127: icmp_seq=2 ttl=60 time=3.17 ms

[opc@onpremise-vm-instance-1 ~]$ ping 172.16.1.81
PING 172.16.1.81 (172.16.1.81) 56(84) bytes of data.
64 bytes from 172.16.1.81: icmp_seq=1 ttl=60 time=3.18 ms
64 bytes from 172.16.1.81: icmp_seq=2 ttl=60 time=3.05 ms
반대로 서울 리전(Oracle Cloud)에서 춘천 리전(온프레미스)으로 연결 테스트를 해보고 정상적으로 통신이 되는지 확인합니다.
[opc@oci-vm-instance-1 ~]$ ping 10.0.187.121
PING 10.0.187.121 (10.0.187.121) 56(84) bytes of data.
64 bytes from 10.0.187.121: icmp_seq=1 ttl=61 time=3.27 ms
64 bytes from 10.0.187.121: icmp_seq=2 ttl=61 time=3.14 ms
Traceroute 결과입니다. Redundant CPE 터널1의 끝점(10.10.11.1)이 보입니다.
[opc@oci-vm-instance-1 ~]$ traceroute 10.0.187.121
traceroute to 10.0.187.121 (10.0.187.121), 30 hops max, 60 byte packets
 1  140.91.214.47 (140.91.214.47)  0.111 ms 140.91.214.43 (140.91.214.43)  0.103 ms 140.91.214.44 (140.91.214.44)  0.079 ms
 2  * * *
 3  * * *
 4  10.10.11.1 (10.10.11.1)  2.955 ms  2.934 ms  2.914 ms
 5  10.0.187.121 (10.0.187.121)  3.138 ms  3.117 ms  3.070 ms
Failback 테스트
다시 Libreswan_Primary (152.67.203.251) 인스턴스에 접속하여 frr 서비스를 시작합니다.
$ sudo systemctl start frr
다시 경로 테이블을 새로고침 해보면 자동으로 Primary Tunnel-2로 변경된 것을 확인할 수 있습니다.
접속 테스트를 춘천리전의 경로 테이블에서 기존 Libreswan_Primary의 Private IP로 변경해줍니다. 
춘천 리전(온프레미스)에서 서울 리전(Oracle Cloud)으로 연결 테스트를 해보고 정상적으로 통신이 되는지 확인합니다.
[opc@onpremise-vm-instance-1 ~]$ ping 172.16.0.127
PING 172.16.0.127 (172.16.0.127) 56(84) bytes of data.
64 bytes from 172.16.0.127: icmp_seq=1 ttl=60 time=3.26 ms
64 bytes from 172.16.0.127: icmp_seq=2 ttl=60 time=3.08 ms

[opc@onpremise-vm-instance-1 ~]$ ping 172.16.1.81
PING 172.16.1.81 (172.16.1.81) 56(84) bytes of data.
64 bytes from 172.16.1.81: icmp_seq=1 ttl=60 time=3.25 ms
64 bytes from 172.16.1.81: icmp_seq=2 ttl=60 time=210 ms
서울 리전(Oracle Cloud)에서 춘천 리전(온프레미스)으로 연결 테스트를 해보고 정상적으로 통신이 되는지 확인합니다.
[opc@oci-vm-instance-1 ~]$ ping 10.0.187.121
PING 10.0.187.121 (10.0.187.121) 56(84) bytes of data.
64 bytes from 10.0.187.121: icmp_seq=1 ttl=61 time=3.30 ms
64 bytes from 10.0.187.121: icmp_seq=2 ttl=61 time=3.16 ms
Traceroute 결과입니다. Primary CPE 터널1의 끝점(10.10.10.1)이 보입니다.
[opc@oci-vm-instance-1 ~]$ traceroute 10.0.187.121

traceroute to 10.0.187.121 (10.0.187.121), 30 hops max, 60 byte packets
 1  140.91.214.43 (140.91.214.43)  0.153 ms 140.91.214.45 (140.91.214.45)  0.105 ms  0.083 ms
 2  * * *
 3  * * *
 4  10.10.10.1 (10.10.10.1)  2.964 ms  2.945 ms  2.924 ms
 5  10.0.187.121 (10.0.187.121)  3.080 ms  3.075 ms  3.056 ms
참고
- Connectivity Redundancy Guide
- Connectivity Redundancy Guide - FastConnect & VPN Connect
- Multi Region FastConnect/VPN Redundancy
이 글은 개인적으로 얻은 지식과 경험을 작성한 글로 내용에 오류가 있을 수 있습니다. 또한 글 속의 의견은 개인적인 의견으로 특정 회사를 대변하지 않습니다.
Donghu Kim INFRASTRUCTURE
oci connectivity vpn redundancy