OCI Release Notes 2023
6월 OCI Cloud Native & Security 업데이트 소식
Table of Contents
Support for Kubernetes volume snapshots
- Services: Container Engine for Kubernetes
- Release Date: June 20, 2023
- Documentation: https://docs.oracle.com/en-us/iaas/Content/ContEng/Tasks/contengcreatingpersistentvolumeclaim_topic-Provisioning_PVCs_on_BV.htm#contengcreatingpersistentvolumeclaim_topic-Provisioning_PVCs_on_BV-PV_From_Snapshot_CSI
릴리즈 내용
이제 CSI Volume Plugin은 Kubernetes Volume Snapshot(Block Volume Backup 으로 프로비저닝됨)을 생성하고, 이를 이용하여 새로운 Persistent Volume을 프로비저닝할 수 있도록 지원합니다. 특정 시점에 기존 Volume의 복사본을 생성한 다음 복사본을 사용하여 새 볼륨을 프로비저닝할 수 있으므로, OKE 환경에 대한 DR 전략으로 포함될 수 있게됩니다.
볼륨 스냅샷 생성을 위한 준비사항
볼륨 스냅샷 생성을 위해서는 기본적으로 VolumeSnapshot, VolumeSnapshotContent, VolumeSnapshotClass가 필요한데, 이는 Core Kubernetes API가 아니므로, 이를 위해 필요한 CRD(Custom Resource Definition)을 설치해야 합니다. 다음 명령어로 설치를 진행합니다.
VolumeSnapshotClass 설치
kubectl apply -f https://raw.githubusercontent.com/kubernetes-csi/external-snapshotter/master/client/config/crd/snapshot.storage.k8s.io_volumesnapshotclasses.yaml
VolumeSnapshotContent 설치
kubectl apply -f https://raw.githubusercontent.com/kubernetes-csi/external-snapshotter/master/client/config/crd/snapshot.storage.k8s.io_volumesnapshotcontents.yaml
VolumeSnapshot 설치
kubectl apply -f https://raw.githubusercontent.com/kubernetes-csi/external-snapshotter/master/client/config/crd/snapshot.storage.k8s.io_volumesnapshots.yaml
동적 블록 볼륨 스냅샷 생성
동적 블록 볼륨 스냅샷 생성은 동적으로 블록 볼륨 백업을 생성하고, 이에 대한 동적 블록 볼륨 스냅샷을 생성하는 방법으로 VolumeSnapshot을 사용하는 Persistent Volume Claim(PVC)를 생성하며, 블록 볼륨 백업 생성을 위한 VolumeSnapshotClass를 필요로 합니다.
다음은 동적 볼륨 스냅샷 생성 예제입니다. PVC 예시
apiVersion: v1
kind: PersistentVolumeClaim
metadata:
  name: sample-pvc
spec:
  accessModes:
    - ReadWriteOnce
  storageClassName: "oci-bv"
  resources:
    requests:
      storage: 50Gi
PVC 생성
$ kubectl create -f csi-mypvctobackup.yaml
Pod 예시
apiVersion: v1
kind: Pod
metadata:
  name: sample-pod
spec:
  containers:
    - name: sample-nginx
      image: nginx
      ports:
        - containerPort: 80
          name: "http-server"
      volumeMounts:
        - mountPath: "/usr/share/nginx/html"
          name: sample-volume
  volumes:
  - name: sample-volume
    persistentVolumeClaim:
      claimName: sample-pvc
블록 볼륨 백업을 위한 VolumeSnapshotClass 예시
apiVersion: snapshot.storage.k8s.io/v1
kind: VolumeSnapshotClass
metadata:
  name: my-snapclass
driver: blockvolume.csi.oraclecloud.com
parameters:
  backupType: full
deletionPolicy: Delete
VolumeSnapshotClass 생성
$ kubectl create -f csi-mysnapshotclass.yaml
VolumeSnapshot 예시
apiVersion: snapshot.storage.k8s.io/v1
kind: VolumeSnapshot
metadata:
  name: my-snapshot
  namespace: default
spec:
  volumeSnapshotClassName: my-snapclass
  source:
    persistentVolumeClaimName: sample-pvc
정적 볼륨 스냅샷 생성
정적 볼륨 스냅샷은 기존에 메뉴얼로 백업한 블록 볼륨에 대한 스냅샷을 생성하는 방법입니다. 이를 위해서는 먼저 블록 볼륨 백업을 먼저 생성하여야 합니다. 그리고 다음과 같이 VolumeSnapshotContent를 정의하고 생성합니다.
VolumeSnapshotContent 예시
apiVersion: snapshot.storage.k8s.io/v1
kind: VolumeSnapshotContent
metadata:
  name: my-static-snapshot-content
spec:
  deletionPolicy: Retain
  driver: blockvolume.csi.oraclecloud.com
  source:
    snapshotHandle: ocid1.volumebackup.oc1.iad.aaaaaa______xbd
  volumeSnapshotRef:
    name: my-static-snapshot
    namespace: default
VolumeSnapshotContent 생성
$ kubectl create -f csi-mystaticsnapshotcontent.yaml
VolumeSnapshot 예시
apiVersion: snapshot.storage.k8s.io/v1
kind: VolumeSnapshot
metadata:
  name: my-static-snapshot
spec:
  source:
    volumeSnapshotContentName: static-snapshot-content
VolumeSnapshot 생성
$ ubectl create -f csi-mystaticsnapshot.yaml
볼륨 스냅샷을 이용하여 새로운 블록 볼륨 생성하기
앞에서 생성한 볼륨 스냅샷을 이용하여 새로운 볼륨을 생성하고 Pod에서 마운트할 수 있습니다.
PVC 예시
apiVersion: v1
kind: PersistentVolumeClaim
metadata:
  name: pvc-fromsnapshot
  namespace: default
spec:
  storageClassName: oci-bv
  dataSource:
    name: test-snapshot
    kind: VolumeSnapshot
    apiGroup: snapshot.storage.k8s.io
  accessModes:
    - ReadWriteOnce
  resources:
    requests:
      storage: 50Gi
PVC 생성
$ kubectl create -f csi-mypvcfromsnapshot.yaml
Pod 예시
apiVersion: v1
kind: Pod
metadata:
  name: sample-pod-restore
spec:
  containers:
    - name: nginx
      image: nginx:latest
      ports:
        - name: http
          containerPort: 80
      volumeMounts:
        - name: data
          mountPath: /data
  volumes:
    - name: data
      persistentVolumeClaim:
        claimName: pvc-fromsnapshot
주의사항
- Cluster의 Worker Node는 반드시 Oracle Linux 7 또는 Oracle Linux 8이어야 합니다.
- Cluster의 Control Plane 노드는 반드시 Kubernetes 1.24 이후 버전이어야 합니다.
- 정적 볼륨 스냅샷을 통해서 새로운 볼륨을 생성해야 하고 다른 구획(Compartment)에 있는 백업 볼륨에 접근을 위해서는 다음과 같은 Policy를 추가해야 합니다. 다음은 예시 입니다.
ALLOW any-user to manage volume-backups in compartment <compartment-name> where request.principal.type = 'cluster'
ALLOW any-user to use volumes in compartment <compartment-name> where request.principal.type = 'cluster'
Support for Self-Managed Nodes
- Services: Container Engine for Kubernetes
- Release Date: June 22, 2023
- Documentation: https://docs.oracle.com/iaas/Content/ContEng/Tasks/contengworkingwithselfmanagednodes.htm
릴리즈 내용
이제 OKE에서 자체 관리 노드(Self-managed nodes)를 사용할 수 있습니다. 자체 관리 노드(Self-managed nodes)는 BYON(Bring Your Own Nodes)이라고도 부릅니다.
자체 관리 노드를 위한 전제 조건
BYON으로 사용할 노드는 기본적으로 노드풀에 포함되지 않습니다. 따라서 노드풀과 관련된 어떤 기능도 사용할 수 없습니다.
- Flannel CNI Plugin을 사용하는 경우만 가능합니다.
- Control Plane Node는 Kubernetes 버전 1.25 이상이어야 합니다.
- OKE Oracle Linux 7 (OL7) 또는 Oracle Linux 8 (OL8) 이어야 합니다.
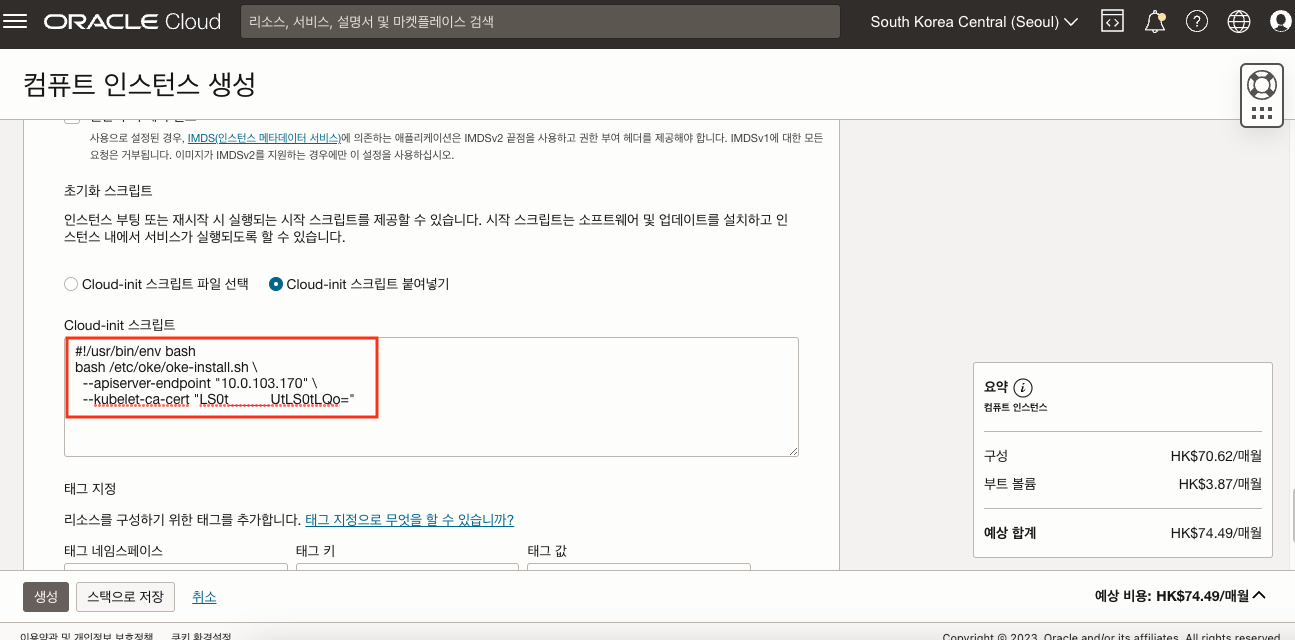
자체 관리 노드를 위한 Cloud-init 스크립트 생성
자체 관리 노드를 생성할 때에는 반드시 다음과 같이 Cloud-init 스크립트가 필요합니다.
#!/usr/bin/env bash
bash /etc/oke/oke-install.sh \
  --apiserver-endpoint "<cluster-endpoint>" \
  --kubelet-ca-cert "<base64-encoded-certificate>"
cluster-endpoint는 OKE Cluster 상세 페이지 혹은 다음 명령어로 확인할 수 있습니다.
$ oci ce cluster create-kubeconfig --cluster-id <cluster-ocid> --region <region-identifier> --kube-endpoint PRIVATE_ENDPOINT --file - \
| grep -oE "https://[0-9\.]+:6443" \   # extract cluster endpoint url
| sed -E 's^https://([0-9\.]+):.*^\1^' # strip protocol/port for IP only
base64-encoded-certificate는 다음 명령어를 이용하여 생성할 수 있습니다.
$ oci ce cluster create-kubeconfig --cluster-id <cluster-ocid> --region <region-identifier> --file - | grep -oE "LS0t.*"
다음은 예시입니다.
$ oci ce cluster create-kubeconfig --cluster-id ocid1.cluster.oc1.phx.aaaaaaaa______ivq --region us-phoenix-1 --file - | grep -oE "LS0t.*"
자체 관리 노드 생성
자체 관리노드를 생성하기 위해서는 Compute Instance 생성과 동일한 방법으로 생성하는데, 앞서 생성한 Cloud-init을 포함하여 생성합니다.
이렇게 생성한 노드는 OKE Cluster에 포함됩니다.
$ kubectl get nodes

NAME           STATUS   ROLES    AGE   VERSION
10.0.103.170   Ready    <none>   40m   v1.25.4
$ kubectl get node 10.0.103.170 -o json | jq '.metadata.labels'

{
...
"displayName": "oke-self-managed-node",
"oci.oraclecloud.com/node.info.byon": "true",
...
}
Support for SSL between the load balancer and worker nodes in a Kubernetes cluster
- Services: Container Engine for Kubernetes
- Release Date: June 28, 2023
- Documentation: https://docs.oracle.com/iaas/Content/ContEng/Tasks/contengworkingwithselfmanagednodes.htm
릴리즈 내용
이제 OKE에서 Load Balancer 서비스를 프로비저닝 할때 Load Balancer와 Backend 서버 사이의 SSL 연결 구현을 할 수 있습니다. 이를 Backend SSL이라 부릅니다. 기본적으로 Load Balancer에서 SSL Termination이 있는 Listener를 생성할 수 있기 때문에 클라이언트부터 Pod까지 완전한 종단간 SSL 통신이 가능해집니다.
인증서 생성 및 Secret 생성
다음은 OpenSSL을 활용하여 Self-Signed 인증서를 생성하고, 이를 통해서 Kubernetes Secret을 생성하는 예시입니다.
Private Key 생성 예시
$ openssl genrsa -out ca.key 2048
인증서 생성 예시
$ openssl req -x509 -new -nodes -key ca.key -subj "/CN=nginxsvc/O=nginxsvc" -days 10000 -out ca.crt
Secret 생성 예시
$ kubectl create secret tls ca-ser-secret --key ca.key --cert ca.crt
Backend SSL을 위한 Annotation
Backend SSL을 위해서는 다음과 같은 Annotation을 사용할 수 있습니다.
service.beta.kubernetes.io/oci-load-balancer-tls-backendset-secret: <value>
다음은 위에서 생성한 Secret을 활용하여 Backend SSL 적용한 서비스 생성 예시입니다.
apiVersion: apps/v1
kind: Deployment
metadata:
  name: nginx-deployment
spec:
  replicas: 2
  selector:
    matchLabels:
      app: nginx
  template:
    metadata:
      labels:
        app: nginx
    spec:
      containers:
      - name: nginx
        image: nginx
        ports:
        - containerPort: 80
---
apiVersion: v1
metadata:
  name: nginx-service
  annotations:
    oci.oraclecloud.com/load-balancer-type: "lb"
    service.beta.kubernetes.io/oci-load-balancer-tls-backendset-secret: ca-ser-secret
spec:
  selector:
    app: nginx
  type: LoadBalancer
  ports:
  - name: http
    port: 80
    targetPort: 80
  - name: https
    port: 443
    targetPort: 443
이 글은 개인적으로 얻은 지식과 경험을 작성한 글로 내용에 오류가 있을 수 있습니다. 또한 글 속의 의견은 개인적인 의견으로 특정 회사를 대변하지 않습니다.
Donghu Kim RELEASE-NOTES-2023-CLOUDNATIVE-SECURITY
oci-release-notes-2023 June-2023 cloudnative