Block Volume
OCI Shared Blockvolume 구성
Shared Blockvolume
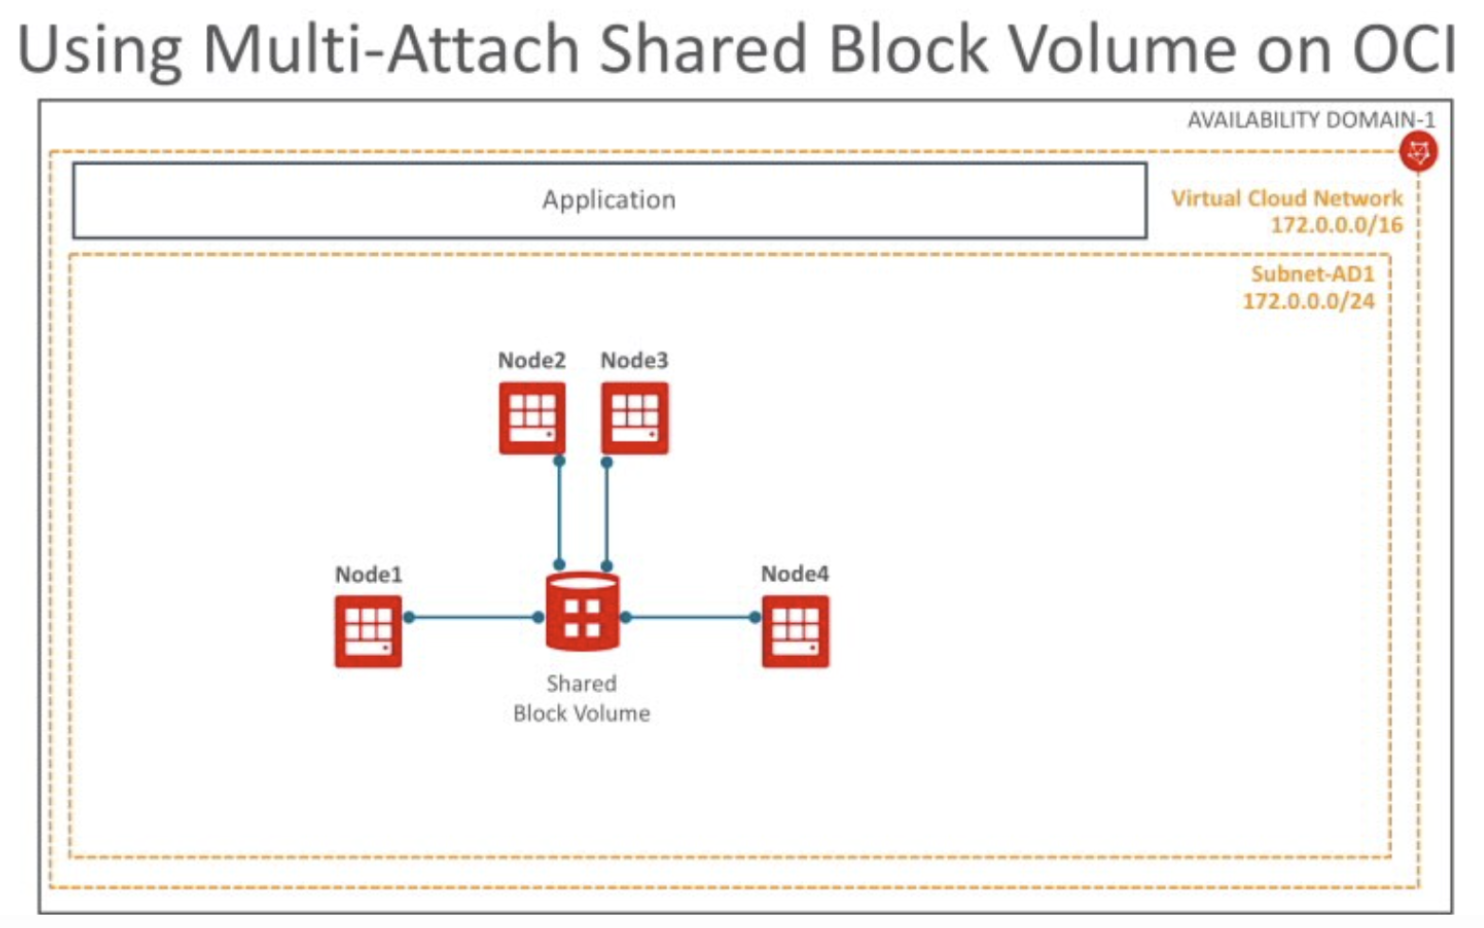
OCI(Oracle Cloud Infrastructure)는 여러 Compute 인스턴스가 공유하는 Block Volume을 지원합니다. 1개의 Block Volume을 2개 이 이상의 Compute 인스턴스가 마운트할 수 있습니다. 여러 Compute 인스턴스가 1개 Block Volume을 읽기/쓰기 모드로 마운트할 경우, 쓰기 중복을 방지하기 위해서 여러 Compute 인스턴스의 파일 쓰기를 조정하는 중재 소프트웨어가 필요합니다. 이런 중재 소프트웨어를 Clusterware라고 합니다.
OCI는 공유 볼륨은다음과 같은 3개 Clusterware를 지원합니다.
- OCSF2(Oracle Cluster File System Version 2)
- GlusterFS
- IBM Spectrum Scale
제약사항

블록볼륨을 생성합니다. 
Compute 내 shared blockstorage 설정 및 iSCSI 정보 확인
- 위 앞에서 생성된 compute의 상세 정보를 확인하여 위해서 아래 compute 를 클릭합니다.
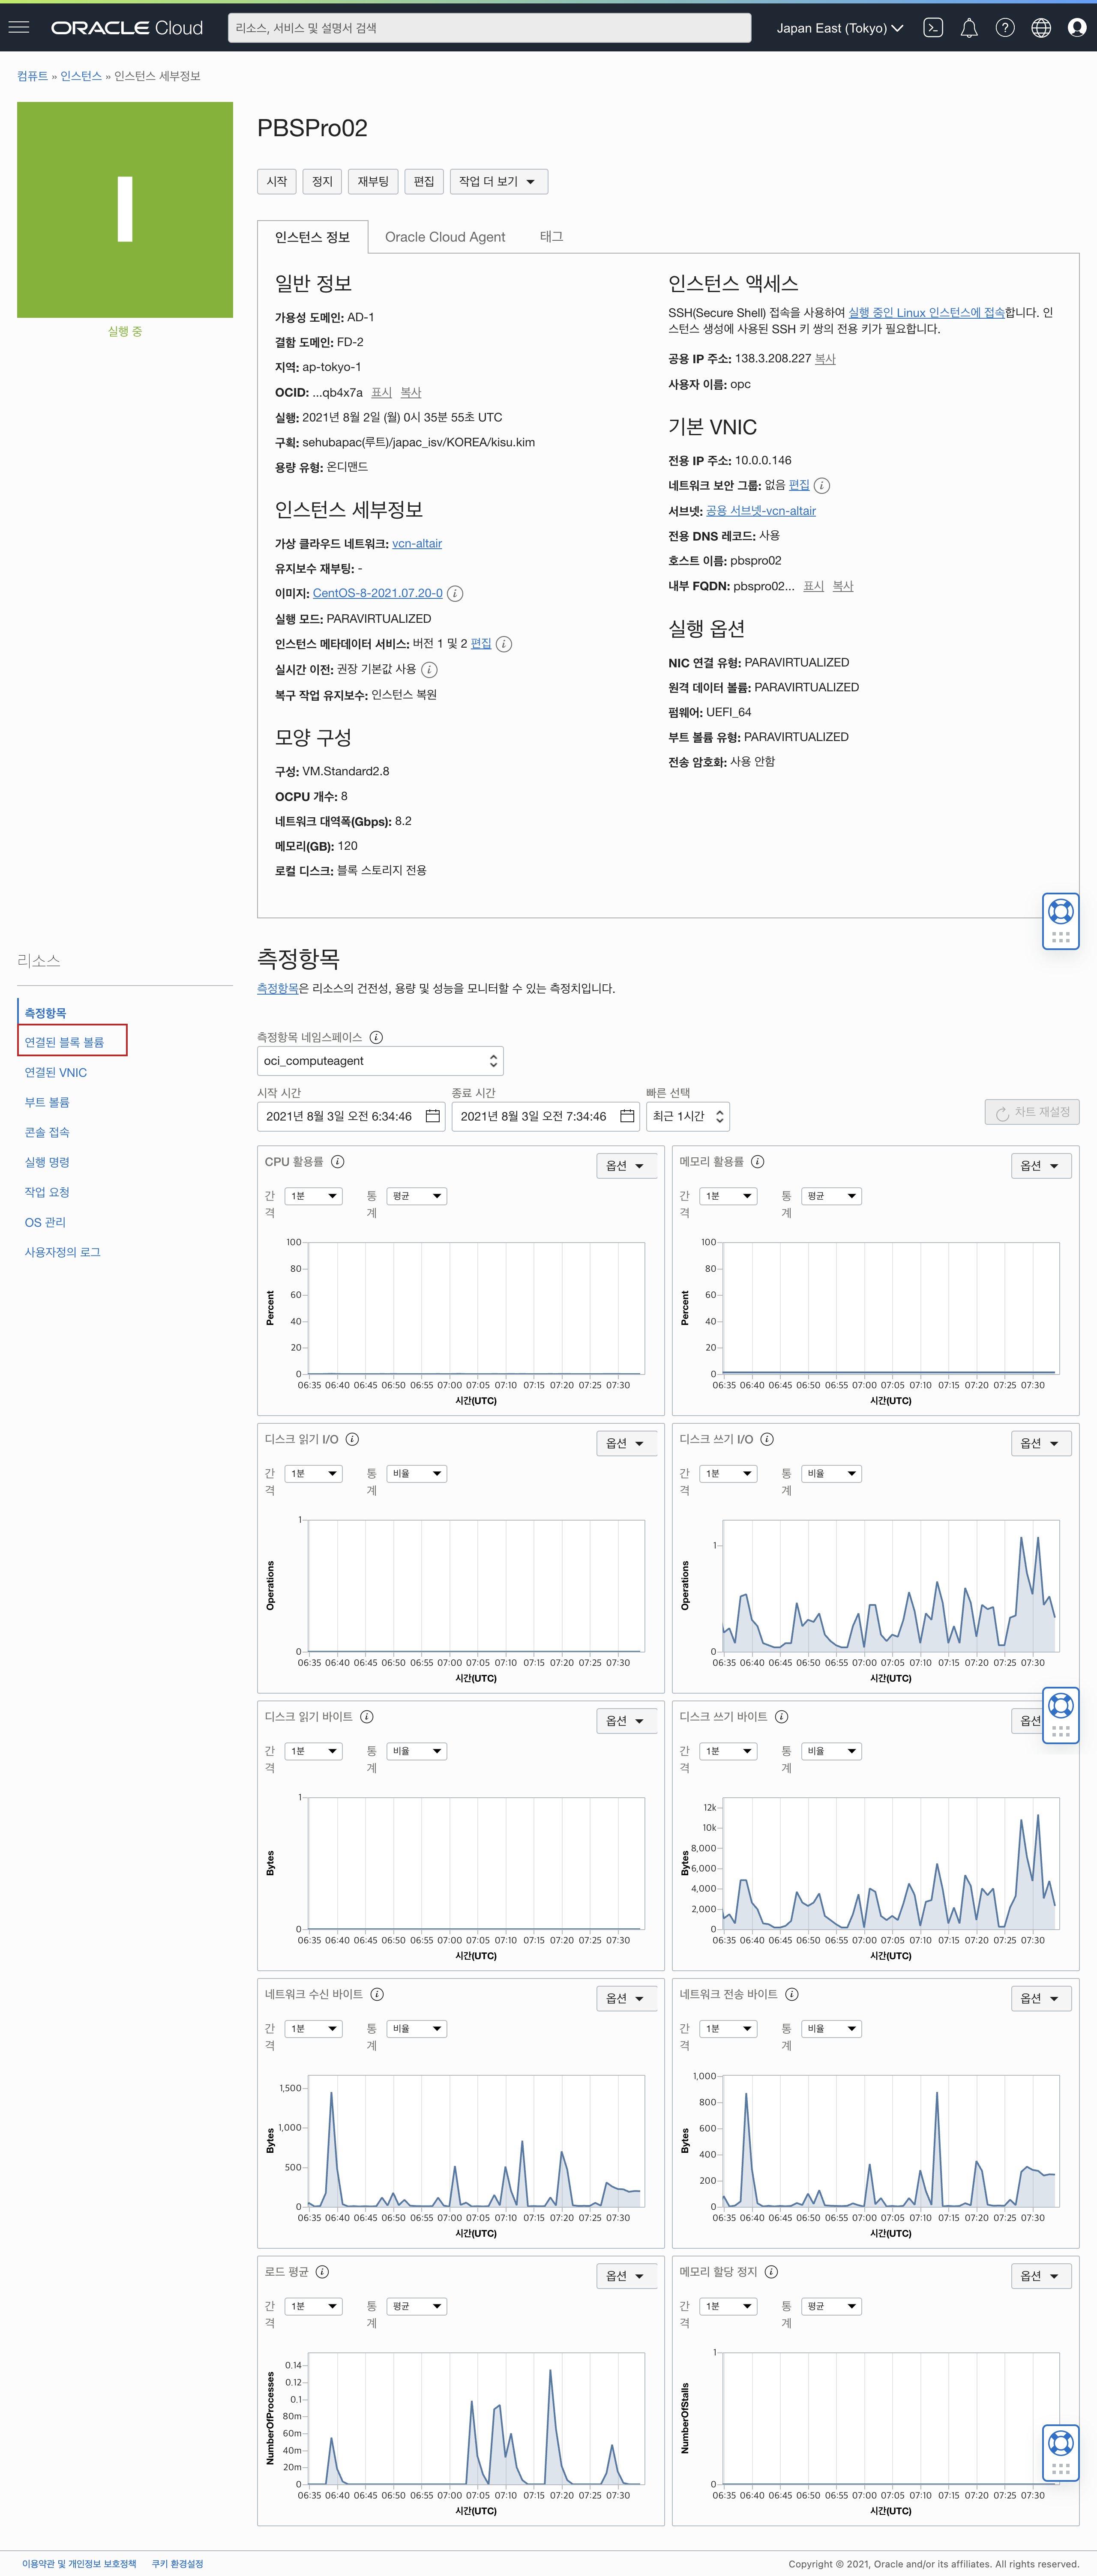
 각 compute 의 세부 정보가 보여집니다. 아래 리소스 항목 중에서 연결된 블록볼륨 클릭
 연결된 블록볼륨에 현재 연결된 블록볼륨이 없으므로 아래와 같이 블록볼륨 연결 이후 아래 셋팅값으로 연결하시 이후에 iSCSI 정보 확인이 가능합니다. 나머지 script 명령어는 아래 링크 확인 부탁 드립니다.
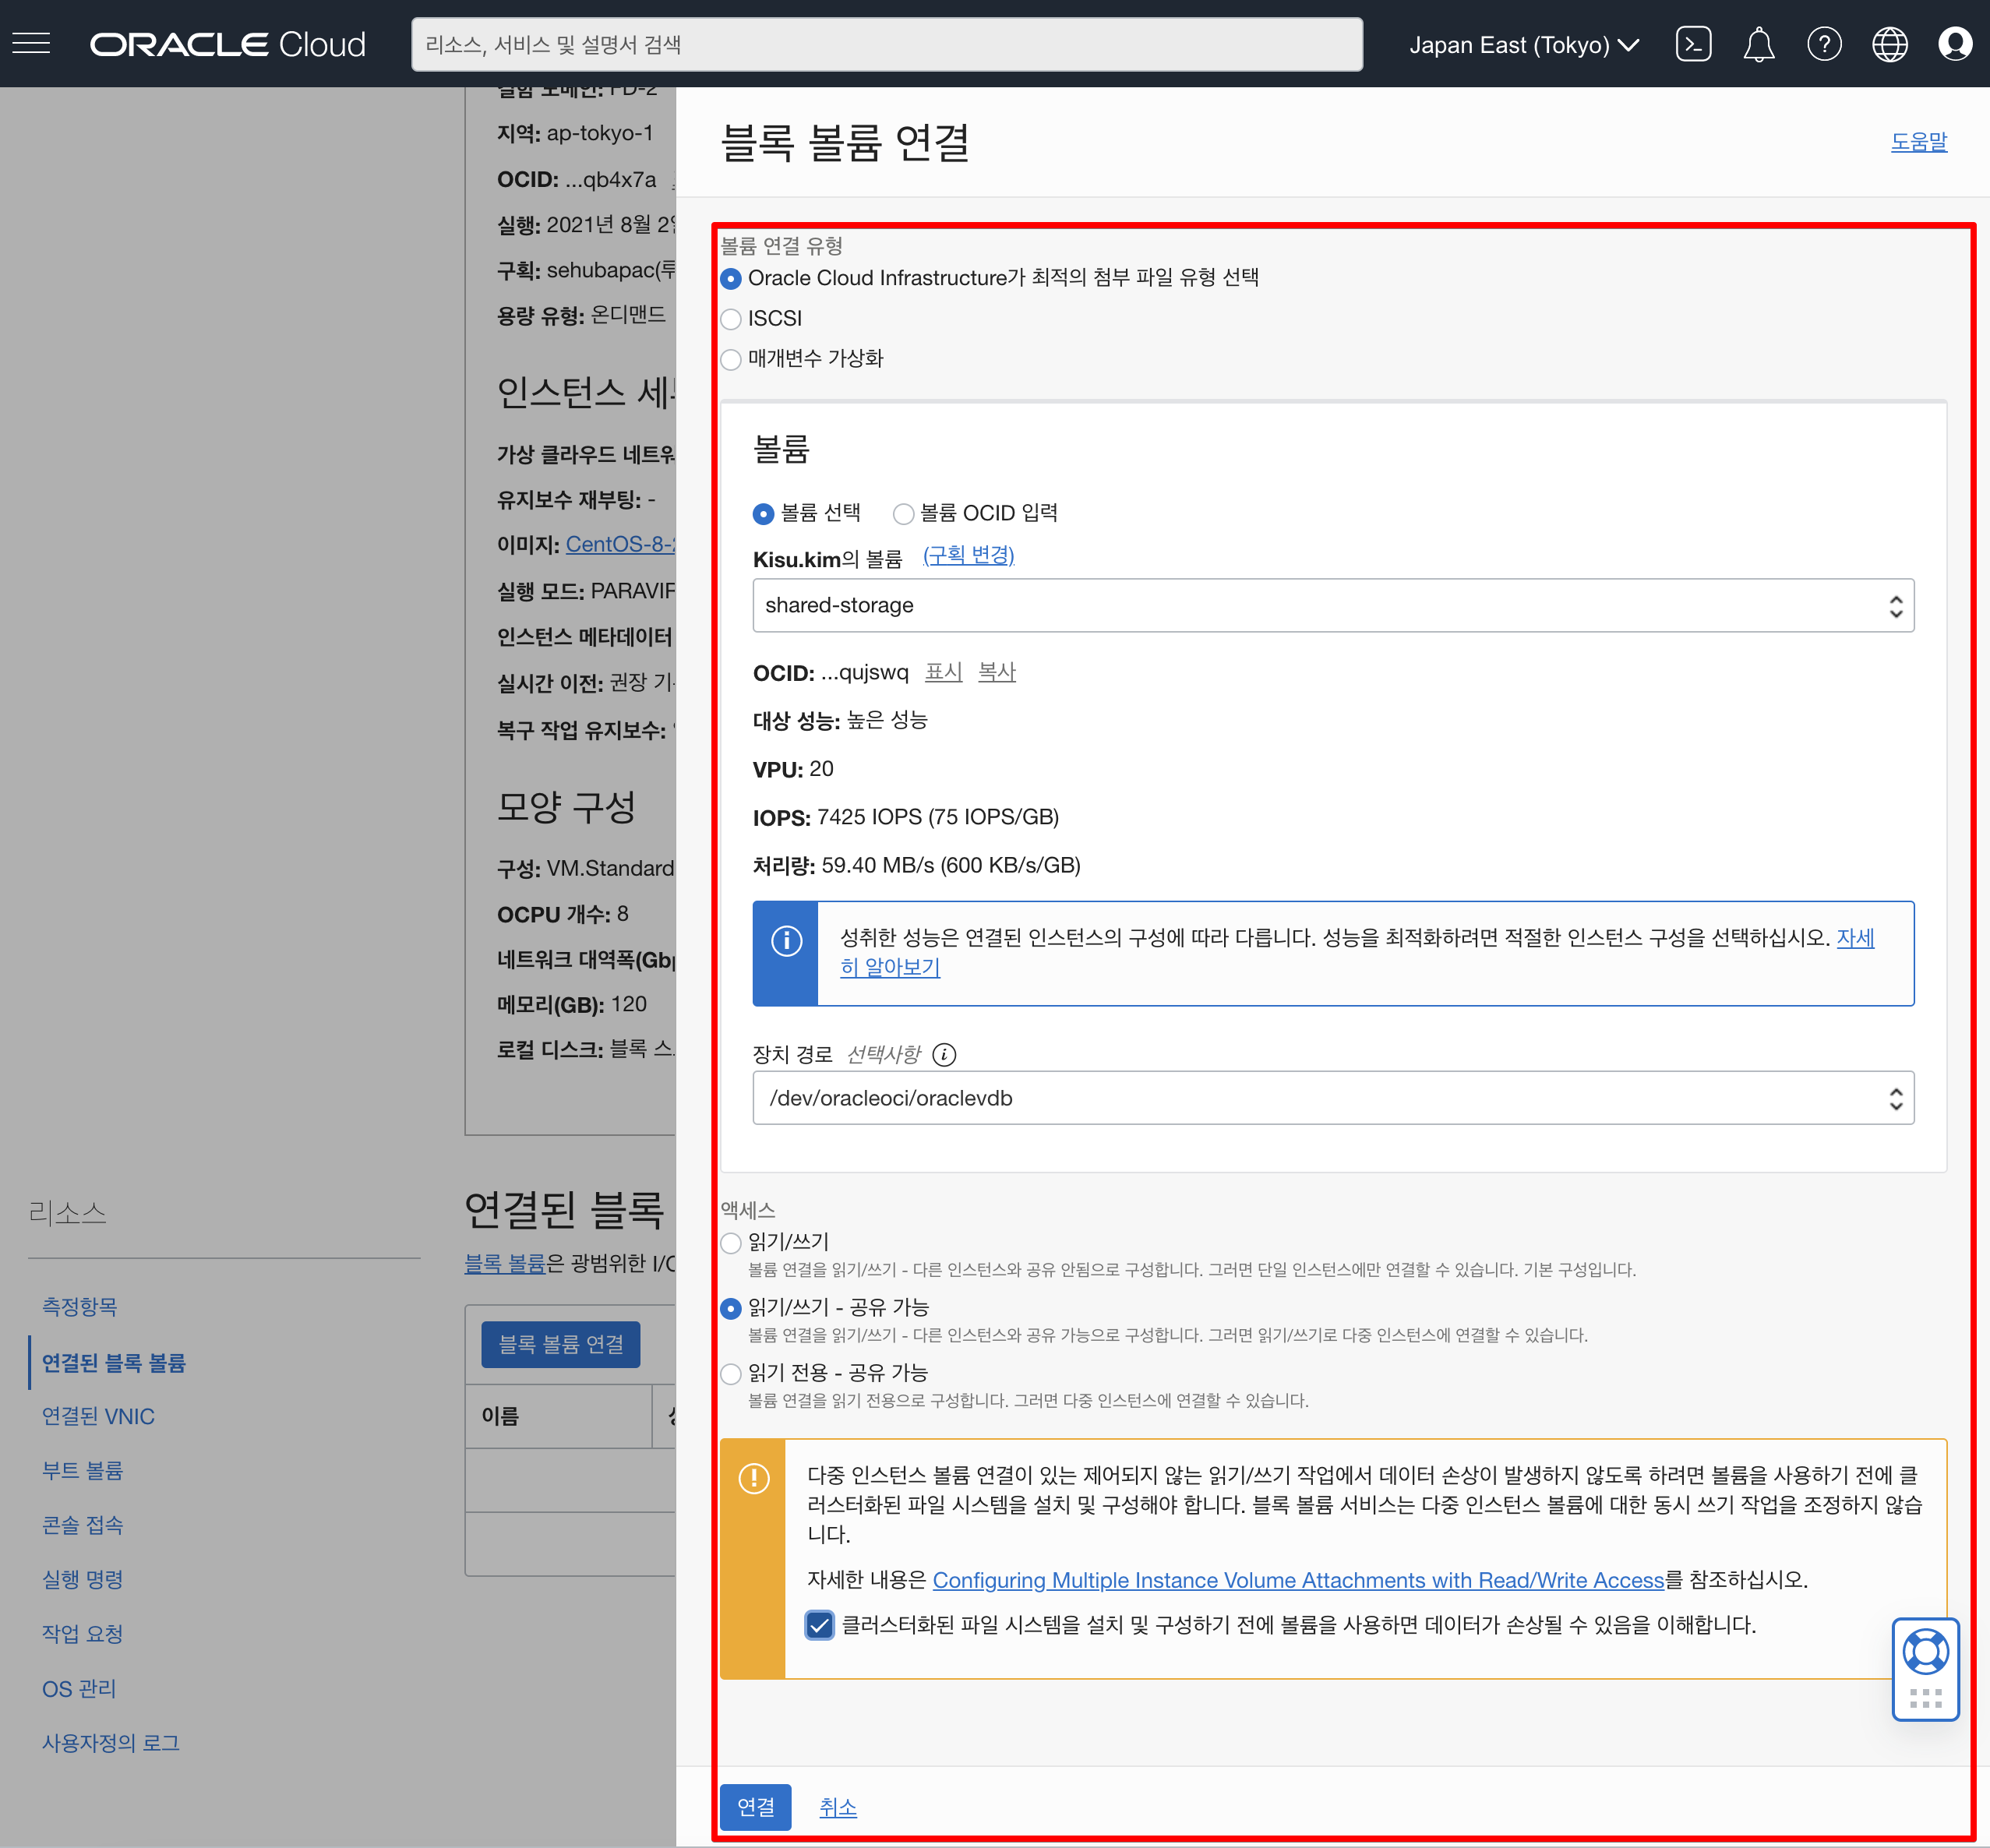
OCFS2 cluster nodes and open ports 7777 and 3260 in the security list for the virtual cloud network (VCN).


sudo firewall-cmd --zone=public --permanent --add-port=7777/tcp
sudo firewall-cmd --zone=public --permanent --add-port=3260/tcp
sudo firewall-cmd --complete-reload


sudo yum install ocfs2-tools-devel ocfs2-tools -y
sudo o2cb add-cluster ociocfs2


sudo o2cb add-node ociocfs2 hostname --ip 172.X.X.X
sudo o2cb add-node ociocfs2 hostname --ip 172.X.X.X


$ sudo cat /etc/ocfs2/cluster.conf
cluster:
        heartbeat_mode = local
        node_count = 2
        name = ociocfs2

node:
        number = 0
        cluster = ociocfs2
        ip_port = 7777
        ip_address = 172.0.0.41
        name = hostname

node:
        number = 1
        cluster = ociocfs2
        ip_port = 7777
        ip_address = 172.0.0.42
        name = hostname


$ sudo /sbin/o2cb.init configure
Configuring the O2CB driver.

This will configure the on-boot properties of the O2CB driver.
The following questions will determine whether the driver is loaded on
boot. The current values will be shown in brackets ('[]'). Hitting
<ENTER> without typing an answer will keep that current value. Ctrl-C
will abort.

Load O2CB driver on boot (y/n) [y]:
Cluster stack backing O2CB [o2cb]:
Cluster to start on boot (Enter "none" to clear) [ocfs2]: ociocfs2
Specify heartbeat dead threshold (>=7) [31]:
Specify network idle timeout in ms (>=5000) [30000]:
Specify network keepalive delay in ms (>=1000) [2000]:
Specify network reconnect delay in ms (>=2000) [2000]:
Writing O2CB configuration: OK
checking debugfs...
Setting cluster stack "o2cb": OK
Registering O2CB cluster "ociocfs2": OK
Setting O2CB cluster timeouts : OK
Starting global heartbeat for cluster "ociocfs2": OK
To verify the settings for the cluster stack, run the /sbin/o2cb.init status command:

$ sudo /sbin/o2cb.init status
Driver for "configfs": Loaded
Filesystem "configfs": Mounted
Stack glue driver: Loaded
Stack plugin "o2cb": Loaded
Driver for "ocfs2_dlmfs": Loaded
Filesystem "ocfs2_dlmfs": Mounted
Checking O2CB cluster "ociocfs2": Online
  Heartbeat dead threshold: 31
  Network idle timeout: 30000
  Network keepalive delay: 2000
  Network reconnect delay: 2000
  Heartbeat mode: Local
Checking O2CB heartbeat: Active
Debug file system at /sys/kernel/debug: mounted
In this example, the cluster is online and is using local heartbeat mode. If no volumes have been configured, the O2CB heartbeat is shown as Not Active rather than Active.

Configure the o2cb and ocfs2 services so that they start at boot time after networking is enabled:

$ sudo systemctl enable o2cb
$ sudo systemctl enable ocfs2
These settings allow the node to mount OCFS2 volumes automatically when the system starts.


1. On each node, enter the following commands to set the recommended values for panic and panic_on_oops:

$ sudo sysctl kernel.panic=30
$ sudo sysctl kernel.panic_on_oops=1
To make the change persist across reboots, add the following entries to the /etc/sysctl.conf file:

# Define panic and panic_on_oops for cluster operation
kernel.panic=30
kernel.panic_on_oops=1


Creating the OCFS2 Volumes
Use the mkfs.ocfs2 command to create an OCFS2 volume on a device.

$ sudo mkfs.ocfs2 -L "ocfs2" /dev/sdb
mkfs.ocfs2 1.8.6
Cluster stack: classic o2cb
Label: ocfs2
Features: sparse extended-slotmap backup-super unwritten inline-data strict-journal-super xattr indexed-dirs refcount discontig-bg
Block size: 4096 (12 bits)
Cluster size: 4096 (12 bits)
Volume size: 12455405158400 (3040870400 clusters) (3040870400 blocks)
Cluster groups: 94274 (tail covers 512 clusters, rest cover 32256 clusters)
Extent allocator size: 780140544 (186 groups)
Journal size: 268435456
Node slots: 16
Creating bitmaps: done
Initializing superblock: done
Writing system files: done
Writing superblock: done
Writing backup superblock: 6 block(s)
Formatting Journals: done
Growing extent allocator: done
Formatting slot map: done
Formatting quota files: done
Writing lost+found: done
mkfs.ocfs2 successful
Mounting the OCFS2 Volumes
As shown in the following example, specify the _netdev option in /etc/fstab to allow the system to mount the OCFS2 volume at boot time after networking is started, and to unmount the file system before networking is stopped.

$ sudo mkdir /ocfs2
$ sudo vi /etc/fstab
#include the below line to mount your ocfs2 after a restart
/dev/sdb /ocfs2 ocfs2     _netdev,defaults   0 0
Run mount -a to mount the OCFS2 partition based on the fstab entry.

Congratulations! The cluster file system is mounted on /ocfs2 on both the Oracle Linux 7.x node1 and node2 servers.
영상을 아래 영상은 정상적으로 configuration 설정된 부분에 대해서 영상입니다.
이 글은 개인적으로 얻은 지식과 경험을 작성한 글로 내용에 오류가 있을 수 있습니다. 또한 글 속의 의견은 개인적인 의견으로 특정 회사를 대변하지 않습니다.
Kisu Kim INFRASTRUCTURE
oci blockvoume