CloudNative
GitOps: OKE, OCIR, GitHub, Git Actions, ArgoCD
Table of Contents
GitOps란
여기서 다루는 ArgoCD를 흔히 GitOps의 구현체라 부릅니다. 그럼 먼저 GitOps가 무엇인지 간략히 살펴보겠습니다. GitOps는 2017년 위브웍스(Weaveworks Inc.)에서 처음 사용한 용어로 프로젝트에 데브옵스를 적용하는 실천 방법으로 정의합니다. 일반적으로 Cloud Native 애플리케이션을 대상(일반적으로 쿠버네티스 환경)으로 한 지속적 배포(Continuous Deployment)에 초점을 두고 있습니다.

GitOps의 핵심 개념들
- 선언형 모델(Declarative Model)
- 일반적으로 익숙한 방식인 명령형 모델(Imperative model)은 배포 환경을 위해 제공되는 다양한 명령어를 기반으로 단계적으로 실행하는 방식으로 모든 배포 과정을 작성합니다. 명령 순서나 내용에 대한 관리를 해줘야 하며, 다양한 예외 상황을 관리해야 합니다. 반면에 선언형 모델(Declarative Model)은 인프라를 포함해서 애플리케이션의 배포 및 운영과 관련된 모든 것을 선언적 코드형태로 관리하고 운영 환경간의 상태 차이가 없도록 동기화하여 유지하는 방식으로 복잡하게 순서를 정의할 필요 없으며, 상대적으로 예외 상황 관리가 용이합니다. Kubernetes와 같이 Manifest(Kubernetes YAML)로 작성한 선언적 코드를 운영환경과 동기화하는 방식이 대표적인 경우라 볼 수 있습니다.
- 단일 진실 공급원(Single Source Of Truth, SSOT)
- GitOps에서는 코드 저장소(Git)를 단일 진실 공급원으로 만들고 배포에 관한 모든 사실을 코드 저장소에서 관리하도록 합니다. 이를 통해서 데이터에 대한 중복과 비정합성을 제거할 수 있습니다.
GitOps 구현 전략
- Git 저장소는 애플리케이션 저장소와 배포 환경에 대한 Manifest 저장소(Config 저장소)로 구분합니다.
- Push 방식과 Pull 방식의 두 가지 배포 방식중에서 선택
- Push 유형: 저장소의 Manifest가 변경되었을 때 배포 파이프라인을 실행 (Jenkins, CircleCI 등)
- Pull 유형: 저장소의 Manifest와 배포환경을 지속적으로 비교하다가 차이가 발생할 경우 저장소의 Manifest 기준으로 배포환경 유지 (ArgoCD, JenkinsX, Flux 등)
- Push 혹은 Pull 모두 상관 없으나 GitOps는 보안상의 이유로 풀 타입 배포 전략을 권장합니다. Pull방식의 경우 자격 증명을 운영환경 외부 도구에 공개하지 않고 배포할 수 있는 보안상 이점이 있습니다.
Github Actions와 ArgoCD를 활용한 GitOps 프로세스
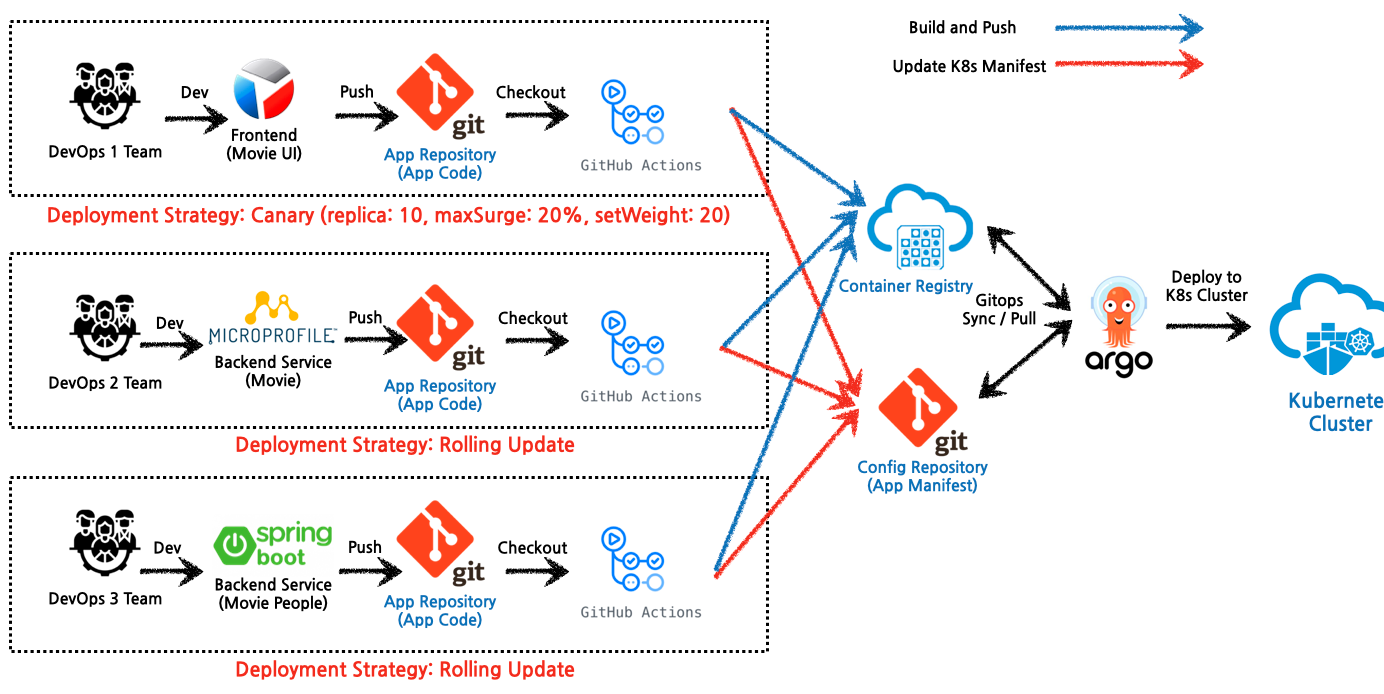
다음 그림은 GitHub Actions, ArgoCD, OKE, OCIR을 이용해서 GitOps를 구현하는 그림입니다. 
각 단계를 간단히 설명하면,
- 소스 코드를 GitHub의 Application Code를 위한 저장소에 Push합니다.
- GitHub Actions에서 Checkout을 통해 소스코드를 가져옵니다.
- GitHub Actions에서 빌드,테스트 및 이미지를 생성하여 OCIR(Oracle Cloud Infrastructure Registry)로 푸시합니다.
- Push가 완료되면 GitHub의 Config 저장소에 있는 Manifest를 업데이트 합니다 (태그 변경등)
- GitHub Config 저장소와 동기화 되어 있는 ArgoCD가 변경된 정보를 Pull합니다. (기본 3분단위로 git과 현재상태를 비교)
- ArgoCD는 변경된 정보를 통해서 OKE(Oracle Kubernetes Engine)에 애플리케이션을 배포합니다.
GitOps 적용 실습
다음과 같이 3개의 애플리케이션 (Frontend 1개, Backend 2개)이 있다고 가정하고, 해당 애플리케이션을 GitHub Actions와 ArgoCD를 사용하여 OKE에 배포해 보도록 합니다. Frontend는 Node.js 기반 애플리케이션이며, Backend1은 Microfropile, Backend2는 SpringBoot로 작성되어 있습니다. 배포 전략은 Frontend의 경우 Canary 배포 전략을 적용하여 테스트 해보도록 합니다.
실습 애플리케이션
애플리케이션은 다음과 같이 Frontend UI와 영화 정보를 가져오는 백엔드1, 영화인 정보를 가져오는 백엔드2로 구분하였습니다. 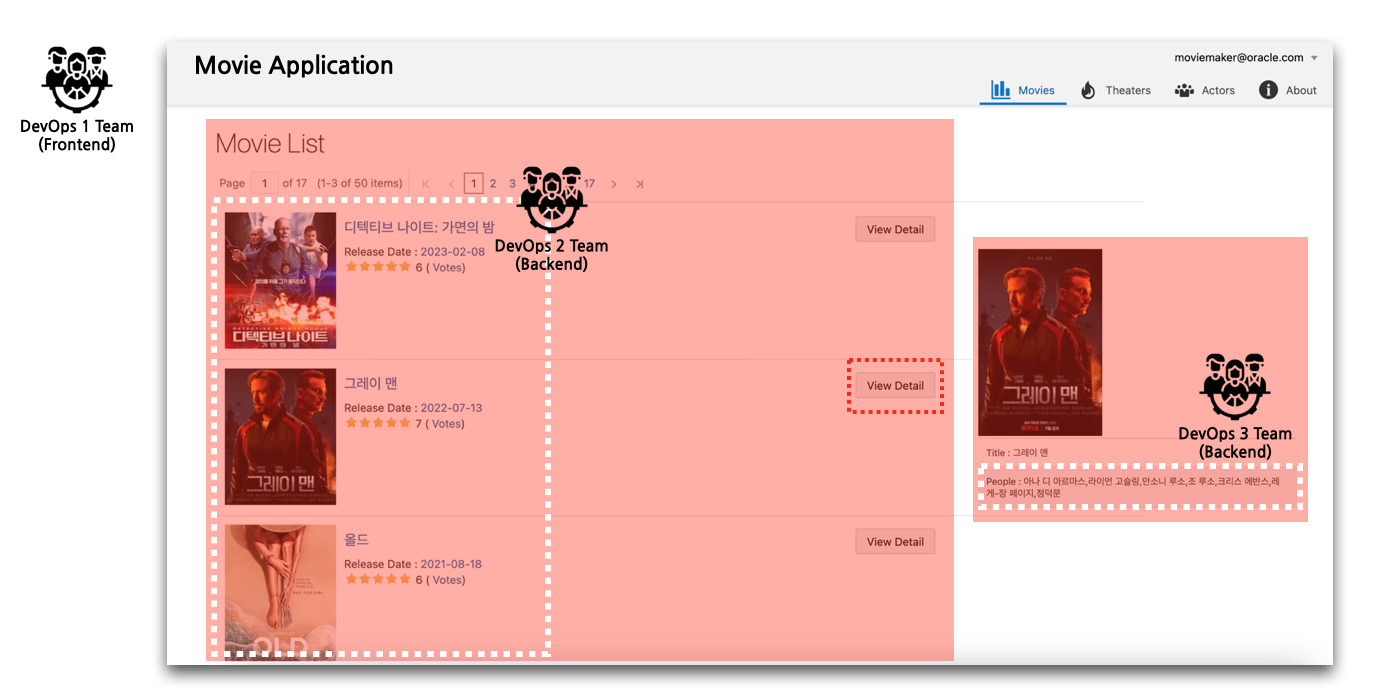
GitHub 저장소 및 소스 준비
준비된 저장소는 각 팀에서 관리하는 App 저장소와 공통으로 관리하는 Config 저장소로 구분하였습니다. 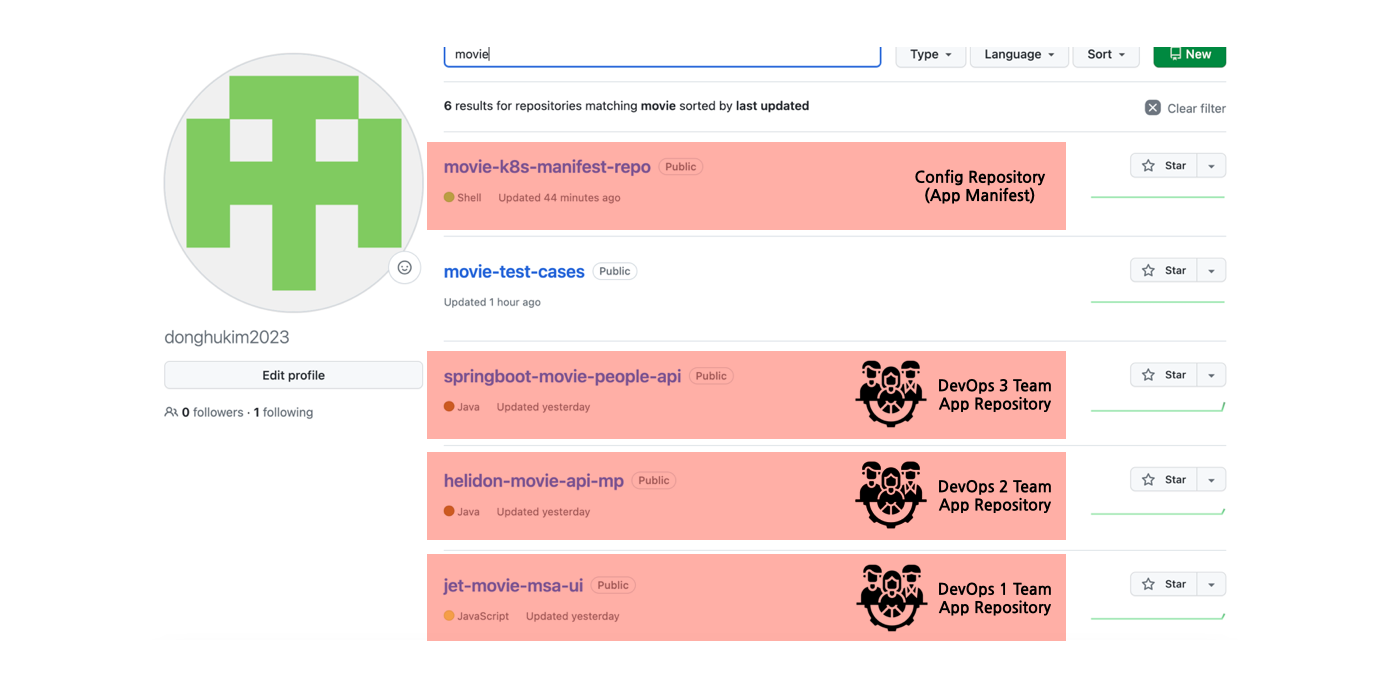
소스는 다음 저장소에서 클론하여 가져옵니다.
$ git clone https://github.com/donghukim2023/jet-movie-msa-ui.git
$ git clone https://github.com/donghukim2023/helidon-movie-api-mp.git
$ git clone https://github.com/donghukim2023/springboot-movie-people-api.git
소스는 아래 GitHub 저장소를 참고하세요.
사전 준비사항
실습을 위해서는 다음과 같이 Oracle Cloud Infrastructure(OCI) 환경과 OKE Cluster를 준비하여야 합니다. 아래 블로그 포스트를 참고합니다.
- OCI 무료 계정 생성 및 관리하기
- OCI Container Engine for Kubernetes (OKE) Cluster를 Quick Create(빠르게 생성) 기능을 활용하여 빠르게 구성하기
- OCI Container Engine for Kubernetes (OKE) Cluster 접속 방법
ArgoCD 설치
OKE Cluster가 준비되면 우선 ArgoCD를 설치합니다.
- Namespace 생성
$ kubectl create namespace argocd - ArgoCD 배포
$ kubectl apply -n argocd -f https://raw.githubusercontent.com/argoproj/argo-cd/stable/manifests/install.yaml - 앞에서 언급한 것처럼 jet-movie-msa-ui는 Canary배포를 할 예정입니다. 이를 위해서는 ArgoCD의 Rollout을 설치해야 합니다.
$ kubectl create namespace argo-rollouts$ kubectl apply -n argo-rollouts -f https://github.com/argoproj/argo-rollouts/releases/latest/download/install.yaml - ArgoCD는 default로 서버를 외부로 노출하지 않습니다. 따라서 아래와 같이 Service Type을 LoadBalancer로 변경하여 외부에서 접속할 수 있도록 해줍니다.
$ kubectl patch svc argocd-server -n argocd -p '{"spec": {"type": "LoadBalancer"}}' - 처음 admin 계정의 패스워드를 K8s Secret으로 저장해 놓는데, 다음 명령어로 패스워드를 얻을 수 있습니다.
$ kubectl -n argocd get secret argocd-initial-admin-secret -o jsonpath="{.data.password}" | base64 -d; echo - 이제 접속할 EXTERNAL-IP를 확인합니다.
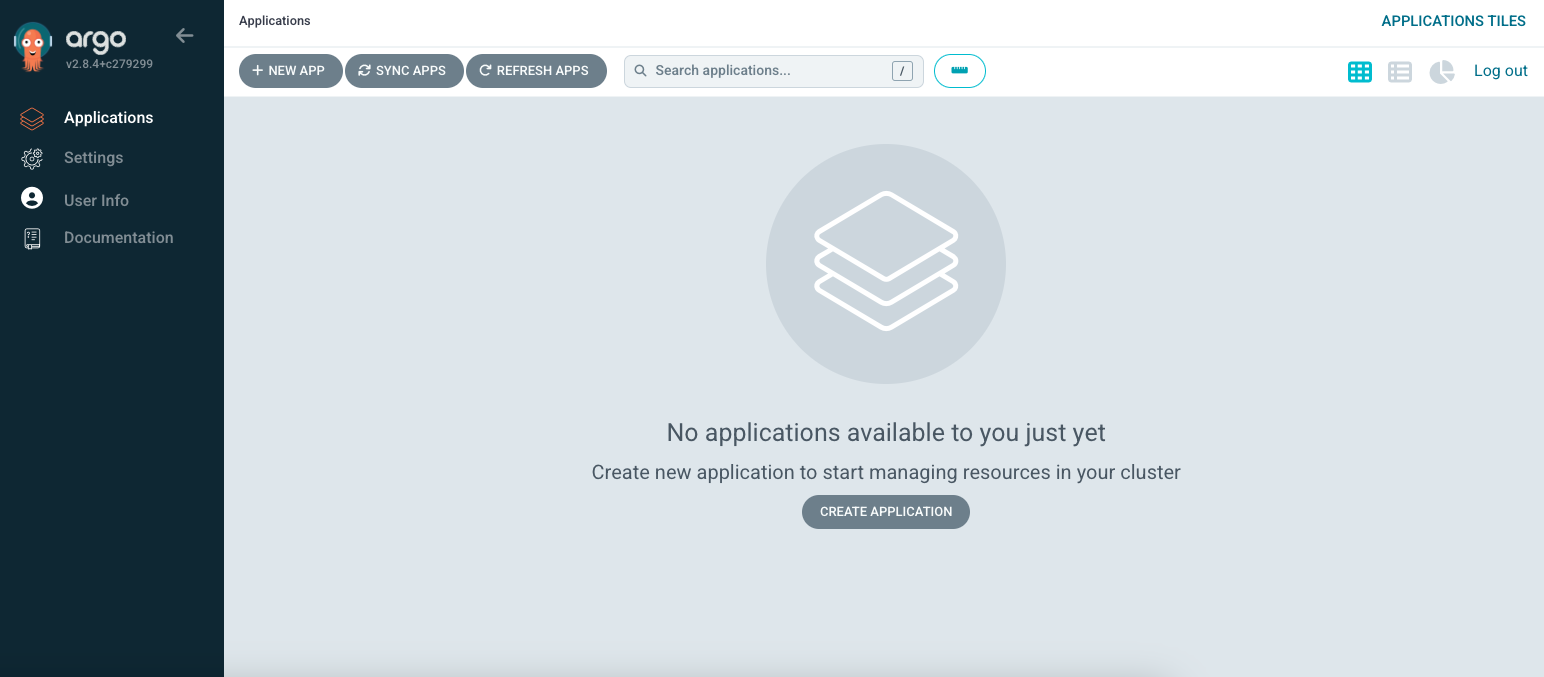
$ kubectl get svc argocd-server -n argocd - 정상적으로 로그인하면 다음과 같은 화면을 볼 수 있습니다.
OCIR 저장소 생성
OCI에서 제공하는 Private Container Registry인 OCIR에 3개의 저장소를 생성하고, 접속을 위한 토큰을 생성합니다.
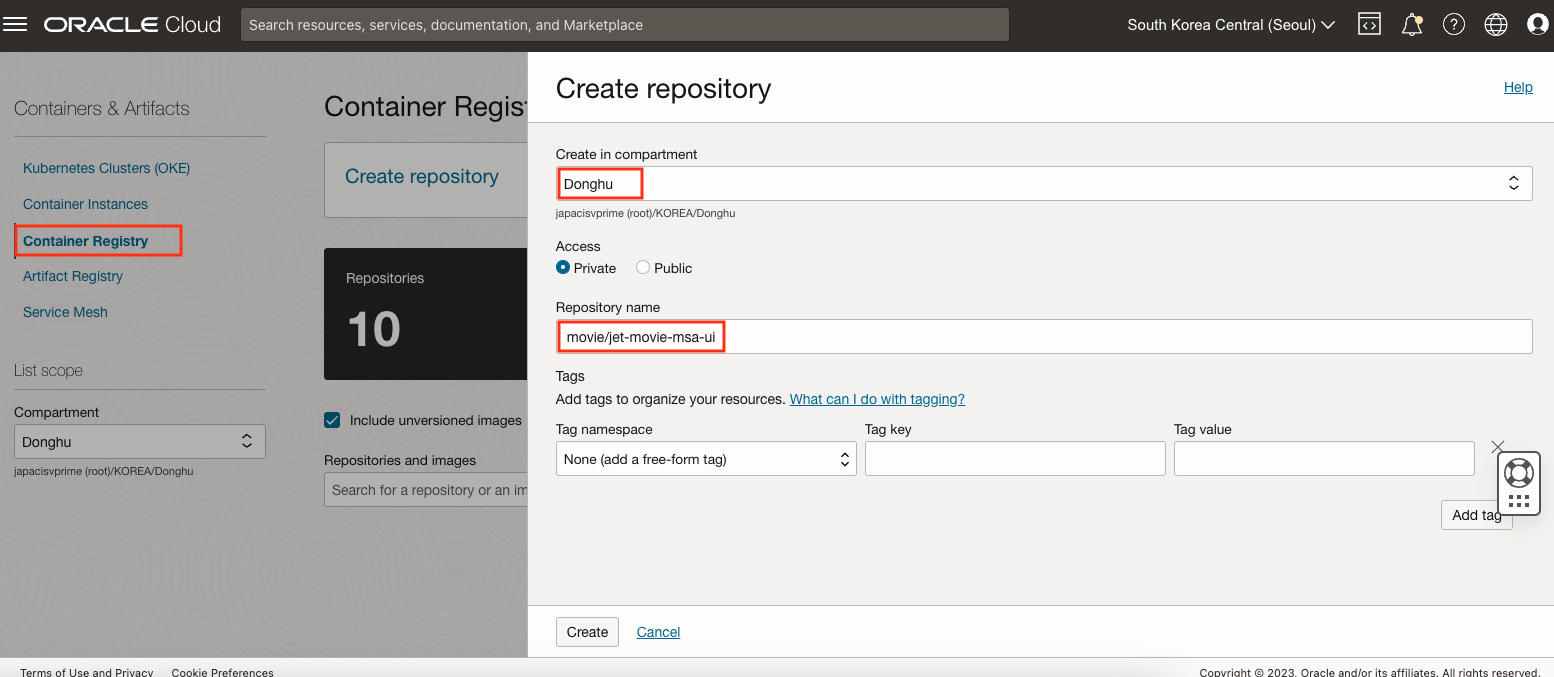
- 먼저 메뉴 > Developer Services> Container Registry로 이동한 후 Create Repository를 클릭하여 다음과 같이 저장소를 생성합니다.
- Create in compartment: 저장소를 생성할 구획 선택
- Access: Private
- Repository name: movie/jet-movie-msa-ui
동일하게 다음과 같이 추가로 두 개의 Repository를 생성합니다.
- movie/helidon-movie-api-mp
- movie/springboot-movie-people-api
OCIR 토큰 생성
OCI Console 오른쪽 상단의 Profile아이콘을 클릭한 후 My profile을 선택합니다. 왼쪽 메뉴에서 Auth tokens를 클릭한 후 Generate token을 클릭합니다. 다음과 같이 입력합니다.
- Description: ocir_token
- 생성된 토큰값은 창을 닫으면 다시 얻을 수 없습니다. 메모한 후 창을 닫습니다.
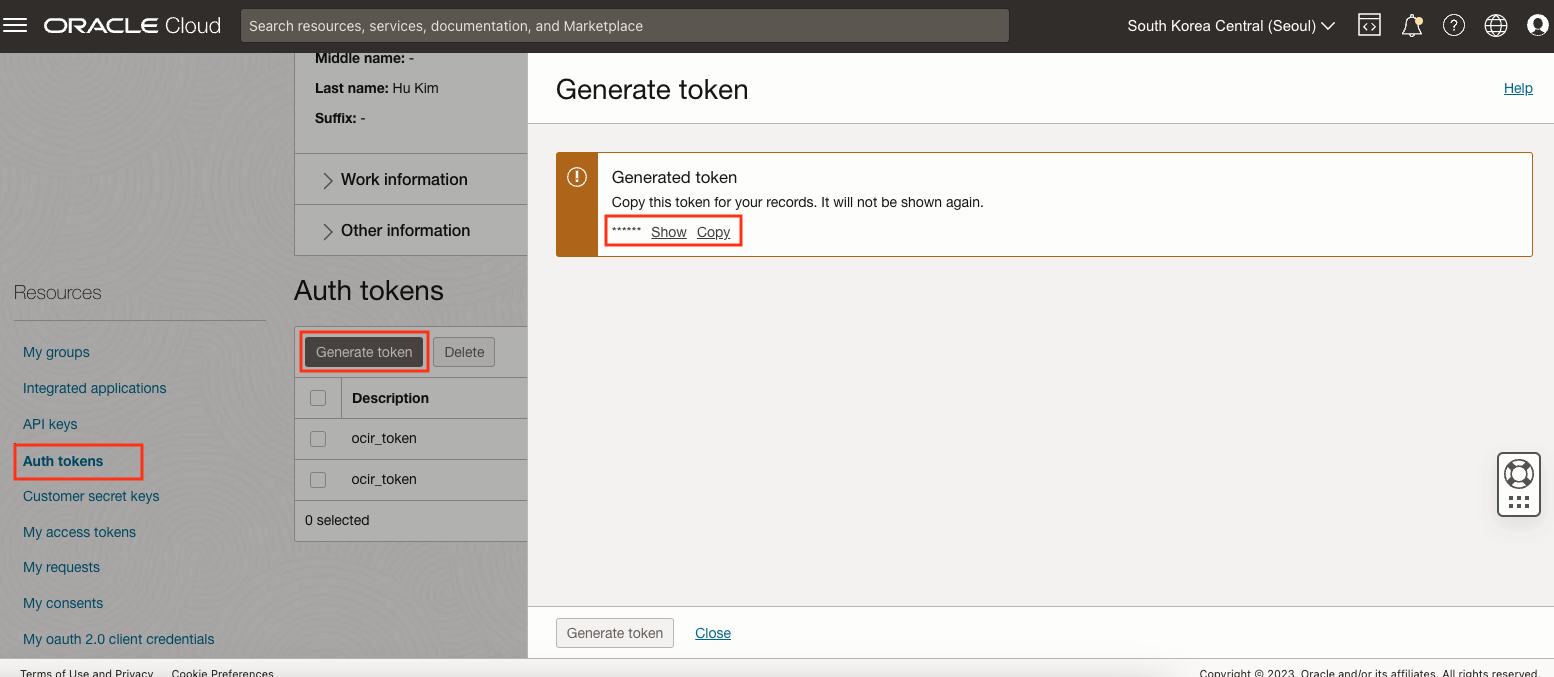
- 생성된 토큰값은 창을 닫으면 다시 얻을 수 없습니다. 메모한 후 창을 닫습니다.
OCIR 로그인 테스트 (선택)
이제 로컬에서 OCIR 접속 테스트를 해볼 수 있습니다. 로컬에 컨테이너 엔진(Docker)를 설치한 후 다음과 같은 명령어로 접속을 해볼 수 있습니다.
- docker login {region-identifier or region-key}.ocir.io
- region-identifier 혹은 region-key는 Regions and Availability Domains에서 확인할 수 있습니다.
- 로그인 시 region-identifier 혹은 region-key 둘 중 하나를 사용할 수 있지만, Kubernetes Manifest에 이미지 경로에 사용하는 OCIR주소와 Kubernetes Secret에 사용하는 OCIR 주소는 같아야 하므로, 가급적이면 하나로 통일해서 사용하는 것이 좋습니다. 여기서는 region-key를 사용합니다.
- Username: {Object storage namespace}/{OCI계정}
- Object storage namespace 정보는 오른쪽 상단의 Profile아이콘을 클릭한 후 Tenancy:{테넌시명} 클릭하면 확인할 수 있습니다. OCI계정은 OCI로그인할 때 사용한 Username입니다.
- 예시: abcdedfhijklmn/username@mail.com
- Object storage namespace 정보는 오른쪽 상단의 Profile아이콘을 클릭한 후 Tenancy:{테넌시명} 클릭하면 확인할 수 있습니다. OCI계정은 OCI로그인할 때 사용한 Username입니다.
- Password: My profile에서 생성한 ocir_token 값
GitHub Actions 설정
먼저 helidon-movie-api-mp 저장소로 이동한 후 Actions 탭에서 다음과 같이 Workflow를 추가합니다.
name: build movie service

on:
  push:
    branches: [ "main" ]
  pull_request:
    branches: [ "main" ]

jobs:
  build:
    runs-on: ubuntu-latest
    env:
      OCI_CLI_USER: $
      OCI_CLI_TENANCY: $
      OCI_CLI_FINGERPRINT: $
      OCI_CLI_KEY_CONTENT: $
      OCI_CLI_REGION: $
    steps:
      - name: Checkout Code
        uses: actions/checkout@v4
      - name: Log into OCIR
        uses: oracle-actions/login-ocir@v1.2.1
        id: login-ocir
        with:
          auth_token: $
      - name: docker build
        id: docker-build
        run: |
          docker build . -t icn.ocir.io/axlpeslmb1ng/movie/helidon-movie-api-mp:$${{ github.sha }}
      - name: docker push
        id: docker-push
        run: |
          docker push icn.ocir.io/axlpeslmb1ng/movie/helidon-movie-api-mp:${{ github.sha }}
      - name: Checkout K8s Manifest
        uses: actions/checkout@v4
        with:
          repository: donghukim2023/movie-k8s-manifest-repo
          path: .
          token: $
      - name: Change config repo manifest
        uses: mikefarah/yq@master
        with:
          cmd: yq -i '.spec.template.spec.containers.[0].image = "icn.ocir.io/axlpeslmb1ng/movie/helidon-movie-api-mp:${{ github.sha }}"' kube-helidon-movie-api-mp-deployment.yml
      - name: Pushes to config repository
        run: |
          git add .
          git config --global user.email "dan.donghu.kim@gmail.com"
          git config --global user.name "donghukim2023"
          git commit -am "..Change Image version to ${{ github.sha }} "
          git push
총 5개의 Secret 환경 변수(env)에 해당하는 값은 OCICLI 도구 설정하기에서 얻는 방법을 확인할 수 있습니다. 해당 값을 helidon-movie-api-mp 저장소의 Settings > Secrets and variables > Actions 에서 등록합니다.
이외 OCI_AUTH_TOKEN과 GIT_REPOPAT을 Secret 변수로 등록합니다. OCI_AUTH_TOKEN 값은 앞서 My profile에서 생성한 ocir_token 값입니다. GIT_REPOPAT 값은 Git 저장소에 접근을 위한 토큰값으로, GitHub 우측 상단 Profile 이미지 클릭 > Settings > Developer Settings > Personal access tokens를 클릭한 후 Generate new token을 클릭하여 토큰을 생성할 수 있습니다. Workflow 권한을 주는 이유는 Container Registry에 Push가 완료된 후 다른 저장소(Config 저장소)를 업데이트 할 수 있어야 하기 때문입니다.
Personal access tokens(PAT) 획득 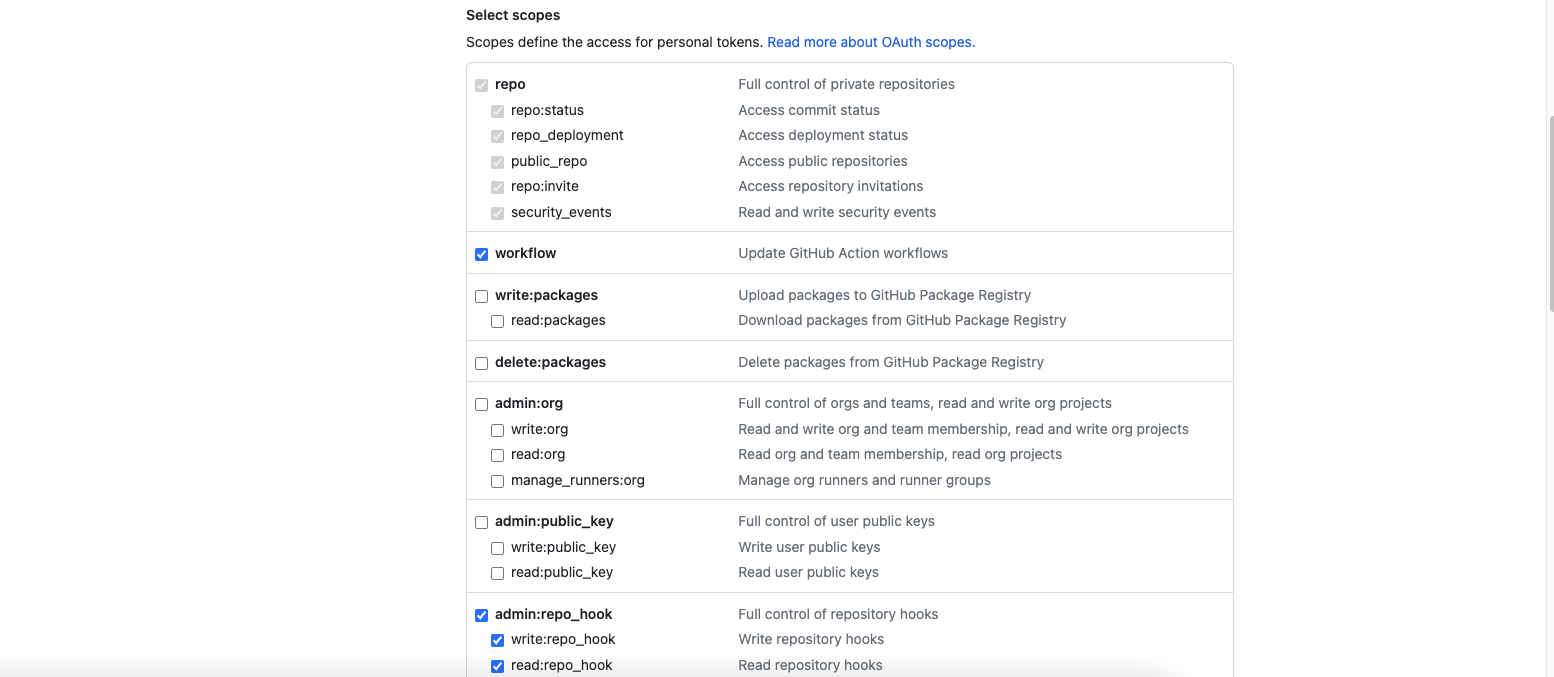
Actions Secret 값 등록 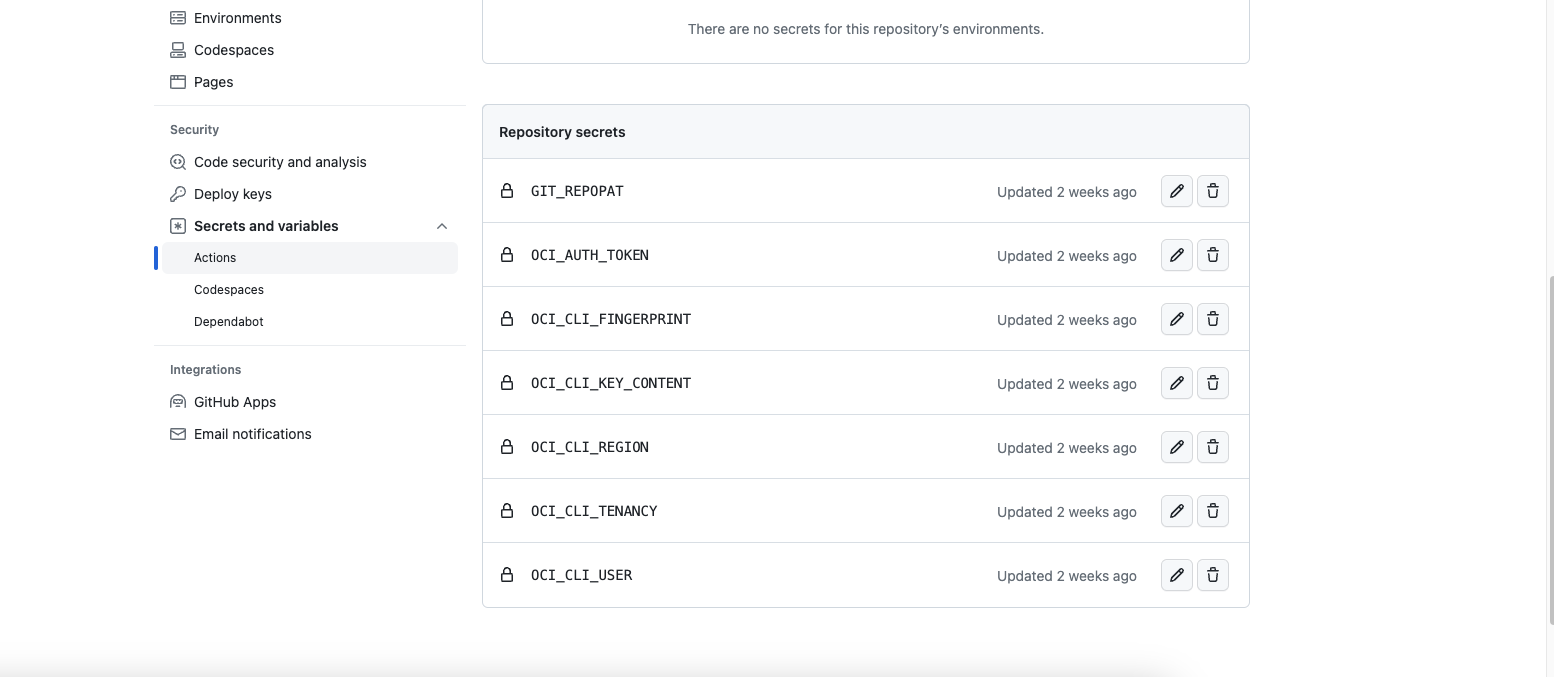
springboot-movie-people-api 저장소의 Actions에도 다음과 같이 Workflow를 생성합니다.
name: build movie people app

on:
  push:
    branches: [ "main" ]
  pull_request:
    branches: [ "main" ]

jobs:
  build:
    runs-on: ubuntu-latest
    env:
      OCI_CLI_USER: $
      OCI_CLI_TENANCY: $
      OCI_CLI_FINGERPRINT: $
      OCI_CLI_KEY_CONTENT: $
      OCI_CLI_REGION: $
    steps:
      - name: Checkout Code
        uses: actions/checkout@v4
      - name: Log into OCIR
        uses: oracle-actions/login-ocir@v1.2.1
        id: login-ocir
        with:
          auth_token: $
      - name: docker build
        id: docker-build
        run: |
          docker build . -t icn.ocir.io/axlpeslmb1ng/movie/springboot-movie-people-api:${{ github.sha }}
      - name: docker push
        id: docker-push
        run: |
          docker push icn.ocir.io/axlpeslmb1ng/movie/springboot-movie-people-api:${{ github.sha }}
      - name: Checkout K8s Manifest
        uses: actions/checkout@v4
        with:
          repository: donghukim2023/movie-k8s-manifest-repo
          path: .
          token: $
      - name: Change config repo manifest
        uses: mikefarah/yq@master
        with:
          cmd: yq -i '.spec.template.spec.containers.[0].image = "icn.ocir.io/axlpeslmb1ng/movie/springboot-movie-people-api:${{ github.sha }}"' kube-springboot-movie-people-api-deployment.yml
      - name: Pushes to config repository
        run: |
          git add .
          git config --global user.email "dan.donghu.kim@gmail.com"
          git config --global user.name "donghukim2023"
          git commit -am "Change Image version to ${{ github.sha }}"
          git push
jet-movie-msa-ui 저장소의 Actions에도 다음과 같이 Workflow를 생성합니다.
name: build movie frontend app

on:
  push:
    branches: [ "main" ]
  pull_request:
    branches: [ "main" ]

jobs:
  build:
    runs-on: ubuntu-latest
    env:
      OCI_CLI_USER: $
      OCI_CLI_TENANCY: $
      OCI_CLI_FINGERPRINT: $
      OCI_CLI_KEY_CONTENT: $
      OCI_CLI_REGION: $
    steps:
      - name: Checkout Code
        uses: actions/checkout@v4
      - name: Log into OCIR
        uses: oracle-actions/login-ocir@v1.2.1
        id: login-ocir
        with:
          auth_token: $
      - name: docker build
        id: docker-build
        run: |
          docker build . -t icn.ocir.io/axlpeslmb1ng/movie/jet-movie-msa-ui:${{ github.sha }}
      - name: docker push
        id: docker-push
        run: |
          docker push icn.ocir.io/axlpeslmb1ng/movie/jet-movie-msa-ui:${{ github.sha }}
      - name: Checkout K8s Manifest
        uses: actions/checkout@v4
        with:
          repository: donghukim2023/movie-k8s-manifest-repo
          path: .
          token: $
      - name: Change config repo manifest
        uses: mikefarah/yq@master
        with:
          cmd: yq -i '.spec.template.spec.containers.[0].image = "icn.ocir.io/axlpeslmb1ng/movie/jet-movie-msa-ui:${{ github.sha }}"' kube-jet-movie-msa-ui-deployment.yml
      - name: Pushes to config repository
        run: |
          git add .
          git config --global user.email "dan.donghu.kim@gmail.com"
          git config --global user.name "donghukim2023"
          git commit -am "Change Image version to ${{ github.sha }}"
          git push
Secret 변수 설정은 다른 Repository(jet-movie-msa-ui, springboot-movie-people-api)에도 동일하게 설정합니다.
GitHub Actions Workflow 실행
먼저 helidon-movie-api-mp의 README 파일의 내용을 수정한 후 저장소에 Push합니다.
$ cd helidon-movie-api-mp
$ echo "# Run Git Actions - 1" >> README.md
$ git add .
$ git commit -n "Modified README.md"
$ git push -u origin main
springboot-movie-people-api와 jet-movie-msa-ui도 동일하게 README 파일의 내용을 수정한 후 저장소에 Push합니다. GitHub Actions에서 모든 단계가 정상적으로 실행되는지 확인합니다. 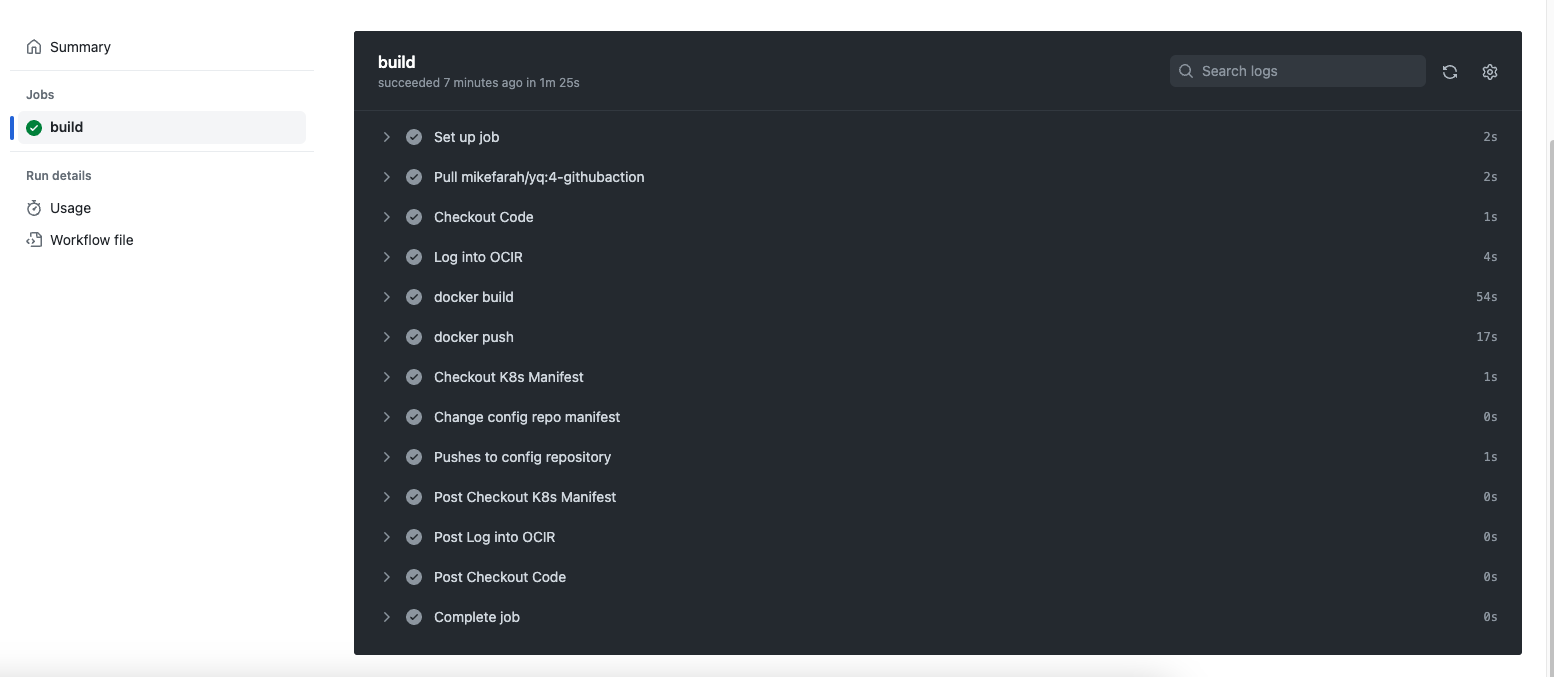
OCIR 이미지 확인 및 Config 저장소의 Manifest 파일 수정 확인
OCIR에 있는 각 저장소에 이미지가 정상적으로 올라간 것을 확인할 수 있습니다. 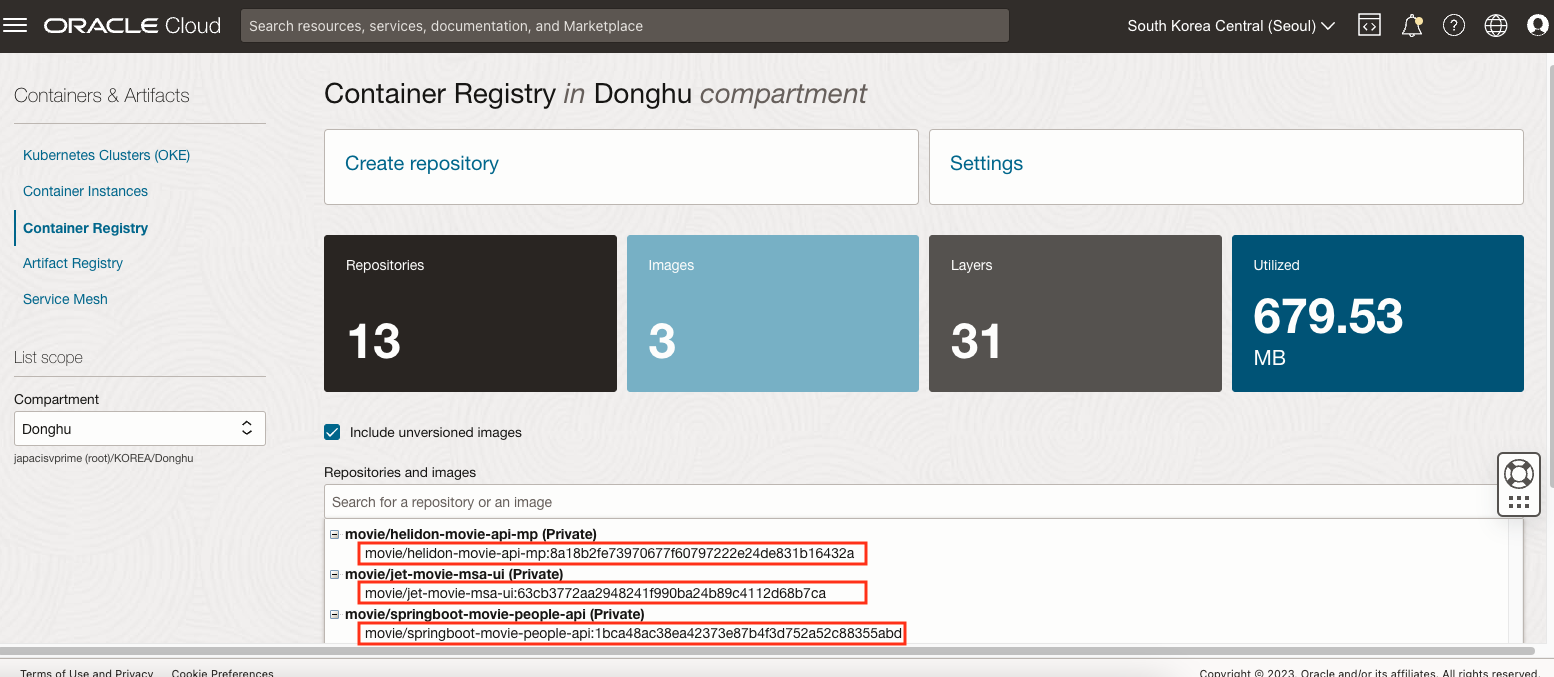
helidon-movie-api-mp이미지의 태그가 8a18b2fe73970677f60797222e24de831b16432a인 것을 확인할 수 있습니다. 이제 Config 저장소의 Manifest에도 반영되었는지 확인해보겠습니다. 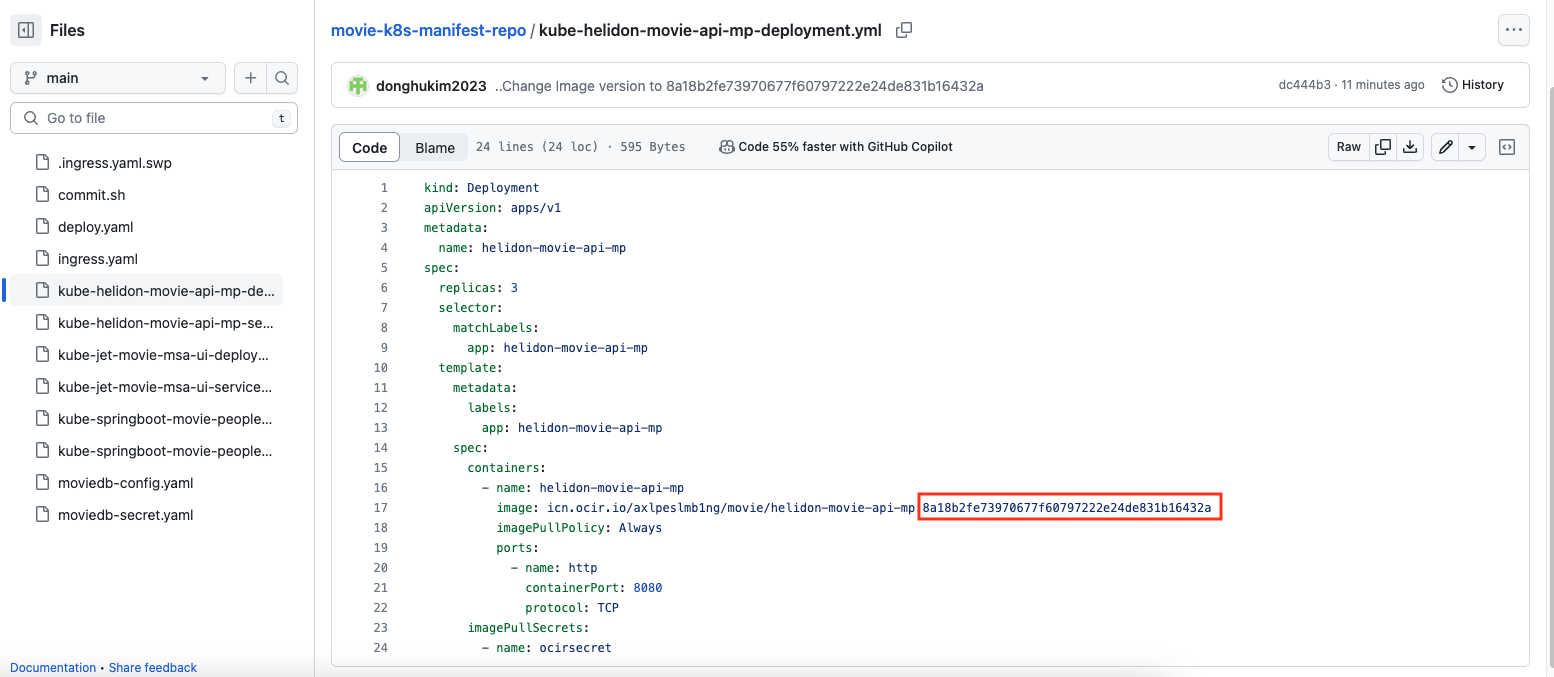
OKE Cluster에 애플리케이션 배포를 위한 Namespace와 OCIR 접근을 위한 Secret 생성
이제 ArgoCD를 통해서 Config 저장소에 있는 Manifest와 OKE Cluster를 동기화 해보겠습니다. 먼저 애플리케이션이 배포될 Namespace를 Cluster에 생성합니다.
$ kubectl create ns movie
kubectl 명령어로 위에서 생성한 Namespace에 작업을 할때마다 –namespace=movie 옵션을 붙여야 합니다. 아래와 같이 context에 미리 –namespace=movie을 설정하면, kubectl 명령어 실행할 때 자동으로 설정되므로, 매번 –namespace=movie 옵션을 붙이지 않아도 됩니다.
$ kubectl config set-context --current --namespace=movie
OKE Cluster에서 OCIR 접근을 위해 Secret을 다음과 같은 형태로 생성합니다.
$ kubectl create secret docker-registry ocirsecret --docker-server=icn.ocir.io --docker-username={Object Storage Namespace}/{OCI Username} --docker-password='{Auth Token}' --docker-email={이메일}
ArgoCD와 Config Repository 동기화
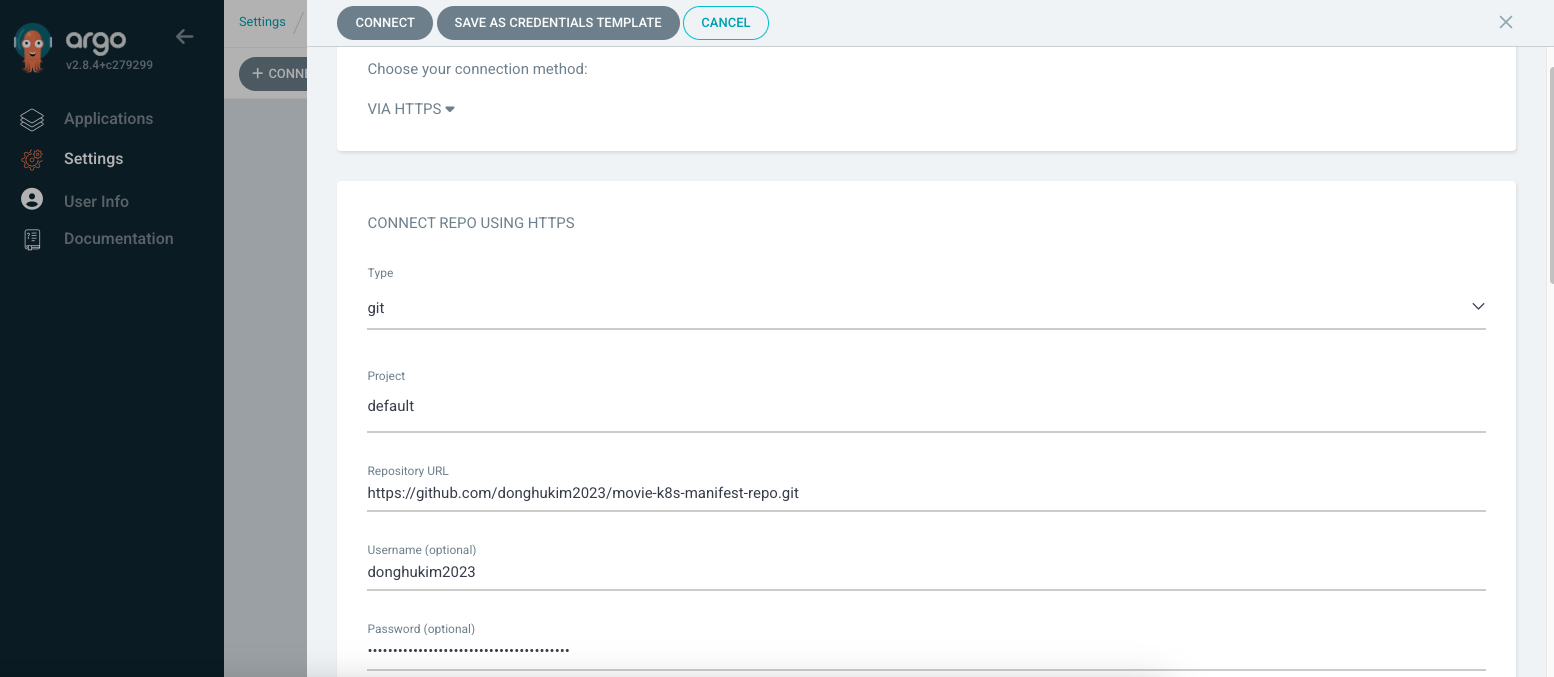
ArgoCD 첫 페이지에서 GitHub을 먼저 연결해보도록 하겠습니다. Settings > Repositories를 선택한 후 CONNECT REPO를 선택합니다. 다음과 같이 입력하고 등록합니다.
- Choose your connection method: VIA HTTPS (여기서는 HTTPS로 연결)
- Type: git
- Project: default
- Repository URL: Config 저장소 주소 (e.g. https://github.com/donghukim2023/movie-k8s-manifest-repo.git)
- Username (optional): GitHub 계정 (e.g. donghukim2023)
- Password (optional): Personal access token 값
이젠 Applications > NEW APP을 선택한 후 다음과 같이 입력한 후 생성합니다.
- Application Name: movie
- Project Name: default
- SYNC POLICY: Automatic
- Repository URL: Config 저장소 주소 (e.g. https://github.com/donghukim2023/movie-k8s-manifest-repo.git)
- Path: . (루트에 Manifest 파일 존재)
- Cluster URL: https://kubernetes.default.svc
- Namespace: movie
생성하면 동기화 작업을 수행하고 APP Health를 체크합니다. 아래와 같이 APP HEALTH는 Healthy, Sync Status는 Synced 상태가 되면 정상적으로 동기화 및 배치된 것입니다. 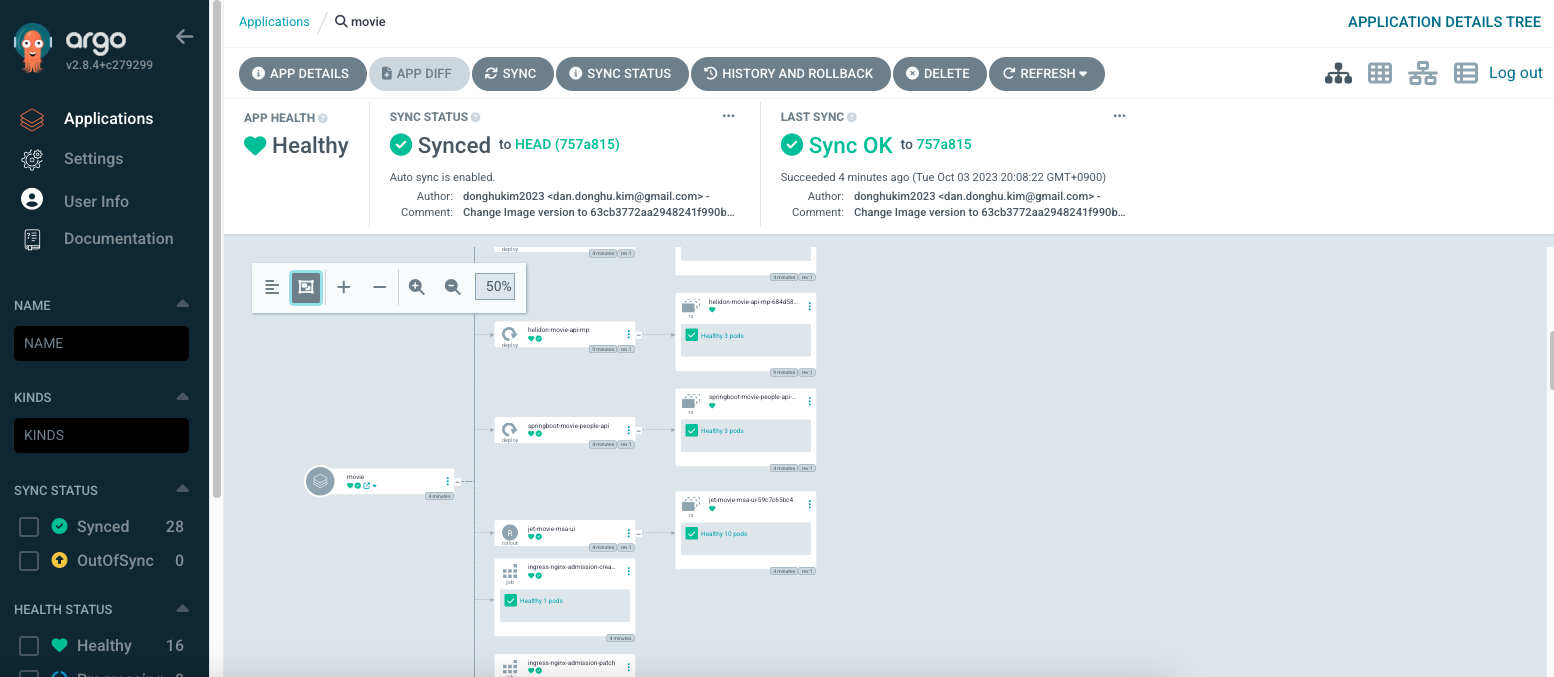
애플리케이션에 접속해보겠습니다. 다음 명령어로 Ingress Controller의 External IP를 확인합니다.
$ kubectl get svc -n ingress-nginx
브라우저에서 http://{EXTERNAL-IP}로 접속해보면 다음과 같은 화면을 볼 수 있습니다. 버전은 현재 1.0으로 확인됩니다. 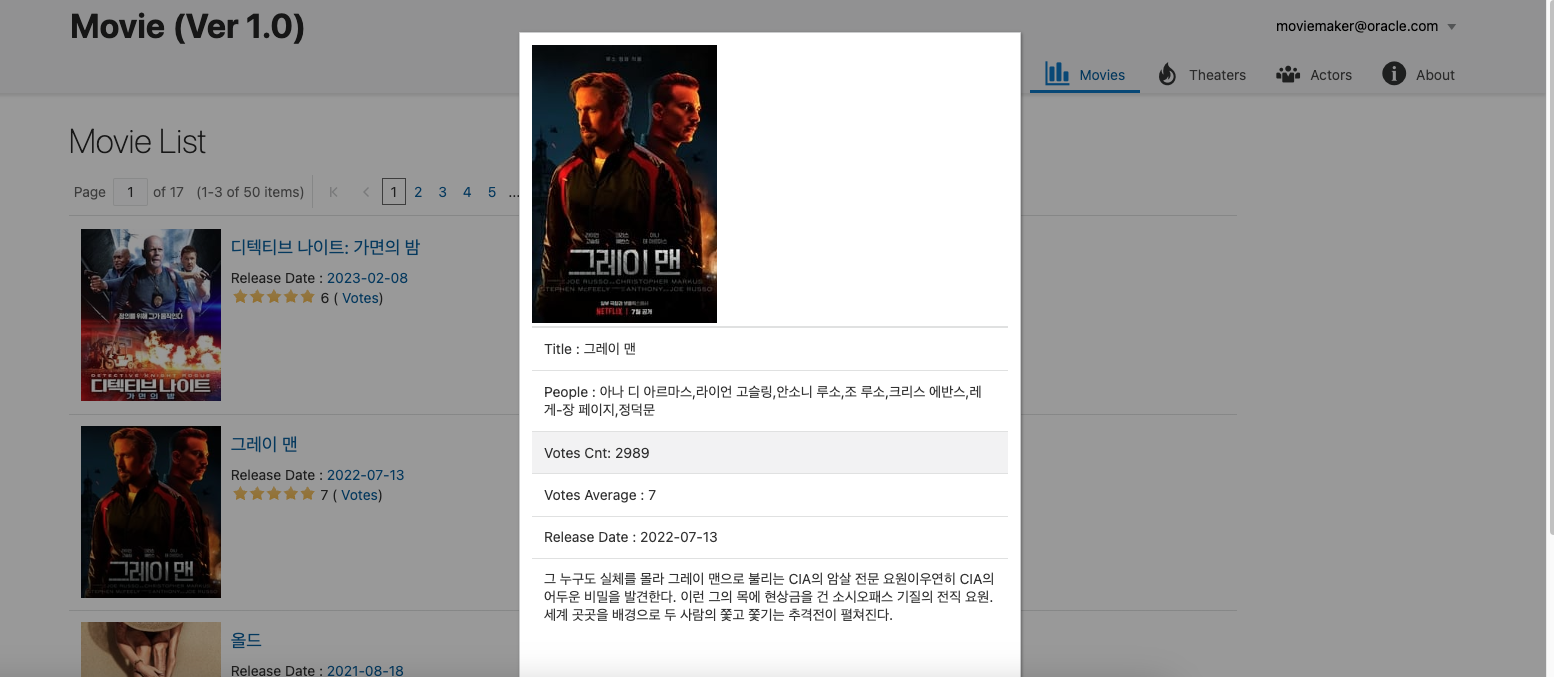
Canary 배포
이제 Canary배포를 해보겠습니다. jet-movie-msa-ui의 Deployment Manifest(kube-jet-movie-msa-ui-deployment.yml)의 내용은 다음과 같습니다.
apiVersion: argoproj.io/v1alpha1
kind: Rollout
metadata:
  name: jet-movie-msa-ui
spec:
  replicas: 10
  revisionHistoryLimit: 2
  selector:
    matchLabels:
      app: jet-movie-msa-ui
  template:
    metadata:
      labels:
        app: jet-movie-msa-ui
    spec:
      containers:
        - name: jet-movie-msa-ui
          image: icn.ocir.io/axlpeslmb1ng/movie/jet-movie-msa-ui:63cb3772aa2948241f990ba24b89c4112d68b7ca
          imagePullPolicy: Always
          ports:
            - name: http
              containerPort: 8000
              protocol: TCP
      imagePullSecrets:
        - name: ocirsecret
  strategy:
    canary:
      maxSurge: "20%"
      maxUnavailable: 0
      steps:
        - setWeight: 20
        - pause: {}
Replicas는 10개로 세팅되어 있으며, strategy 부분에 canary 전략을 수행하도록 작성하였습니다. maxSurge는 20%로 실제 1.0 버전에서 2.0 버전으로 프로모션할 때 전체 Pod중에서 20%씩 프로모션 되도록 설정했습니다. 즉 전체 10개중에서 2개가 새로 2.0이 되고, 기존 1.0 2개가 종료되는 형식입니다. setWeight 값을 20으로 설정했으므로, 새로 2.0 버전을 새로 배포한다 하더라도 전체 10개중 2개만 2.0으로 트래픽을 전달 받습니다. 나머지 8개는 기존 1.0버전으로 트래픽이 전달됩니다. pause는 일정 시간이 지나면 자동으로 프로모션 되도록 설정할 수 있는 옵션으로 여기서는 그냥 Manual로 프로모션 되도록 설정하였습니다.
이제 jet-movie-msa-ui의 소스를 변경한 후 CI/CD를 수행해보겠습니다.
$ cd jet-movie-msa-ui

$ vi src/js/appController.js
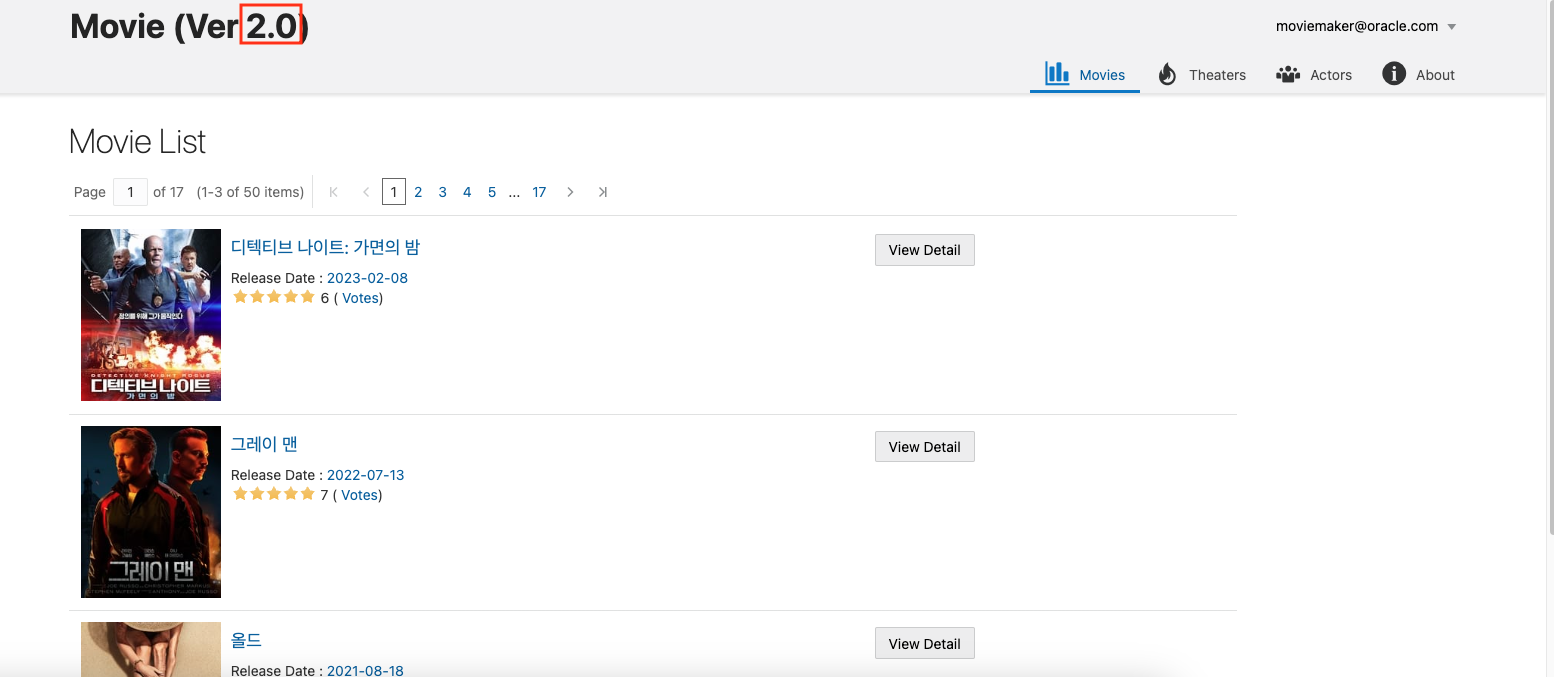
80라인의 내용을 다음과 같이 2.0으로 수정하고 저장합니다.
self.appName = ko.observable("Movie (Ver 2.0)");
다시 GitHub에 푸시합니다.
$ git add .
$ git commit -m "Upgraded to 2.0"
$ git push -u origin main
GitHub Actions의 Workflow가 완료된 후 일정 시간(약 3분)이 지나면 ArgoCD가 다시 동기화를 수행합니다. (Manual 동기화는 ArgoCD의 Movie Applicatoin에서 SYNC 버튼 클릭)
setWeight가 20이므로, 2개의 신규 Pod(2.0)가 생성되고, 나머지 8개의 Pod는 기존 1.0 버전으로 운영되는 상태가 됩니다. 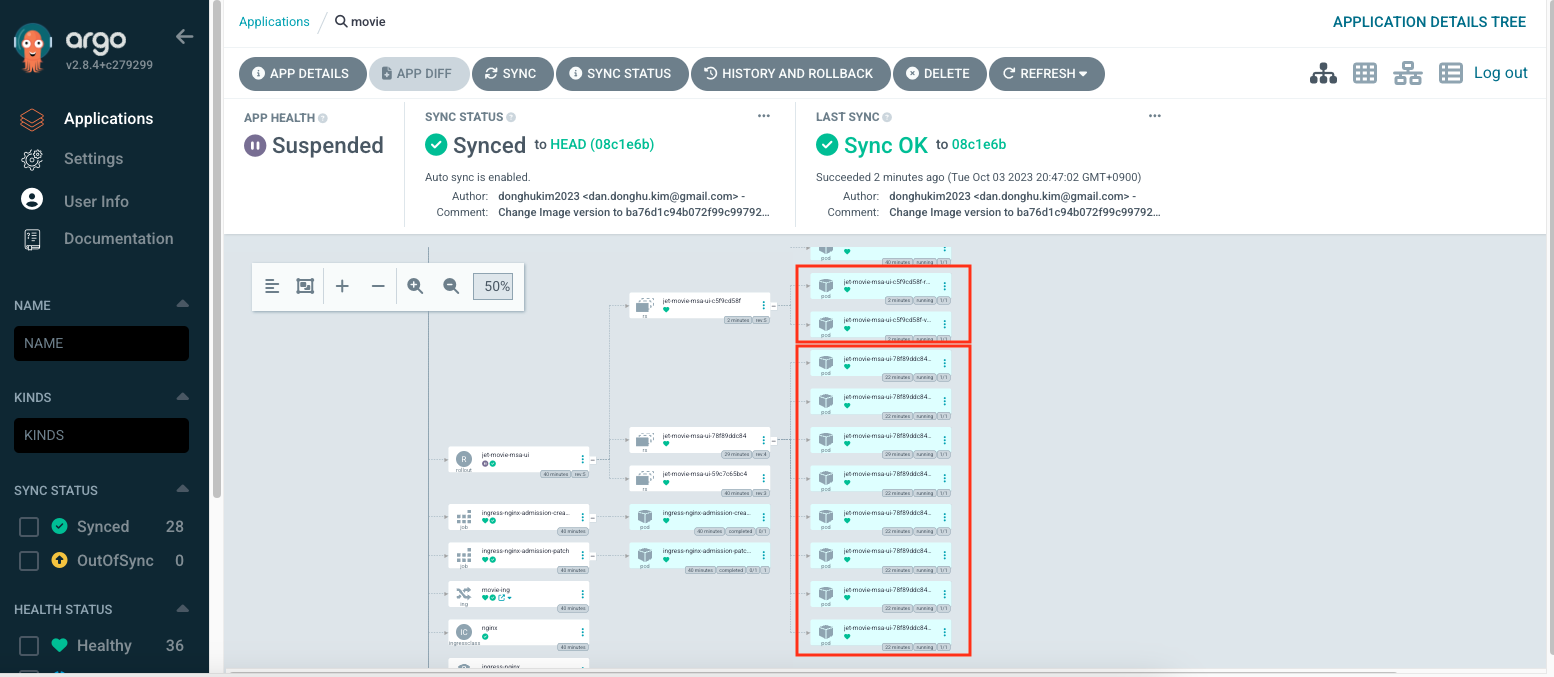
실제 화면에 접속해보면 2.0 버전이 가끔씩 나오는 것을 확인할 수 있습니다.
이제 Manual 프로모션을 합니다. 이 작업을 수행하기 위해서는 kubectl의 ArgoCD Rollout을 위한 플러그인이 필요합니다. 해당 플러그인은 kubectl 명령어로 ArgoCD Rollout 관련 다양한 작업을 수행할 수 있는 도구입니다. 관련 내용은 https://argo-rollouts.readthedocs.io/en/stable/features/kubectl-plugin/를 참고합니다. 필자의 환경은 MacOS이므로 MacOS에 맞는 버전으로 설치합니다. 그 외 다른 환경의 경우에는 https://argo-rollouts.readthedocs.io/en/stable/installation/을 참고합니다.
$ brew install argoproj/tap/kubectl-argo-rollouts
설치가 완료되면 다음 명령어로 jet-movie-msa-ui를 프로모션 합니다.
$ kubectl argo rollouts promote jet-movie-msa-ui
kubectl get po
NAME                                           READY   STATUS              RESTARTS   AGE
helidon-movie-api-mp-684d588bbc-8l4d6          1/1     Running             0          50m
helidon-movie-api-mp-684d588bbc-v6rn5          1/1     Running             0          50m
helidon-movie-api-mp-684d588bbc-wg2jn          1/1     Running             0          50m
jet-movie-msa-ui-78f89ddc84-249gc              1/1     Running             0          26m
jet-movie-msa-ui-78f89ddc84-5wnmr              1/1     Running             0          26m
jet-movie-msa-ui-78f89ddc84-jvfvz              1/1     Terminating         0          34m
jet-movie-msa-ui-78f89ddc84-pdg6s              1/1     Running             0          26m
jet-movie-msa-ui-78f89ddc84-ss9s5              1/1     Running             0          26m
jet-movie-msa-ui-78f89ddc84-tbr82              1/1     Running             0          26m
jet-movie-msa-ui-78f89ddc84-vbjt5              1/1     Running             0          26m
jet-movie-msa-ui-78f89ddc84-zrrtl              1/1     Terminating         0          26m
jet-movie-msa-ui-c5f9cd58f-kfrj6               0/1     ContainerCreating   0          0s
jet-movie-msa-ui-c5f9cd58f-n4gl9               1/1     Running             0          3s
jet-movie-msa-ui-c5f9cd58f-q286s               0/1     ContainerCreating   0          0s
jet-movie-msa-ui-c5f9cd58f-rwl74               1/1     Running             0          6m43s
jet-movie-msa-ui-c5f9cd58f-trz26               1/1     Running             0          3s
jet-movie-msa-ui-c5f9cd58f-vnf85               1/1     Running             0          6m43s
springboot-movie-people-api-598598f7b9-cm5rr   1/1     Running             0          45m
springboot-movie-people-api-598598f7b9-mpbpd   1/1     Running             0          45m
springboot-movie-people-api-598598f7b9-rlbtr   1/1     Running             0          45m
2개가 새로 생성되면서 2개가 종료되는 것을 확인할 수 있습니다. 이렇게 순차적으로 프로모션이 완료된 후 다시 접속해보면 2.0으로 업그레이드된 애플리케이션을 확인할 수 있습니다.
지금까지 GitOps 구현체인 ArgoCD와 젠킨스와 더불어 가장 많이 사용되고 있는 GitHub Actions CI 도구를 활용해서 OKE 환경에 애플리케이션 배포 자동화를 위한 CI/CD를 적용해 보았습니다. 이 글을 통해서 OCI 환경에서 GitHub Actions, ArgoCD를 이용해 CI/CD를 구현하고자 하는 분들께 많은 도움이 되길 바랍니다.
이 글은 개인적으로 얻은 지식과 경험을 작성한 글로 내용에 오류가 있을 수 있습니다. 또한 글 속의 의견은 개인적인 의견으로 특정 회사를 대변하지 않습니다.
Donghu Kim CLOUDNATIVE
oke ocir git actions argocd