CloudNative
OCI API Gateway를 위한 OAuth2 구성
Table of Contents
OCI API Gateway
OCI API Gateway는 여러 유형의 백엔드 엔드포인트 혹은 서비스를 프라이빗 혹은 퍼블릭의 단일 API 엔드포인트로 통합하고, 라우팅을 해주는 서비스입니다. API 엔드포인트는 API 유효성 검사, 요청 및 응답 변환, CORS, 인증 및 권한 부여, 요청 제한등의 기능을 수행할 수 있습니다. 여기서 API Gateway는 OCI Identity Domain과 통합되어 인증 및 인가를 통해 API를 보호할 수 있습니다. API 보안을 위해서 현재 OCI API Gateway는 OAuth2와 OpenID Connect(OIDC)를 지원합니다.
이번 포스팅에서는 OCI API Gateway에서 OAuth2로 API 인증 적용을 위한 OCI Identity Domain 설정 및 API Gateway와의 통합 방법에 대해서 설명합니다.
OCI API Gateway에서 OpenID Connect로 API 인증 적용 방법은 OCI API Gateway를 위한 OpenID Connect(OIDC) 구성을 참고하세요.
이번 글에서는 API Gateway에 OAuth2 구성 방법에 대해서만 설명하며, 관련 개념에 대해서는 따로 다루지 않습니다.
OCI API Gateway 생성 및 Deployment 생성
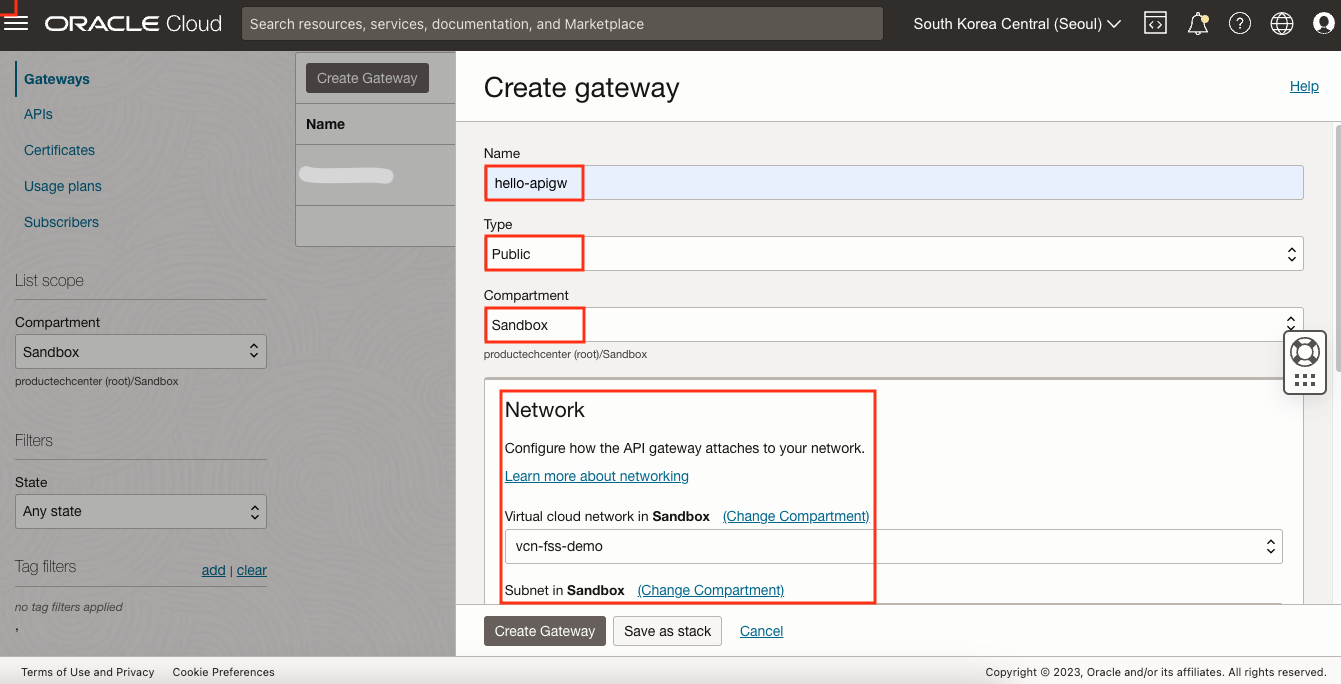
먼저 API Gateway를 생성합니다. API Gateway는 메뉴 > Developer Services > API Gateway*에서 Create Gateway 버튼을 클릭하여 생성이 가능합니다.
- Name: hello-apigw
- Type: Public
- Compartment: API Gateway를 생성할 구획 선택
- Network: VCN 및 Public Subnet 선택
Deployment를 생성합니다. 생성한 API Gateway를 선택한 후 좌측 Deployments 메뉴 선택, Create deployment 버튼을 클릭합니다.
- Basic Information
- Name: hello
- Path prefix: /
- Compartment: Deployment를 생성할 구획 선택
Authentication은 뒷 부분에서 설정할 것이므로 여기서는 일단 No Authentication을 선택하고 Next를 클릭합니다. 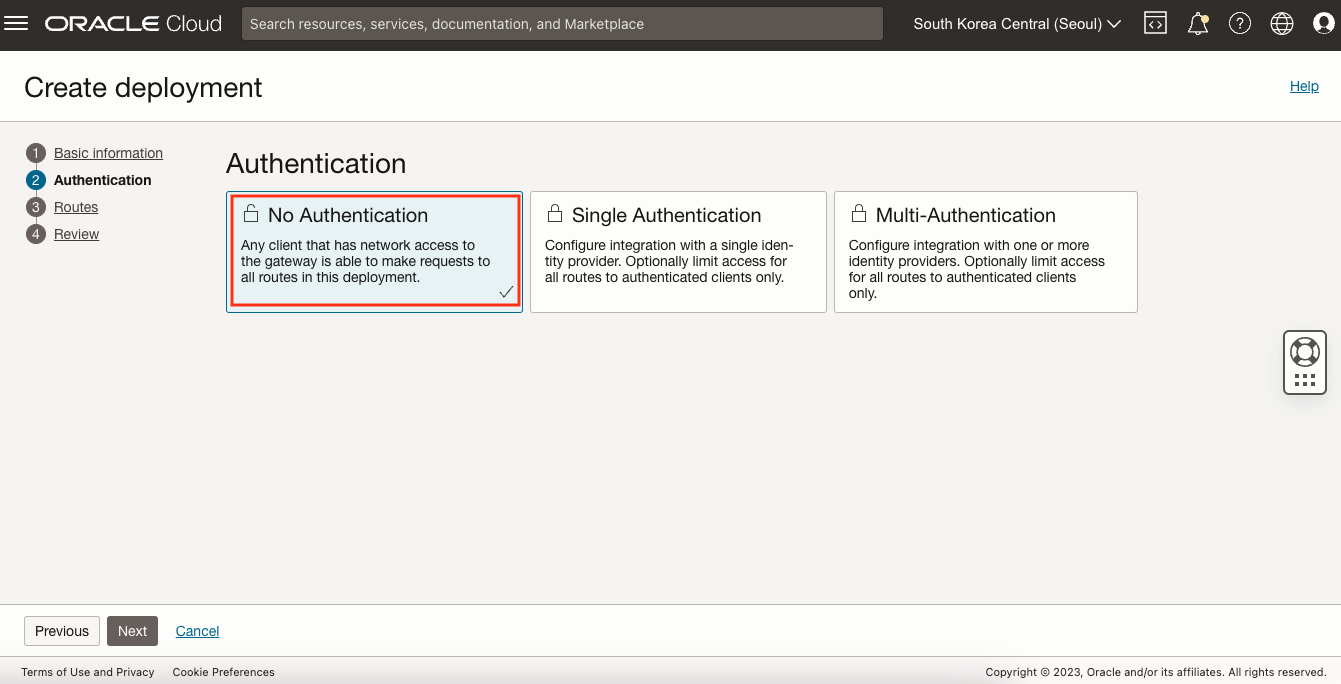
Routes에서 다음과 같이 Route를 등록합니다.
- Route 1
- Path: /hello
- Methods: GET
- Add a single backend: 체크
- Backend Type: Stock response
- Status Code: 201
- Body: {“message”: “Hello”}
- Header name: Content-type, Header value: application/json

Next를 클릭한 후 Create를 클릭하여 생성합니다.
다음과 같이 API Gateway의 Endpoint와 Route Path를 통해 호출해보면 정상적으로 호출이 되는 것을 확인할 수 있습니다. 
OCI API Gateway에서 OAuth2을 구성하는 방법
이제 생성한 API에 OAuth2 보안을 적용해 보도록 하겠습니다.
Access signing certificate 사용 설정
클라이언트가 OCI Identity Domain에 로그인하지 않고도 Tenancy 서명 인증서에 액세스할 수 있도록 설정합니다. 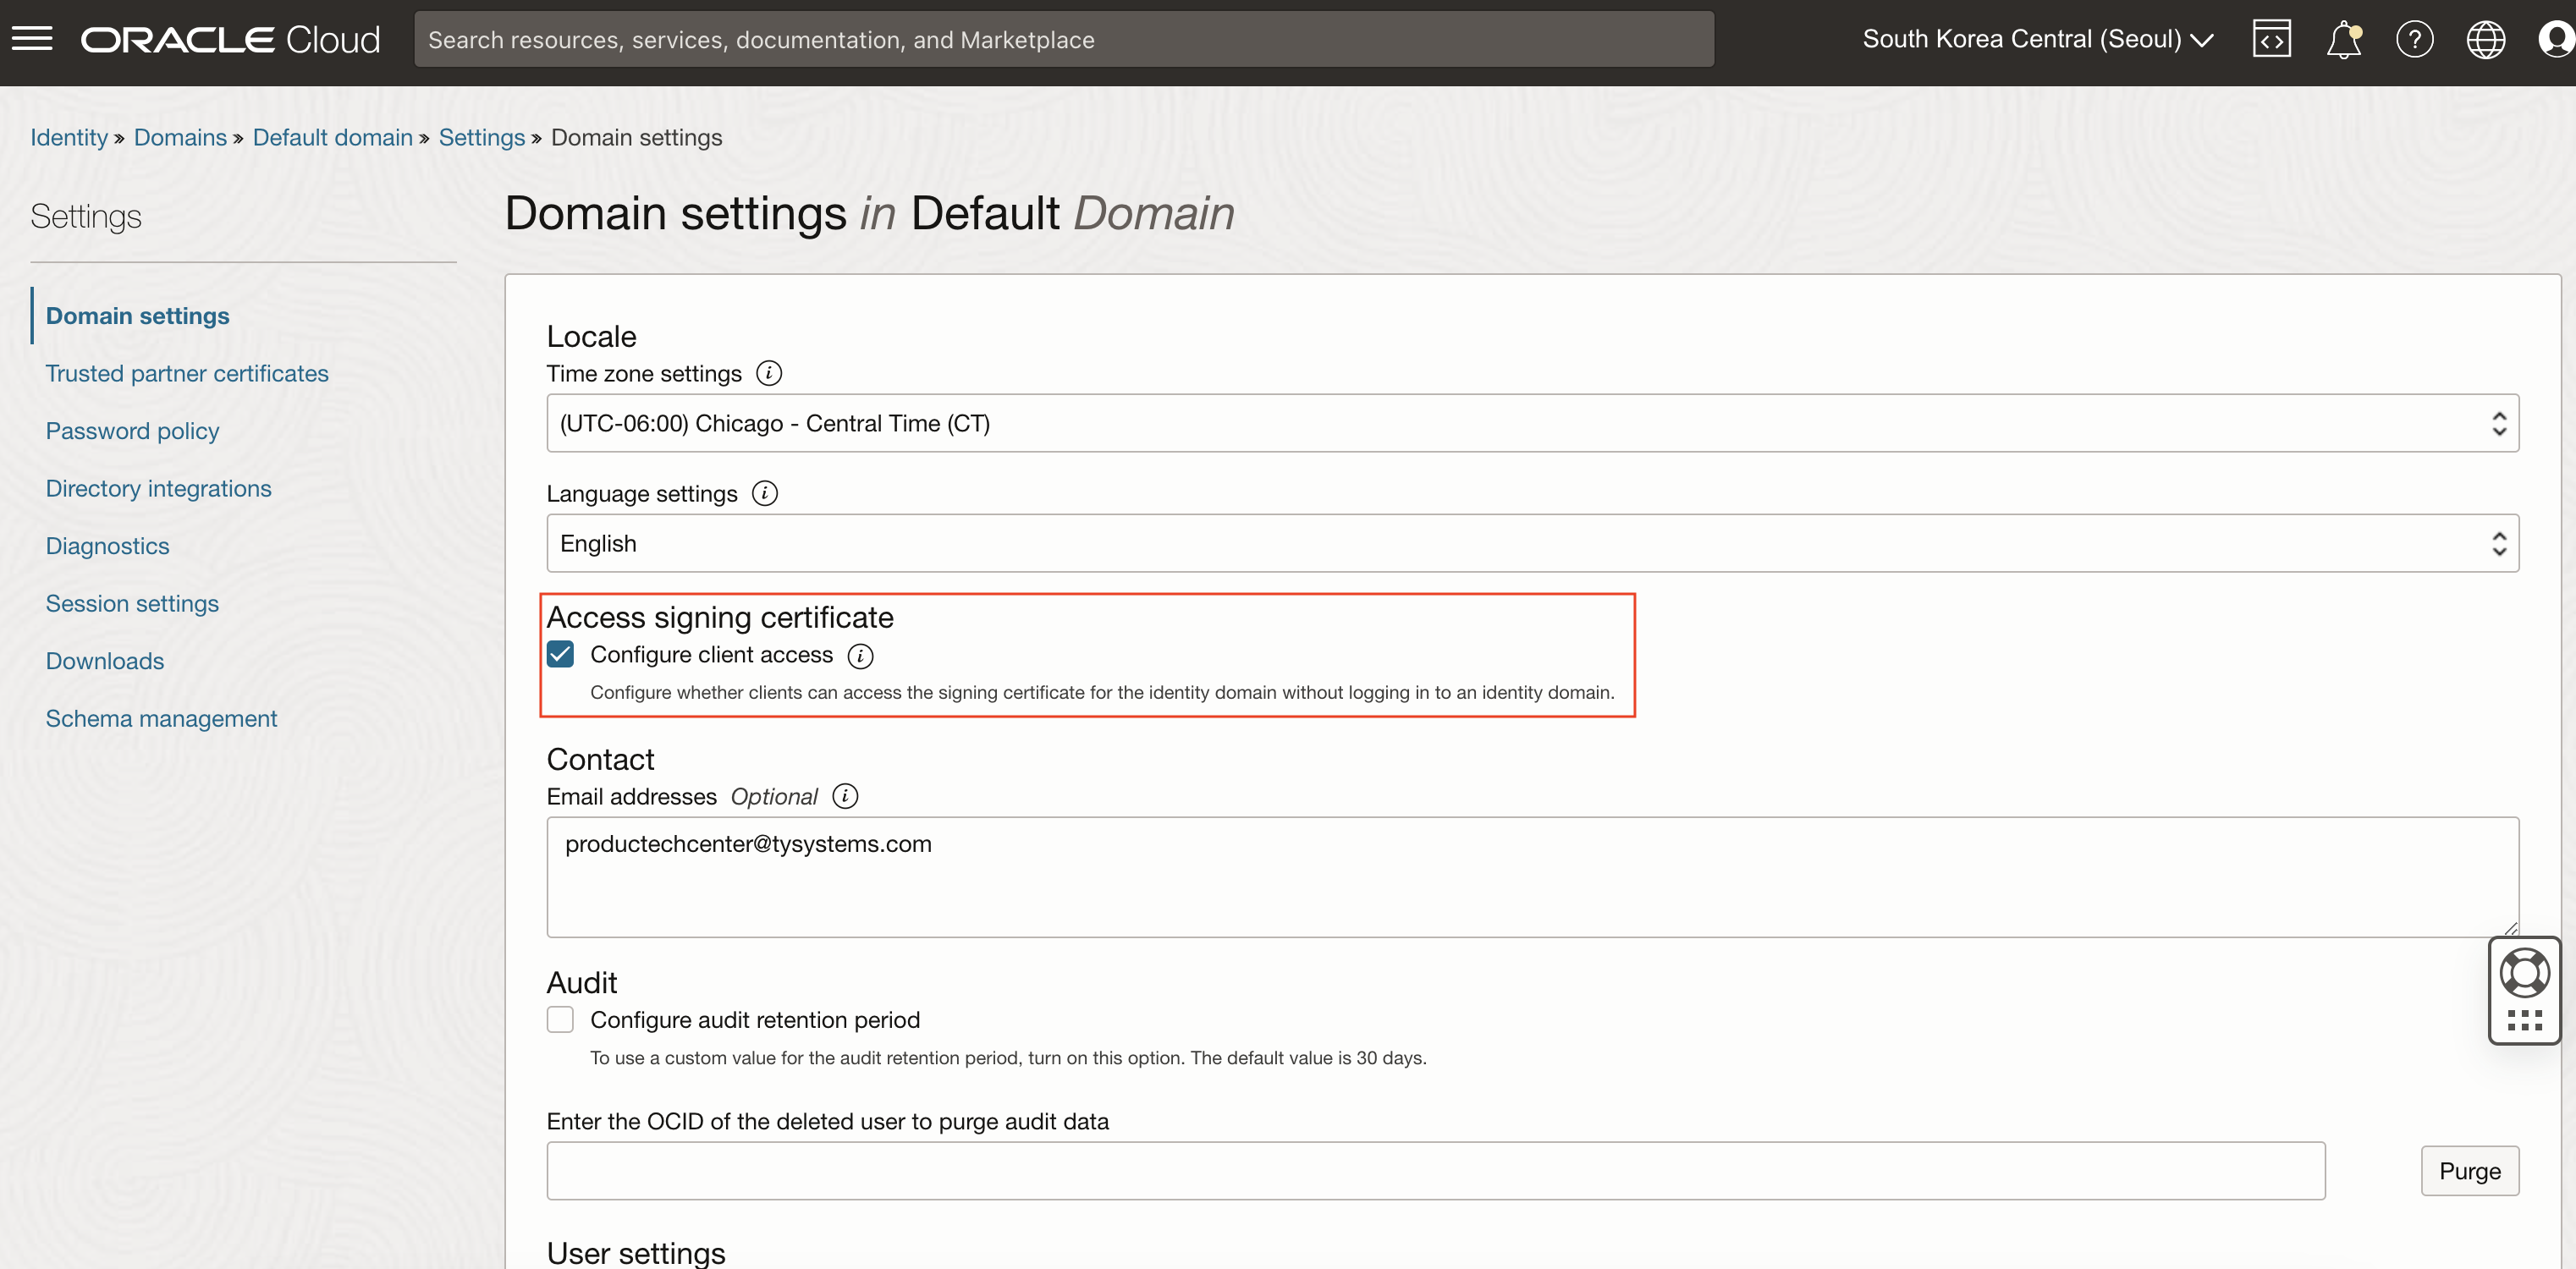
OCI Identity Domain의 Resource Server Application 구성
다음과 같이 OCI Console 메뉴 > Identity & Security > Domains 클릭 후 적용 할 도메인을 선택(여기서는 Default)합니다. 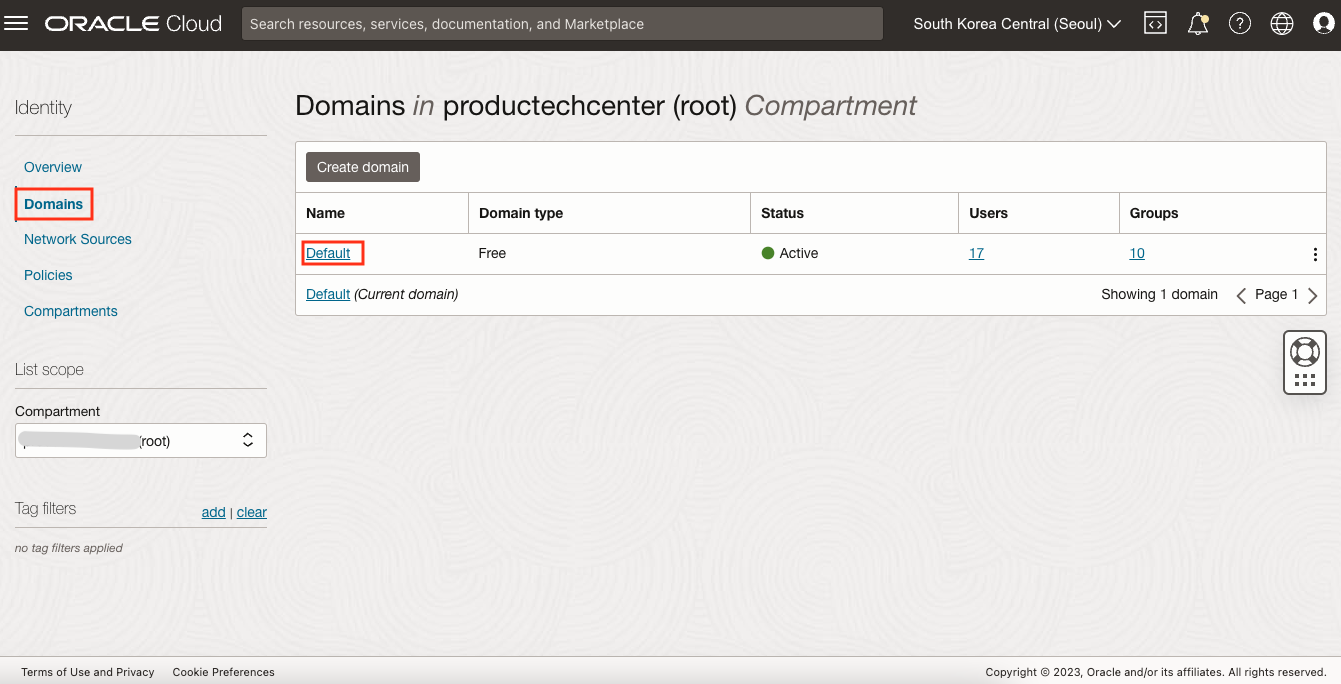
Integrated Applications > Add application 클릭 후 Dialog 창에서 Credential Application을 선택합니다. 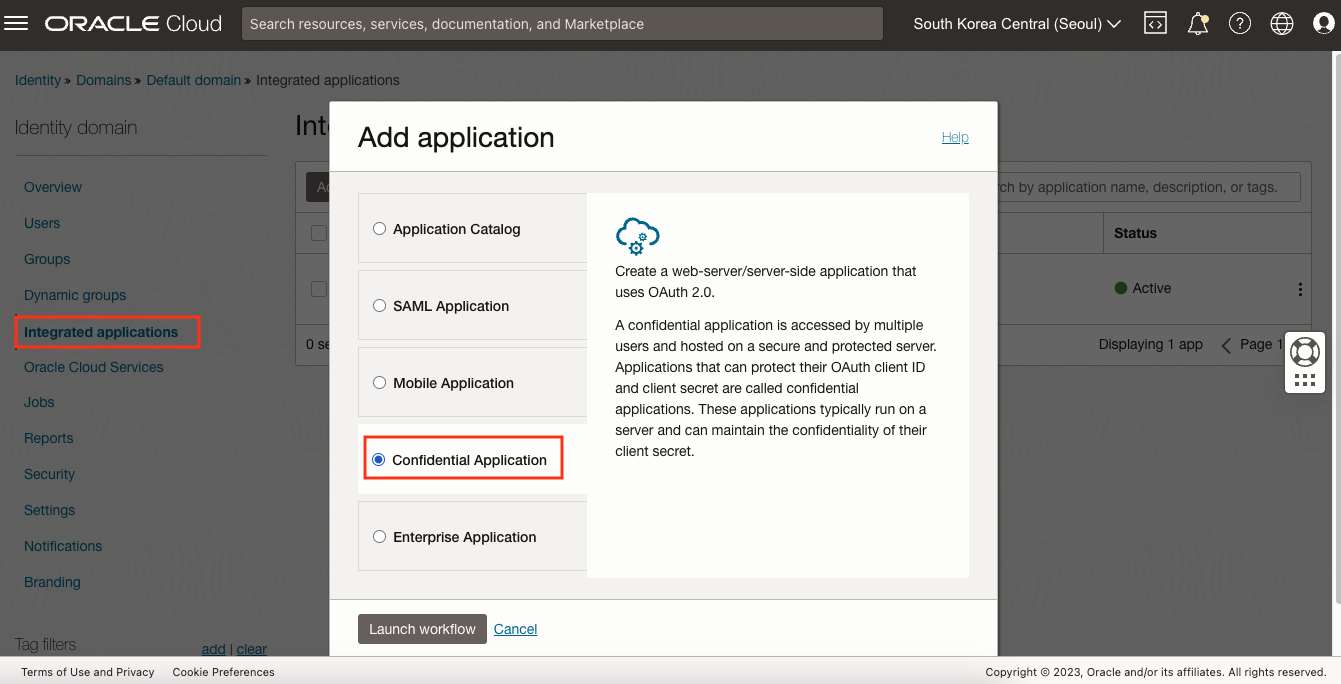
다음과 같이 Name을 입력합니다.
- Name: Hello APIGW Application
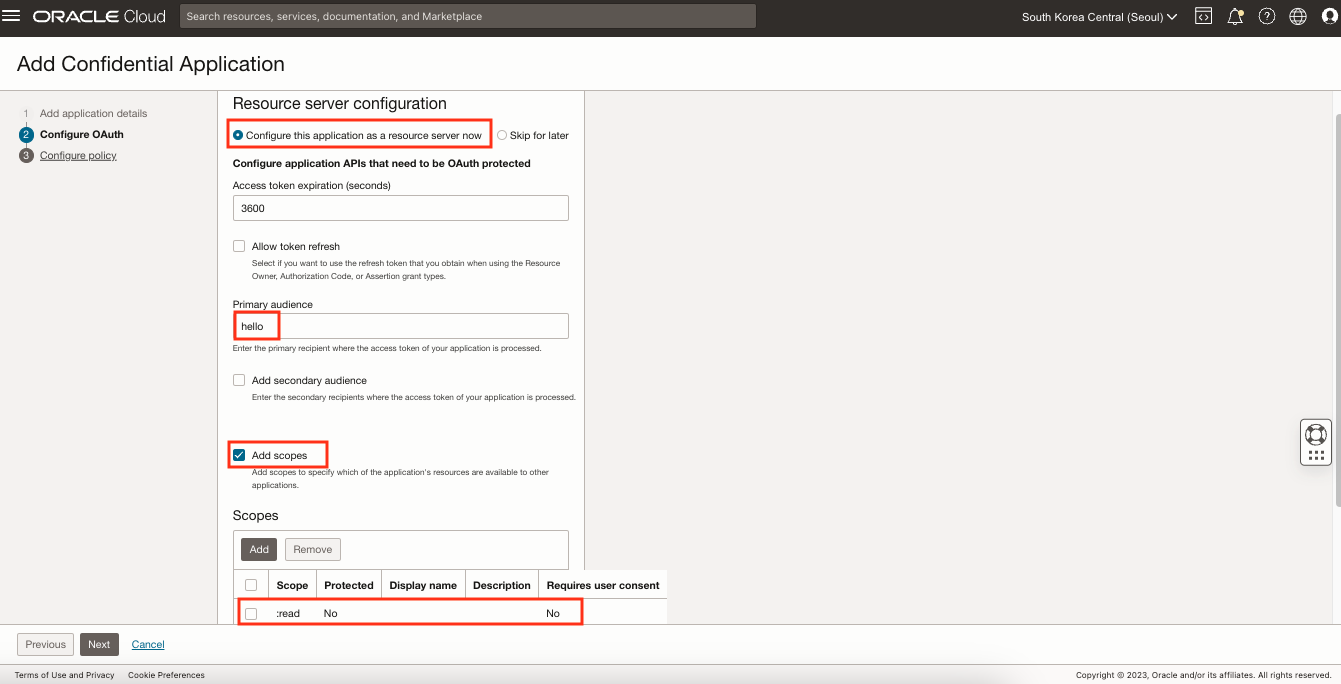
Configure OAuth에서 다음과 같이 Resource Server 구성을 합니다.
- Configure this application as a resource server now: 선택
- Primary audience: hello
- Add scopes: 선택
- Scope: :read
- Add 버튼 클릭 후 Scope 이름으로 :read 입력
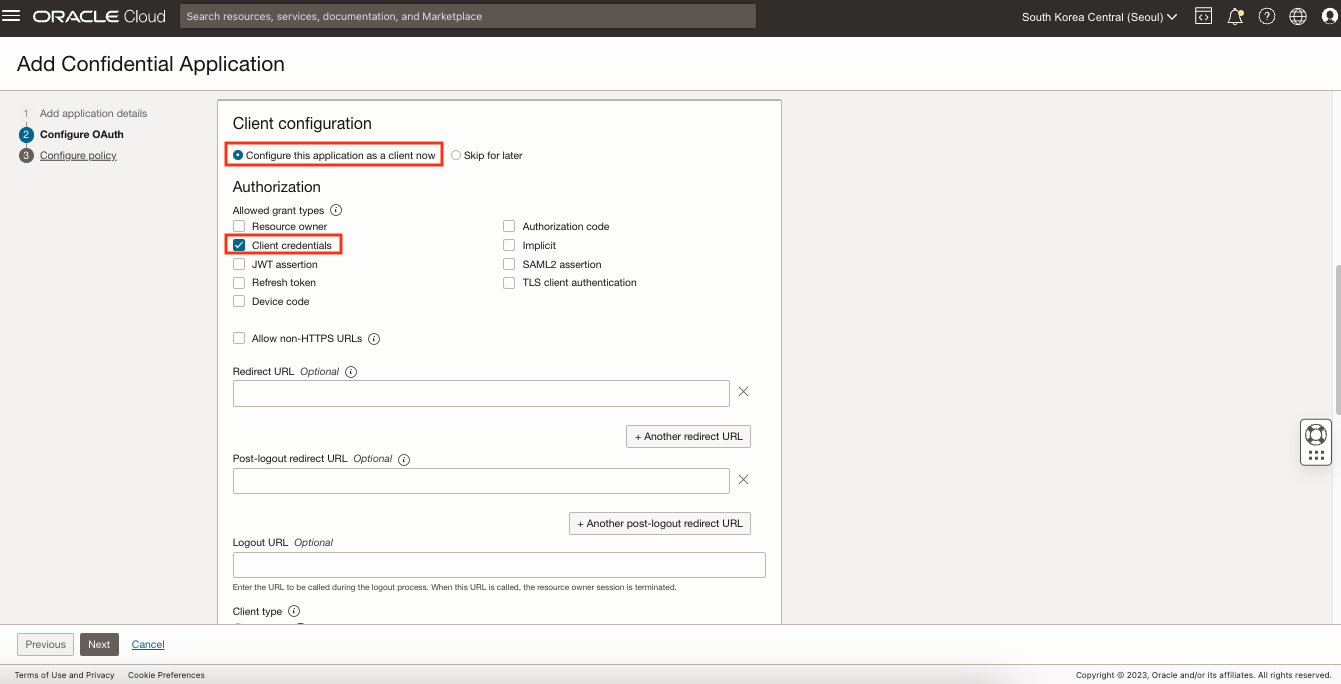
OCI Identity Domain의 Client 구성
Resource Server 구성에 이어서 Client Configuration 구성을 합니다.
- Configure this application as a client now: 선택
- Allowed grant types: Client credentials
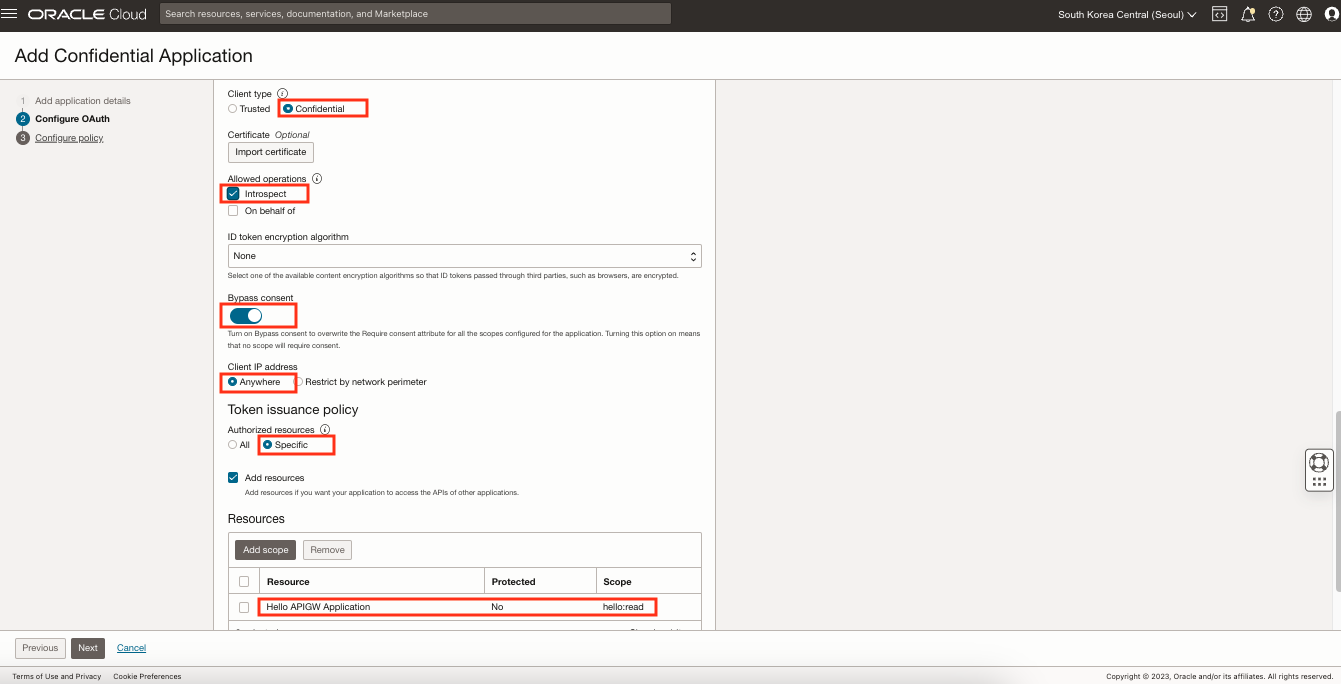
- Client type: Confidential
- Allowed operations: Introspect
- Bypass consent: On
- Client IP address: Anywhere
- Authorized resources: Specific
- Add resources: 선택
- Resources
- Add scope 버튼 클릭 후 Hello APIGW Application 선택
Web tier policy는 Skip and do later를 선택하고 Finish를 클릭합니다.
생성된 애플리케이션을 선택하면 다음과 같이 Client ID와 Client secret을 확인할 수 있습니다. 이 정보는 Access Token을 발급받기 위해 사용되므로 메모합니다. 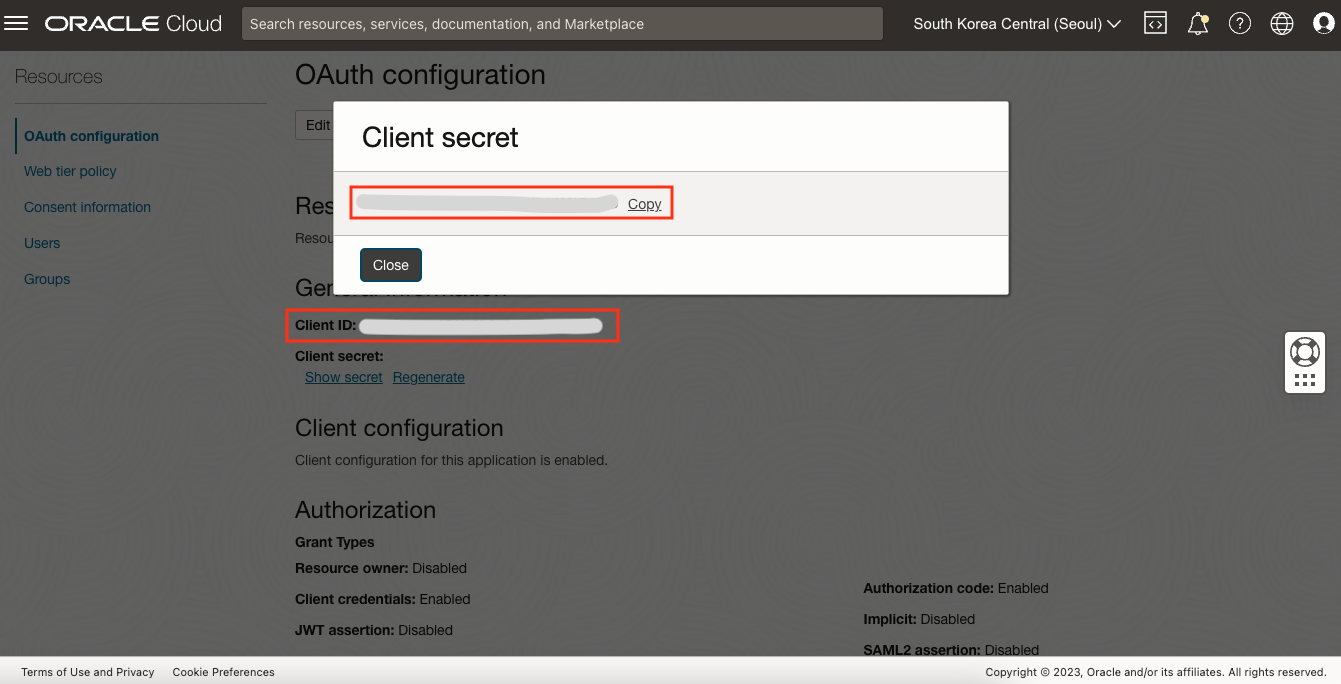
API Deployment Route Path에 OAuth2 인증 설정
이제 앞서 생성한 Deployment Route Path에 OAuth2 인증 설정을 진행합니다. 먼저 생성한 Deployment를 선택 후 Edit을 클릭합니다. 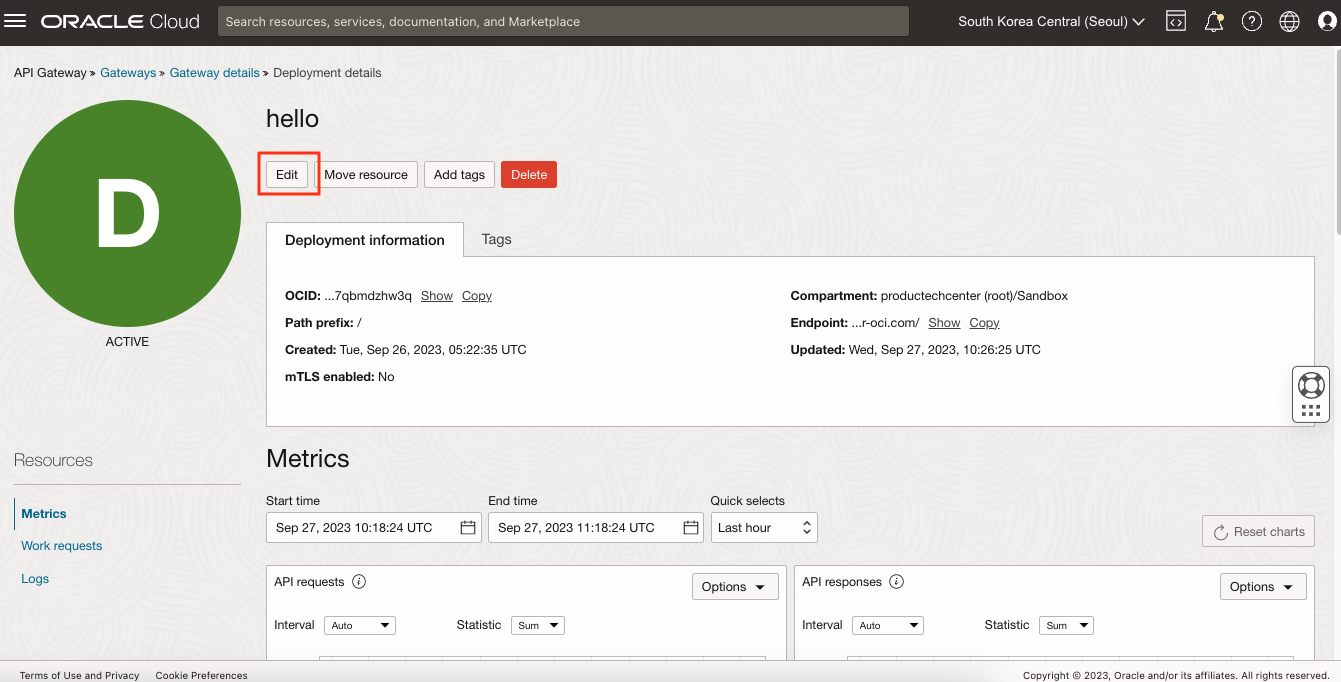
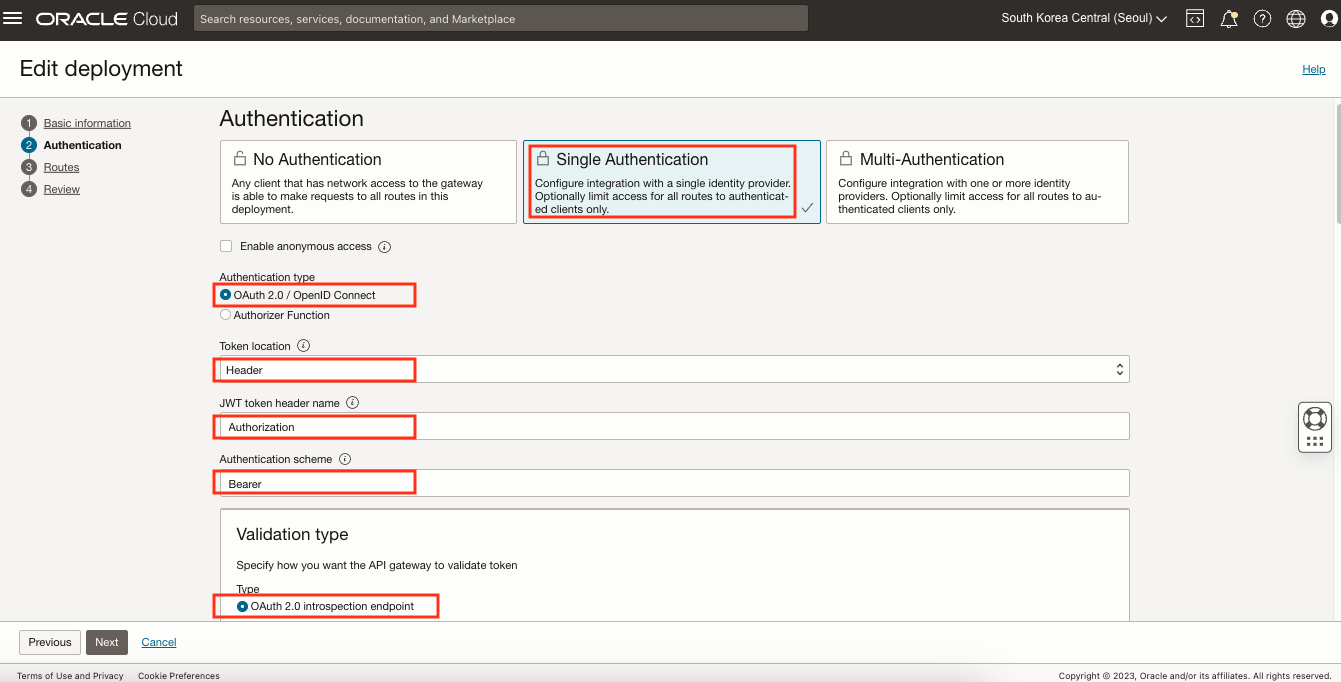
Authentication 단계에서 Single Authentication을 선택한 후 다음과 같이 설정합니다.
- Authentication type: OAuth 2.0 / OpenID Connect
- Token location: Header
- JWT token header name: Authorization
- Authentication scheme: Bearer
- Validation type: OAuth 2.0 introspection endpoint
- Identity Provider가 Introspection Endpoint API를 제공해야 합니다. OCI Identity Provider의 Introspection Endpoint로 JWT혹은 non-JWT토큰의 유효성을 검사합니다. 여기서 Introspection Endpoint를 얻을 때는 ID Provider의 Discovery URL이 필요한데, 기본적으로
https://my-idp/.well-known/openid-configuration형태의 주소를 가집니다. my-idp 주소는 Identity Domain을 클릭하면 Domain URL로 확인이 가능합니다.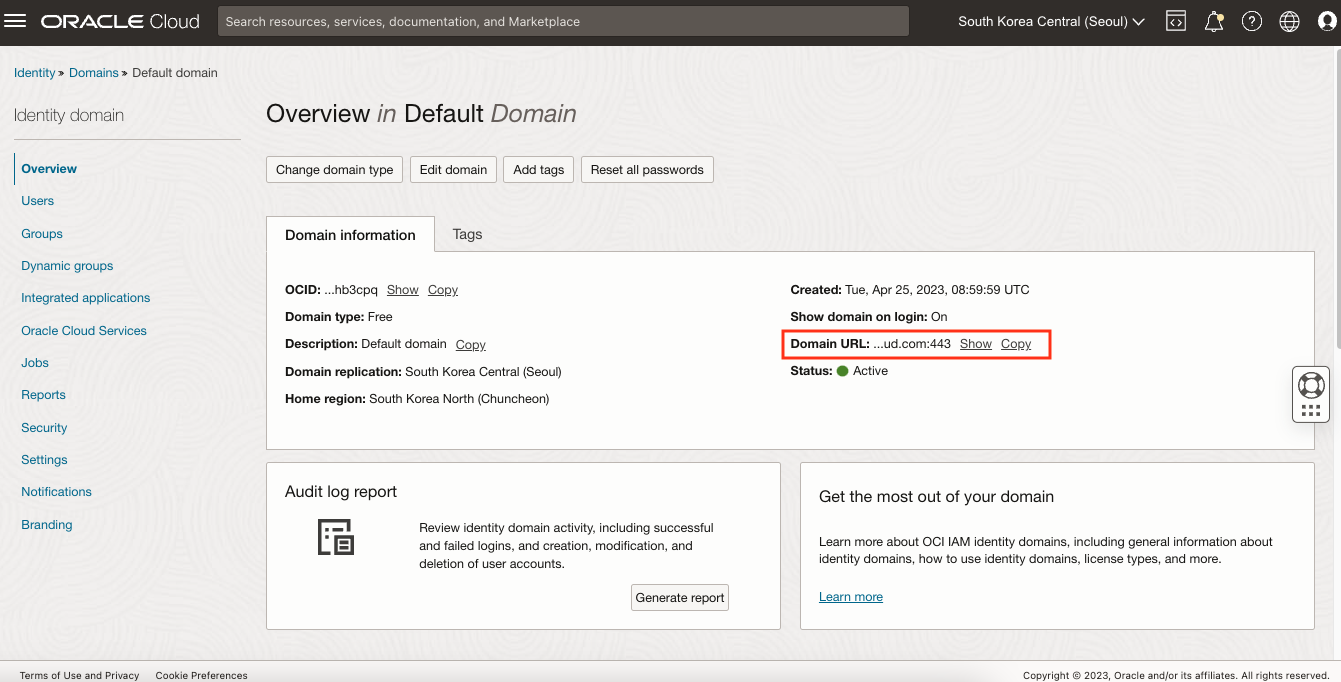
- Identity Provider가 Introspection Endpoint API를 제공해야 합니다. OCI Identity Provider의 Introspection Endpoint로 JWT혹은 non-JWT토큰의 유효성을 검사합니다. 여기서 Introspection Endpoint를 얻을 때는 ID Provider의 Discovery URL이 필요한데, 기본적으로
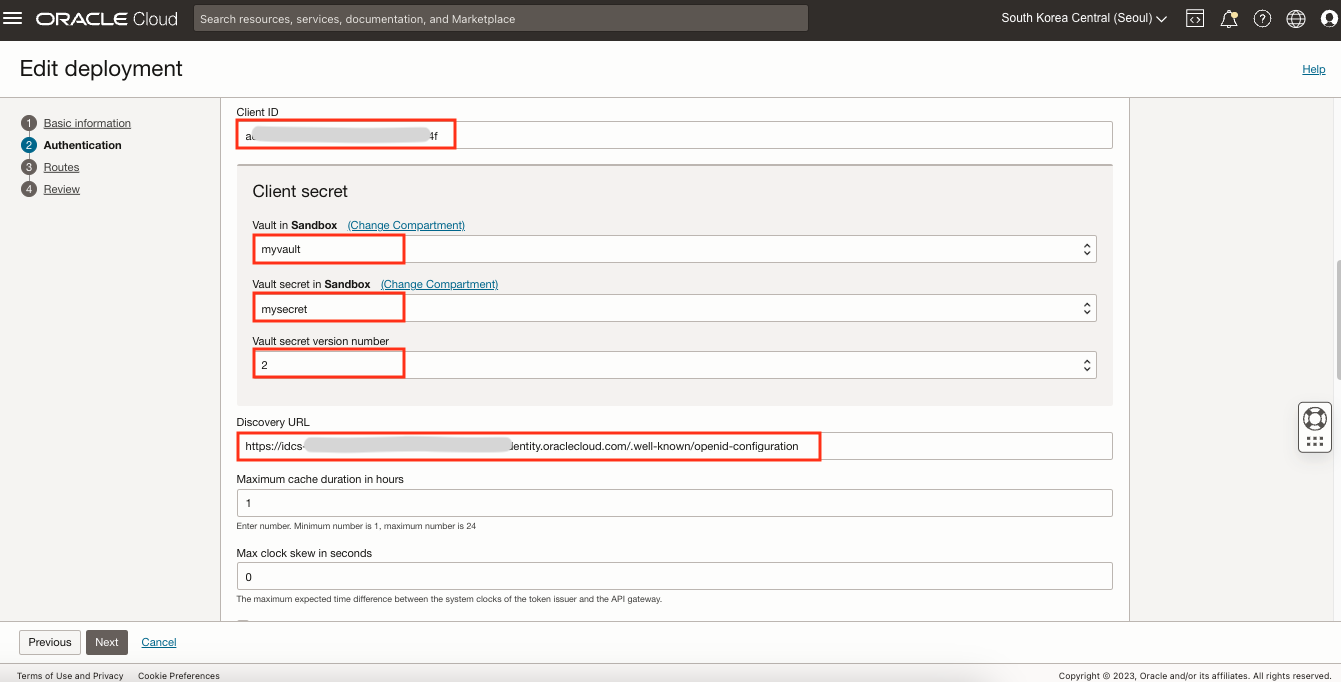
- Client ID: Identity Domain에서 생성한 Credential Application의 Client ID
- Client Secret: Identity Domain에서 생성한 Credential Application의 Secret 값으로 OCI Vault에 저장한 후 사용 가능합니다. Vault 생성은 TheKoguryo’s 기술 블로그: Secret Store로 OCI Vault 사용하기를 참고합니다.
- Discovery URL: https://my-idp/.well-known/openid-configuration
- my-idp는 Identity Domain의 Domain URL입니다.
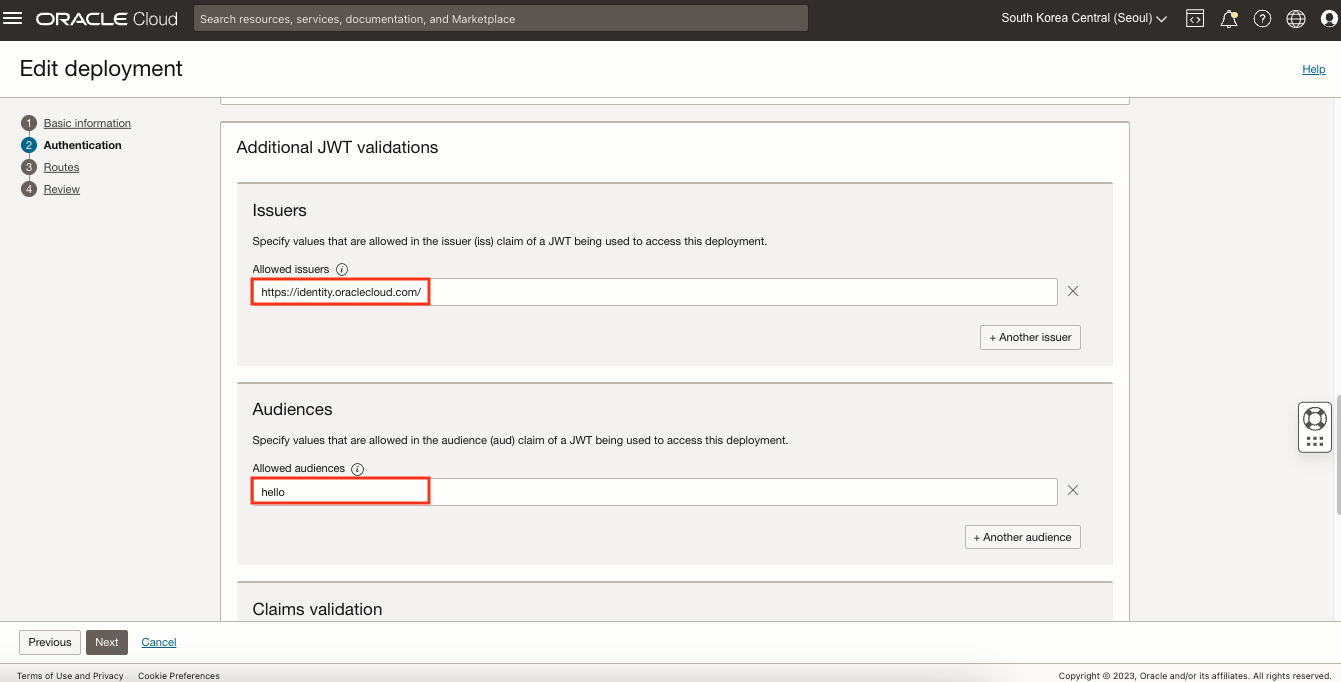
- Additional JWT validations
- Allowed issuers: https://identity.oraclecloud.com/
- Allowed Audiences: hello
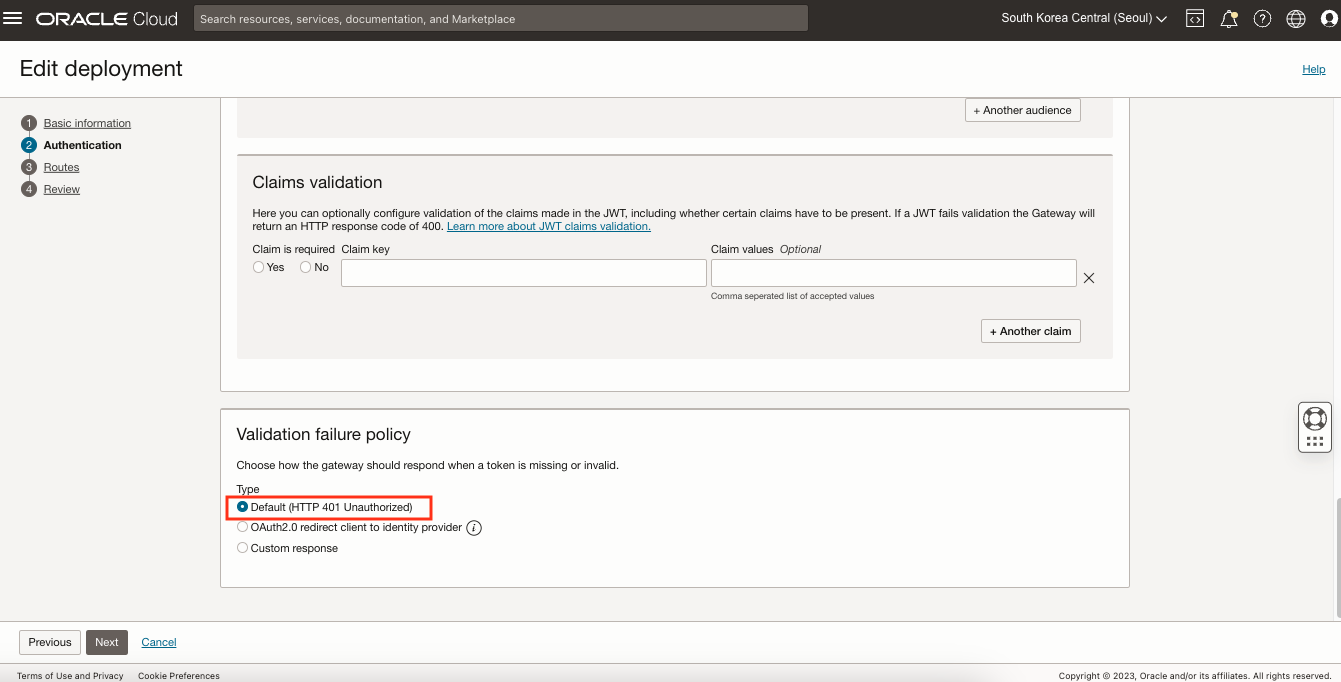
- Validation failure policy: Default (HTTP 401 Unauthorized)
Next를 두 번 클릭한 후 Review에서 Save changes를 클릭하여 저정합니다.
이제 다시 API를 호출해보면 다음과 같이 401 Unauthorized 오류가 발생하는 것을 볼 수 있습니다. 
OAuth2 적용 테스트
Postman으로 테스트를 진행합니다.
- Method: GET
- URL: API 주소
- Authorization: OAuth2.0
Token: 아래에서 생성한 토큰 이름 (Configure New Token 설정하면 나옴)
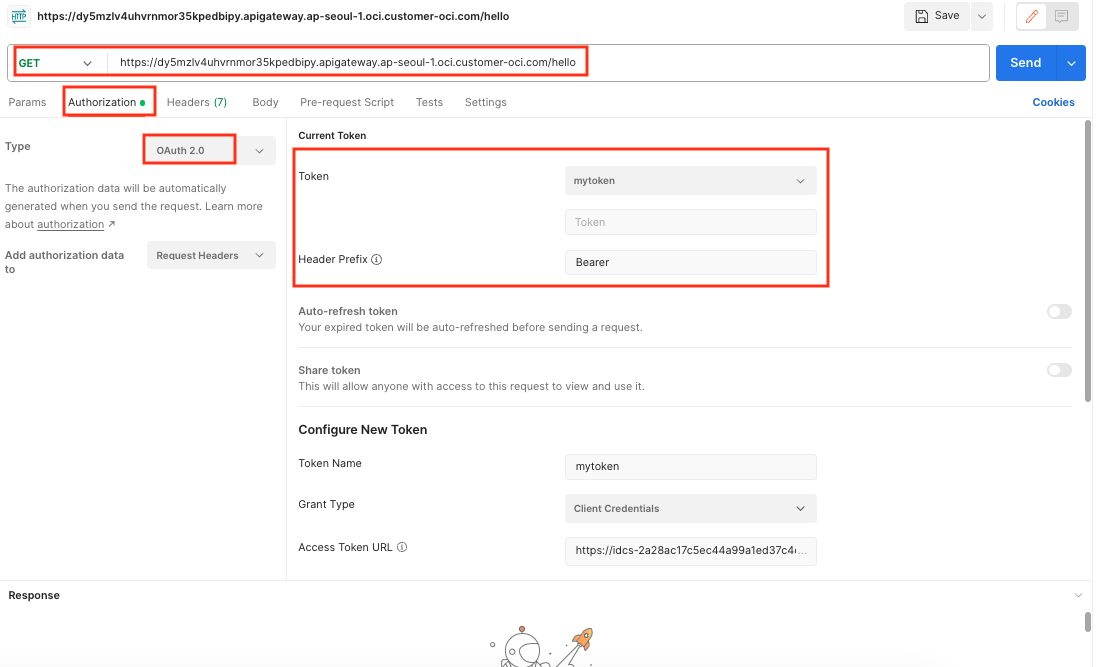
- Configure New Token
- Token Name: mytoken
- Grant Type: Client Credentials
- Access Token URL: Discovery URL을 통해서 token_endpoint 확인
- Client ID: 앞에서 생성한 Credential Application의 Client ID 값
- Client Secret: 앞에서 생성한 Credential Application의 Client Secret 값
- Scope:: hello:read

Get New Access Token 클릭한 후 Authentication complete이 되면 Proceed를 클릭합니다. 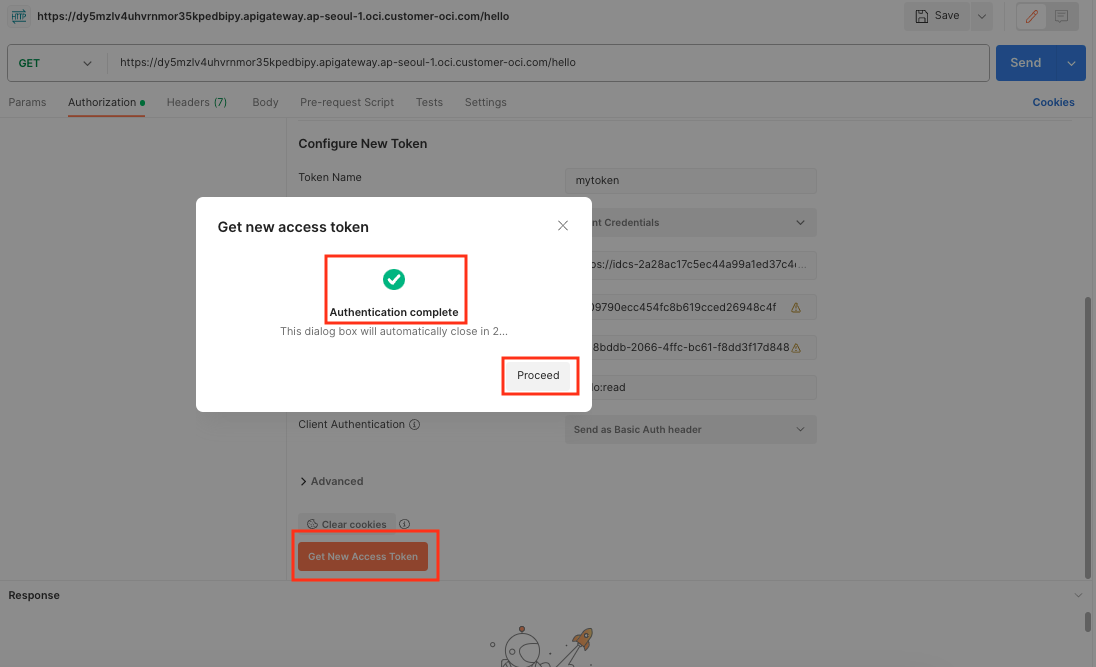
Use Token을 클릭합니다. 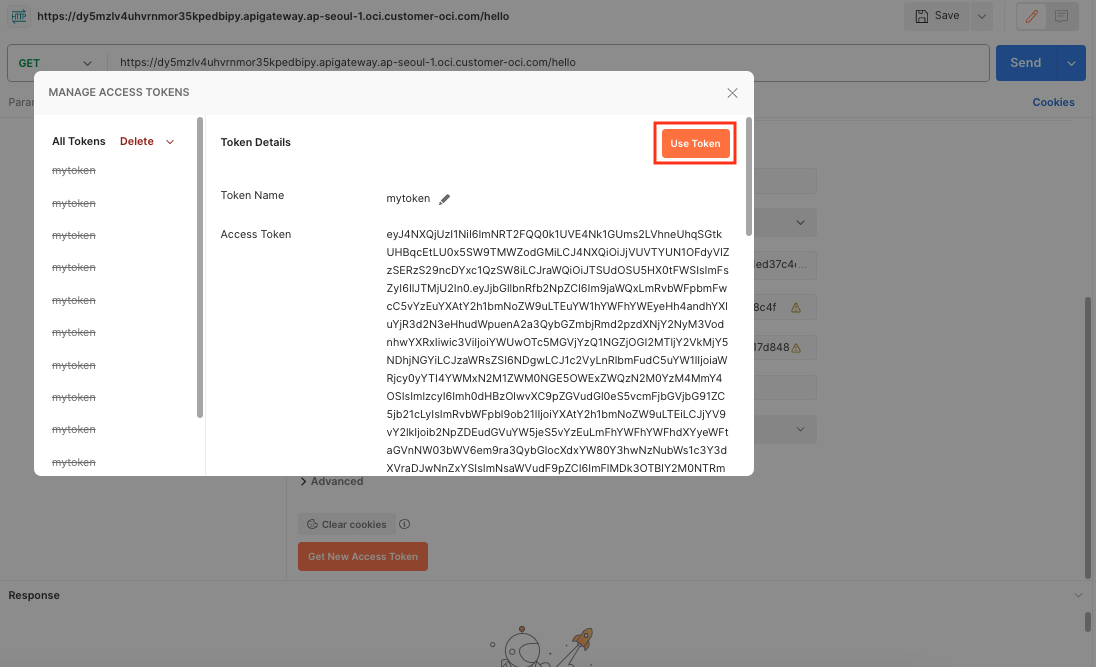
적용된 Access Token으로 API를 호출합니다. 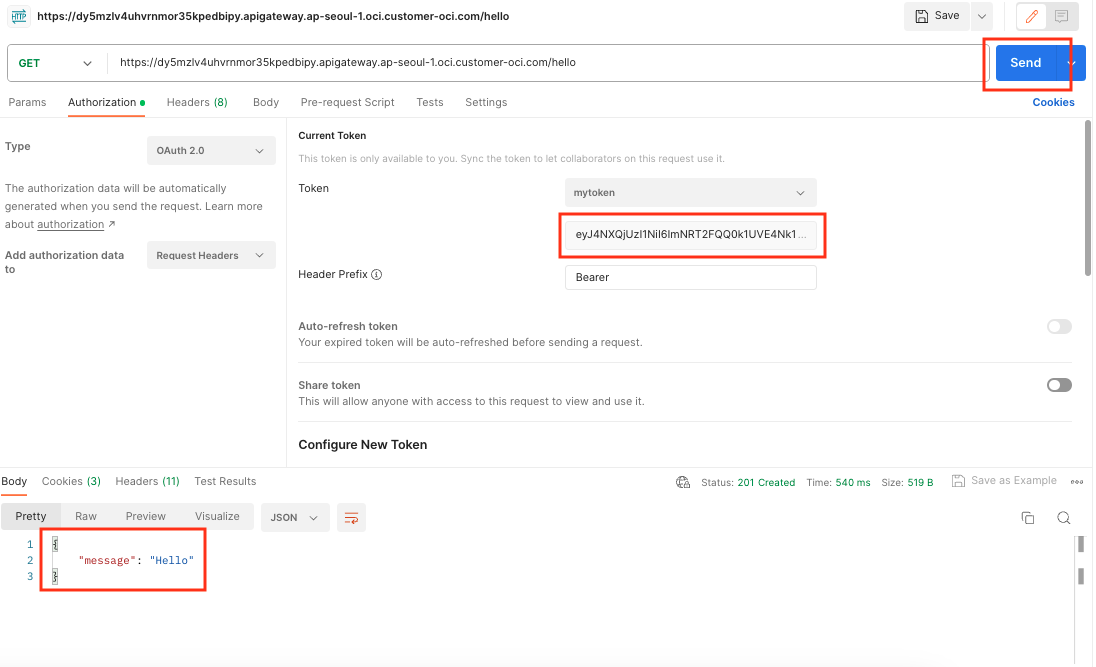
참고 웹사이트
- https://docs.oracle.com/en-us/iaas/Content/APIGateway/Tasks/apigatewayaddingauthzauthn.htm
- https://hudi.blog/open-id/
- https://juniortech.tistory.com/15
이 글은 개인적으로 얻은 지식과 경험을 작성한 글로 내용에 오류가 있을 수 있습니다. 또한 글 속의 의견은 개인적인 의견으로 특정 회사를 대변하지 않습니다.
Donghu Kim CLOUDNATIVE
api gateway oauth2